Do you want to know how to import products from Excel to WooCommerce?
As a WooCommerce store owner, manually adding products can be quite a hassle, especially when you have hundreds of them. Excel is a great spreadsheet tool that is ideal for compiling product data. However, WooCommerce’s native importer tool does not support importing products from Excel files.
Do not worry; we have the solution! As you read on, we will show you step-by-step how to import products from Excel into WooCommerce using the best import plugin for WooCommerce and WordPress – WP All Import.
Why Choose Excel (XLS or XLSX) To Import WooCommerce Products
An Excel file is a spreadsheet document designed in the Microsoft Excel or Google Sheets application. It contains rows and columns that create a tabular layout for users to enter, read, and manipulate data. Excel files carry the .XLS and .XLSX file extensions.
There are many reasons why creating a product import file in Excel is beneficial. Some of these include:
- The user-friendly interface makes it easy to manipulate data visually.
- The data validation and error-checking capabilities it offers.
- Formulas and functions to carry out complex calculations.
- Collaboration features to facilitate teamwork when needed.
- Its integration with other business management tools such as Zapier.
So if you’re ready to import your WooCommerce products from an Excel file, let’s discuss how to create it.
How To Create WooCommerce Product Import Excel File
You may need to prepare an Excel file for bulk product import in two main scenarios:
- Creating an Excel File from Scratch: For this scenario, you need to add a few standard columns in the Excel file. These include the Product Name, Description, Regular Price, Sale Price, Image(s), Attributes & Categories columns. You can also include other columns for custom fields if relevant to your products.
- Migrating Product Data in an Existing WooCommerce Store: We recommend using the WP All Export plugin to migrate product data from an existing WooCommerce store. The plugin will enable you to export your WooCommerce product data in the .XLS or .XLSX file formats. You can then use the exported Excel file as the product import file for your new WooCommerce store.
Once your Excel import file is ready, it’s time to import your products into your WooCommerce store. The next section will take you through a step-by-step tutorial on how to do this.
How To Import WooCommerce Products From an Excel File
WooCommerce provides a built-in product import tool that only supports importing products from CSV files. So if you want to import your products from an Excel file without converting the file to CSV, which could mess up your data, you must use a third-party WooCommerce product import plugin.
There are many great WooCommerce product import plugins available. Each plugin offers different features, some more advanced and intuitive than others.
WP All Import is the best plugin for importing products from Excel to WooCommerce because it offers the most complete set of import features in the WordPress ecosystem.
The plugin provides a modern drag-and-drop user interface that you can operate whether you are a beginner or an expert WordPress user. Some of the exciting features you will get from using it include:
- Advanced filtering rules to import subsets of your products.
- Scheduling to automate recurring product imports.
- Support for importing all WooCommerce product types, including variable products.
- Support for importing all WooCommerce product data, including custom fields.
- On-the-fly data modification capabilities using PHP functions, and more.
Now that we know how awesome the WP All Import plugin is, we will show you how to use it to import products from Excel to WooCommerce.
1. Install WP All Import and Its WooCommerce Add-On
To start, you will need to purchase and download the Pro version of the WP All Import plugin. You will also need to get the WooCommerce Import Add-On. The add-on is important because it adds support for WooCommerce fields and allows you to import all WooCommerce product types, including variable products.
Once you have downloaded both plugins on your local drive, go to your WordPress admin dashboard and navigate to Plugins › Add New Plugin to start by adding the WP All Import plugin.
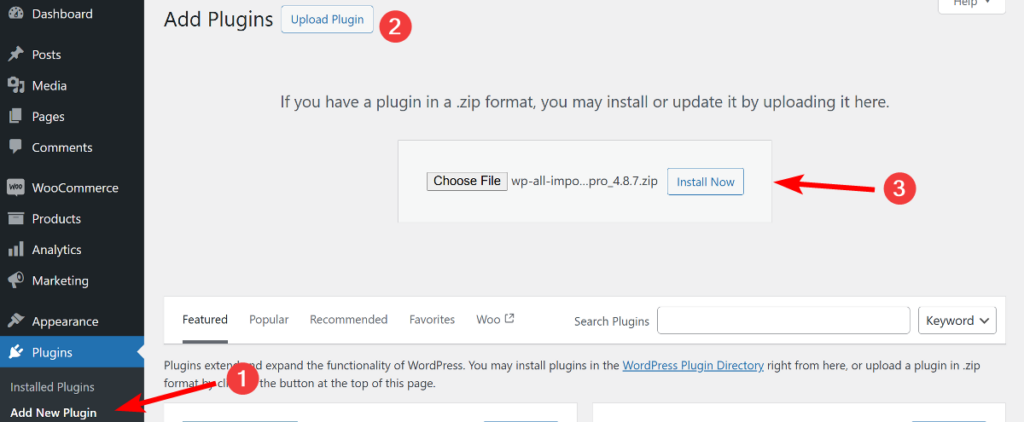
Next, Upload Plugin › Choose File › Install Now › Activate, and the plugin will be installed and activated on your website. Follow the same steps to install the WooCommerce Add-On.
2. Create a New Product Import and Upload Your Excel File
To create a new import of your products from Excel to WooCommerce, navigate to All Import › New Import.
On the New Import screen, WP All Import provides three ways to upload your import file. You can upload a file from your PC, download a file from a URL or FTP/SFTP, or use an existing file you previously imported.
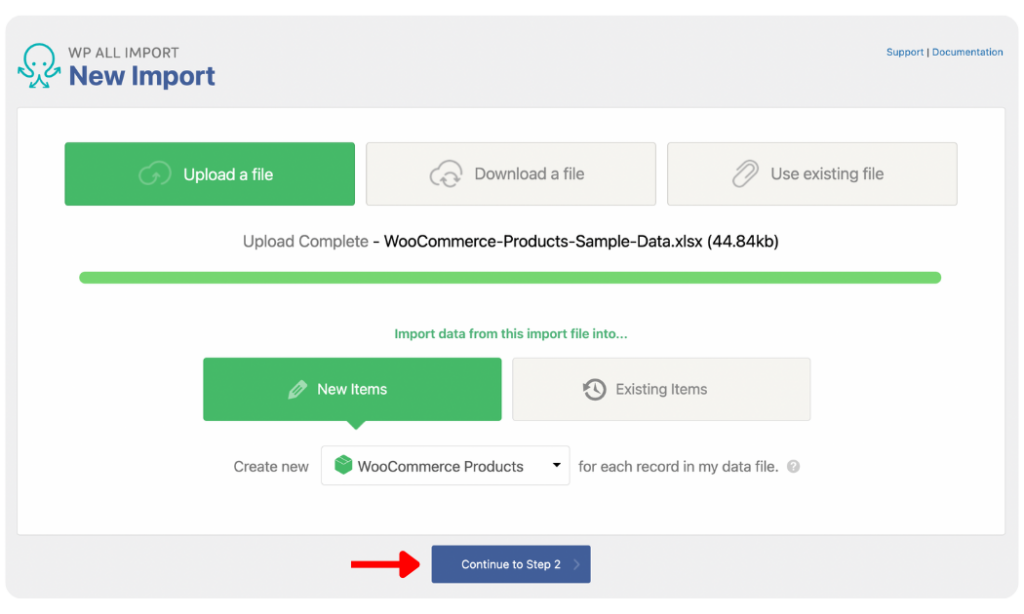
Once you have loaded your product data using one of the options, under New Items, select WooCommerce Products as the import type. WP All Import provides various options on the import type dropdown to import other WooCommerce data types such as customers, orders, reviews, etc. So if you ever need to import other WooCommerce data types, you do not need to purchase a new plugin.
Click Continue to Step 2 after completing the actions to proceed to the next step.
3. Review Uploaded Product Excel File and Apply Filters
On the Review Import File screen that appears, WP All Import lets you review your product data to ensure everything has been pulled correctly. To review the import file, use the left (<) and right (>) gray arrows at the top of the screen.
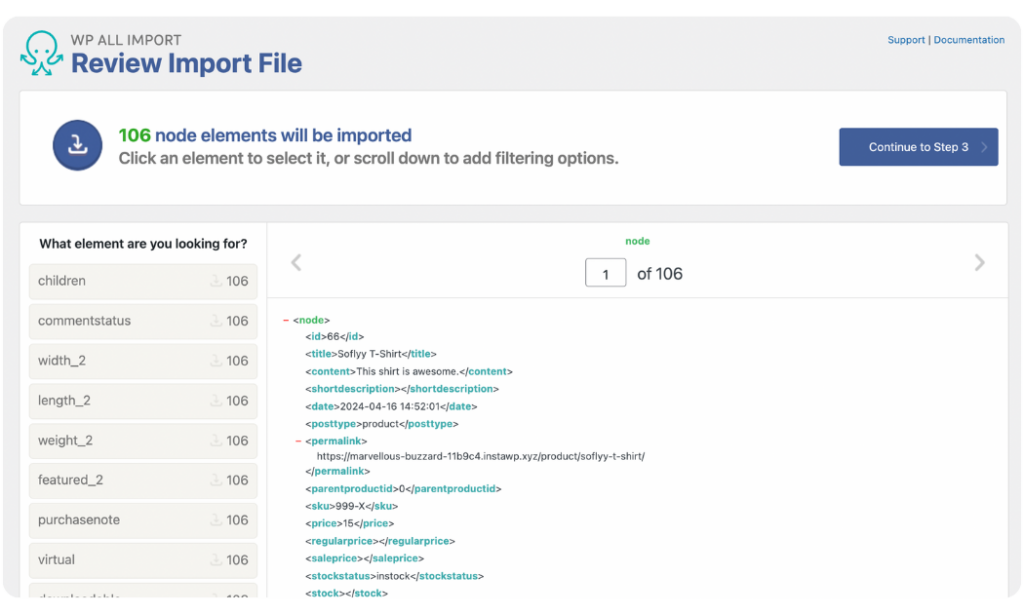
WP All Import also provides a powerful filtering feature, which you will find when you scroll down to the bottom of the screen. Open the Manage Filtering Options panel to reveal the filter settings.
The filter settings allow you to define a subset of your product data that you want to import into WooCommerce. For example, if you run an online store for male t-shirts, you can set up a filter to only import t-shirts that cost more than $10. To do this, you will select price as the Element, set the Rule as “greater than” and input 10 as the Value. Click Add Rule › Apply Filters to XPath and your filter will be created.

Depending on your import requirements, you can add multiple filters to a product import and combine them with AND and OR operators.
If you are satisfied with your review and have added your desired filters, click Continue to Step 3 to proceed.
4. Map Product Data From Excel to WooCommerce Fields
The Drag & Drop screen is where all the fun happens!
WP All Import provides an intuitive drag-and-drop data mapping interface that makes the import process easier, even for beginners.
Let’s begin mapping the product data from the top.
Title & Description
The Title & Description section has the input fields for your product’s Title, Description, and Short Description. Individually drag the elements from the incoming product data table on the left and drop them into the corresponding input field to map them.
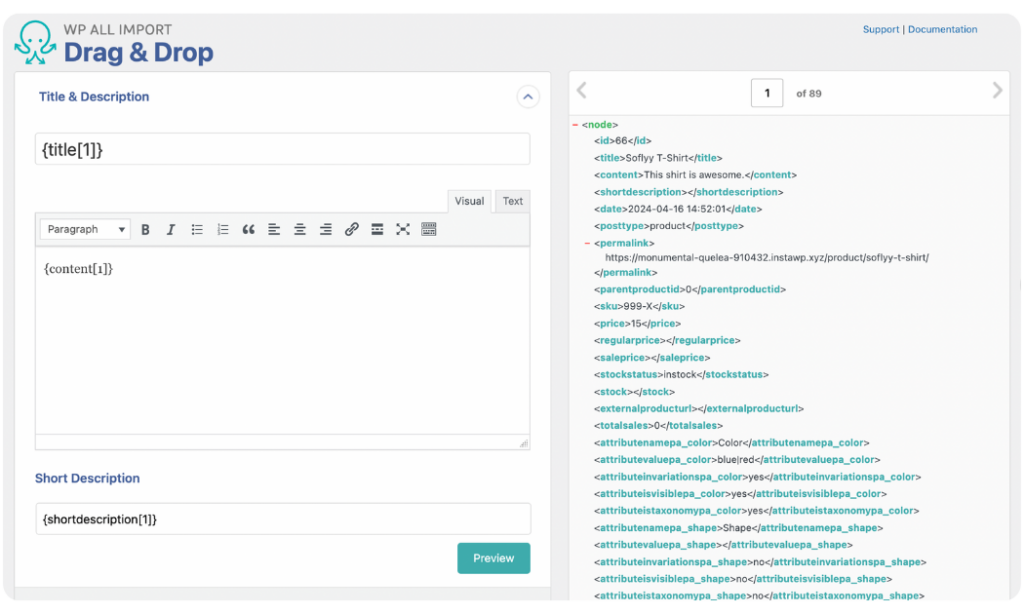
WooCommerce Add-On
The WooCommerce Add-On section includes all of the standard WooCommerce fields divided into different tabs. Mapping data from your imported Excel file feels like how you would do when manually adding a product in WooCommerce.
The first thing to do in this section is to set the Product Type. WP All Import supports importing simple, variable, grouped, and external/affiliate products.
After selecting the Product Type, the General tab will show the correct input fields. If you are importing simple or variable products, you will see input fields for SKU, Regular Price, and Sale Price. To populate them, simply map the elements from your import file, containing the data, into the provided input boxes.
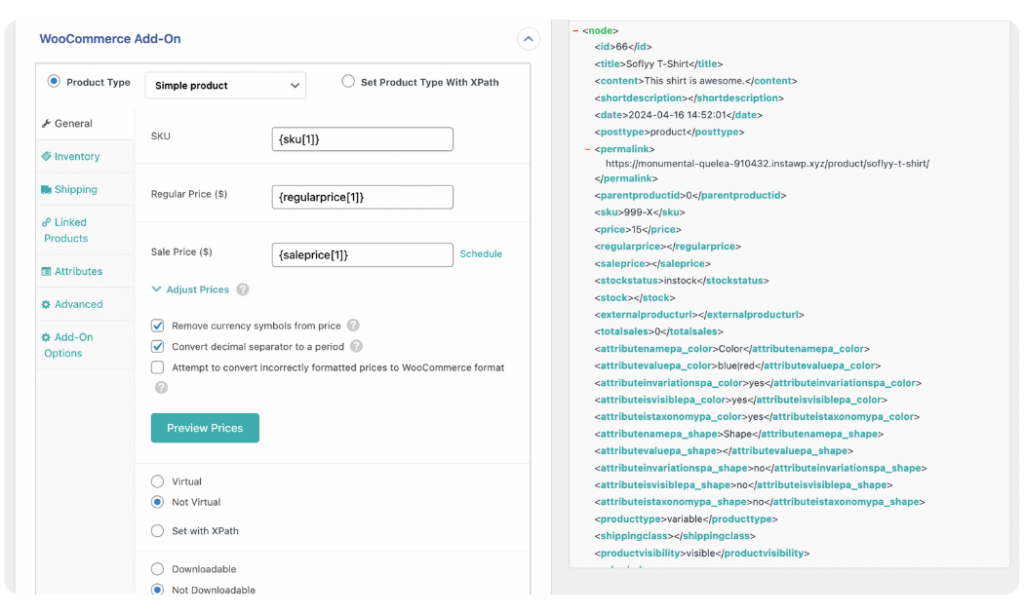
There are additional tabs for mapping details for your products’ Inventory, Shipping & Attributes. Follow the same easy drag-and-drop process to map incoming product data elements into the provided input fields.
Images
The Images section has settings for importing product images from multiple sources.
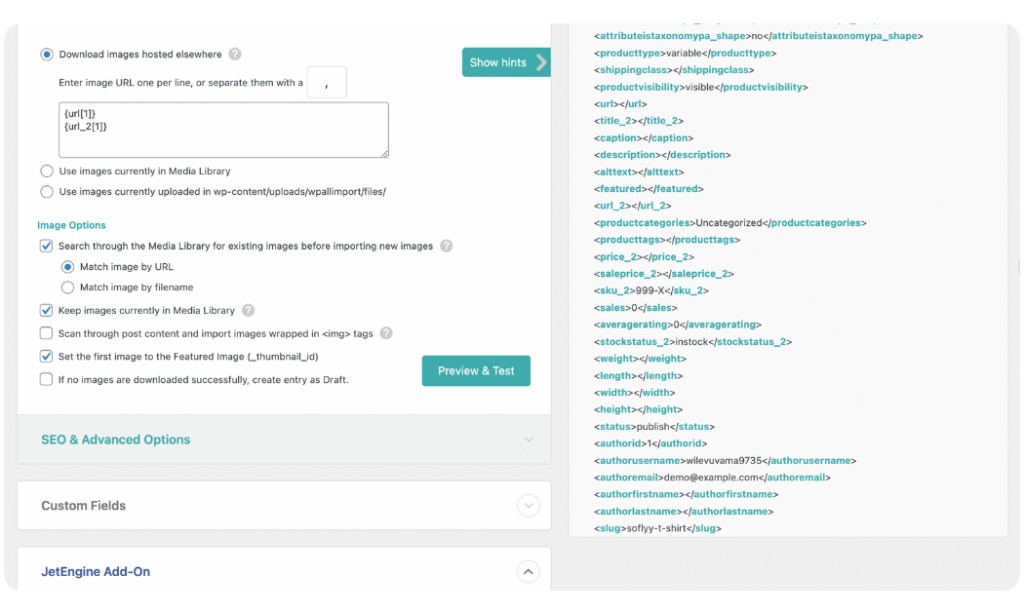
WP All Import provides three ways to import your product images into your WooCommerce store. You can download the images from an external URL, use the images already in your Media Library, or use images uploaded in a folder in your website’s backend.
To map your product images, drag the image element from the incoming data file, and drop it into the provided input field.
Additional Image Options are provided within the panel to specify how WP All Import should handle your product image import.
Taxonomies, Categories, Tags
The Taxonomies, Categories, Tags panel is where you map your WooCommerce products’ categories and tags.
WP All Import allows you to import products with just one category, multiple categories, or hierarchical (parent/child) categories. You can also import products with just one tag or multiple tags.
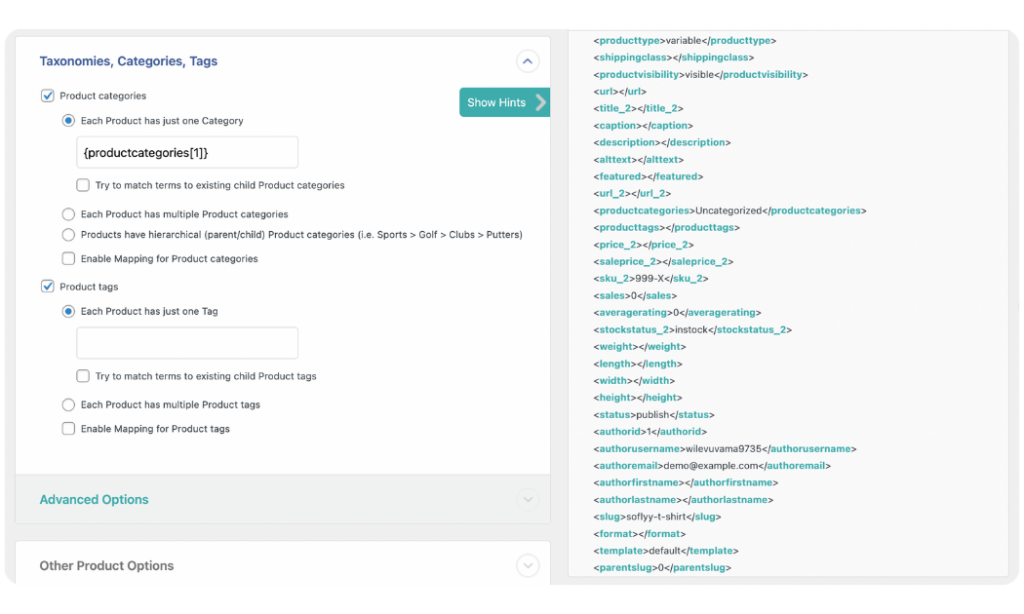
To map your product categories and tags, drag the category and tag elements from your incoming data file into the fields provided.
For a more in-depth explanation, you can read our article on how to import various product categories.
WP All Import provides additional panels for mapping other fields in your import file. These panels include Custom Fields, Function Editor, and more. However, we will not discuss them in this article.
Once you complete all your product data mapping on the Drag & Drop screen, scroll to the bottom and click Continue to Step 4.
5. Configure Additional Product Import Settings
On the Import Settings screen, you will see additional options to optimize your product import.
The first thing to do on this screen is to set a Unique Identifier for your import. The Unique Identifier is important because it ensures that if you run the import again, WP All Import can correctly link records in your updated file with those created during the first import. This prevents duplicates and keeps your product data clean.
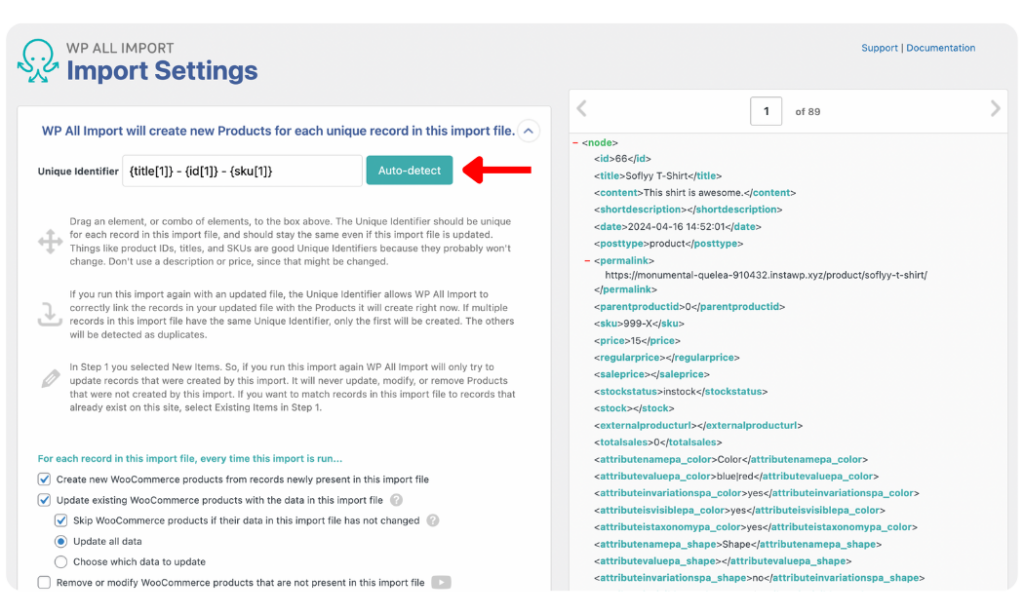
To set a Unique Identifier, click the Auto-detect button or drag and drop a combination of unique elements from your incoming import file. The ideal elements for this include product IDs, Titles & SKUs.
Other import settings are provided within the panel to specify to WP All Import how each record should be handled every time the import is run. The default settings work fine, but you can tweak them if needed.
Scroll down the screen to reveal the Scheduling Options panel. This panel enables you to schedule imports that run automatically. You can choose Automatic Scheduling to use WP All Import’s interface-based automatic scheduling service for a small monthly fee. You can schedule imports to run daily, weekly, or monthly. Select Manual Scheduling if you would rather manually create cron jobs on your website’s server to handle recurring imports.
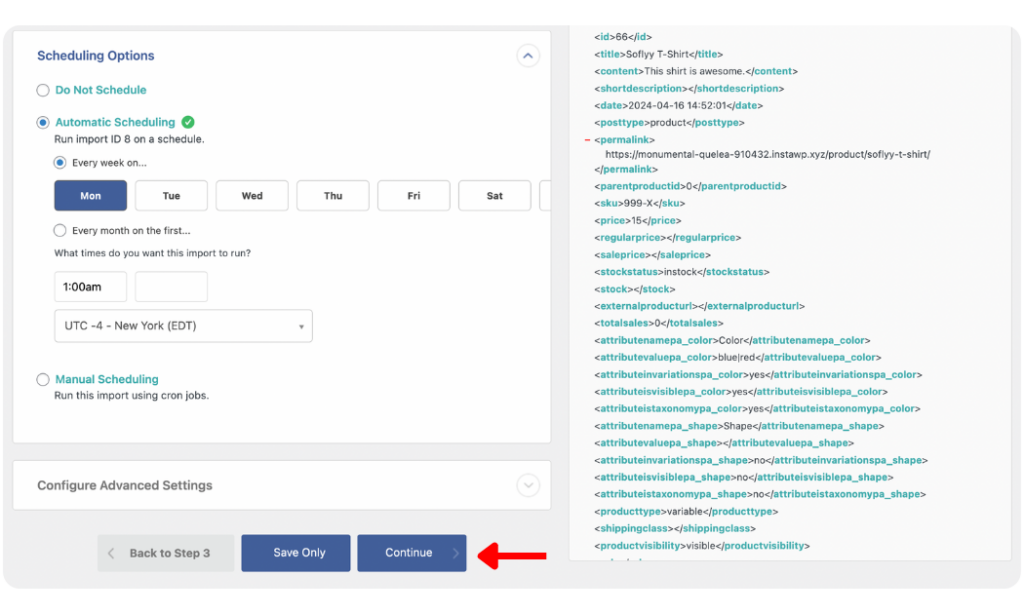
The Configure Advanced Settings panel gives you options to optimize the speed of your import. You can keep the default selections or change them if relevant.
Click Continue once you have configured all your additional import settings.
6. Run Import and Verify the Data
We’re now at the final step of importing WooCommerce products from Excel!
WP All Import summarizes all your applied import settings on the Confirm & Run screen. Review the settings to be sure you are pleased with your selections. If you notice any mistakes, you can go back and change your settings.
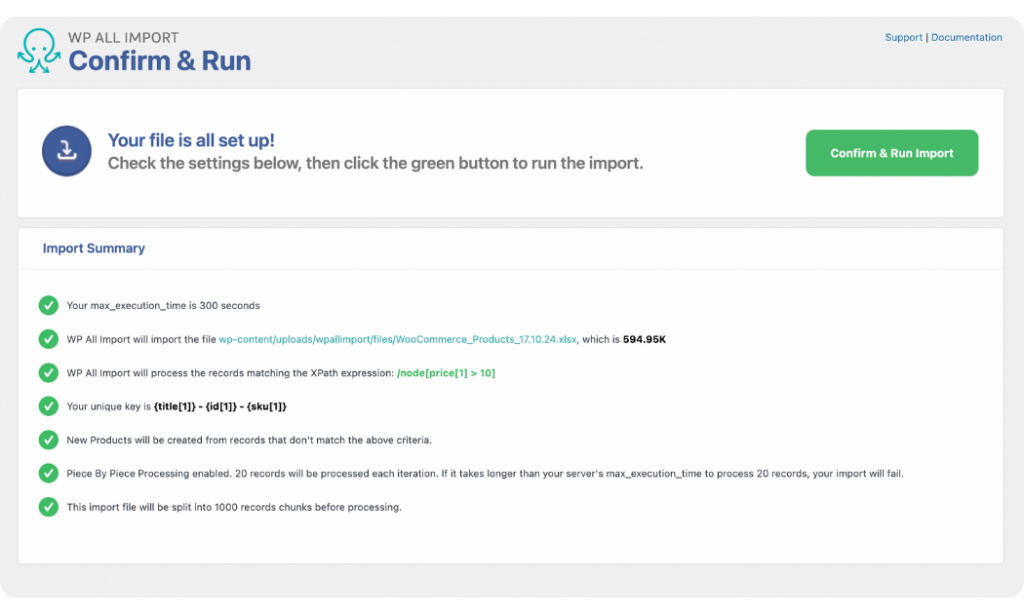
If everything is as it should be, click the Confirm & Run Import button to start the import process. You will see an Import Complete notification once the import is completed successfully.
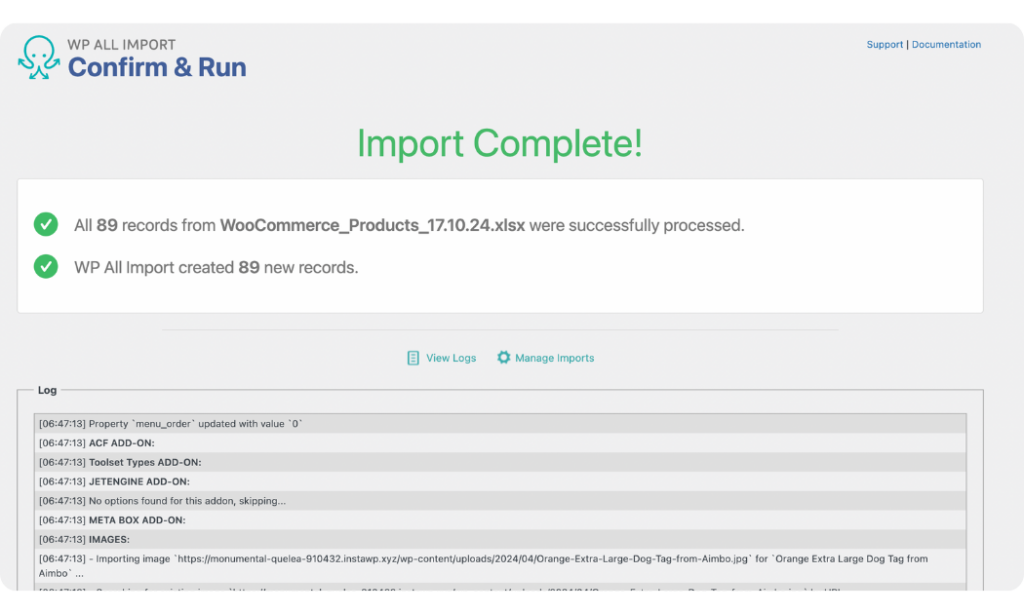
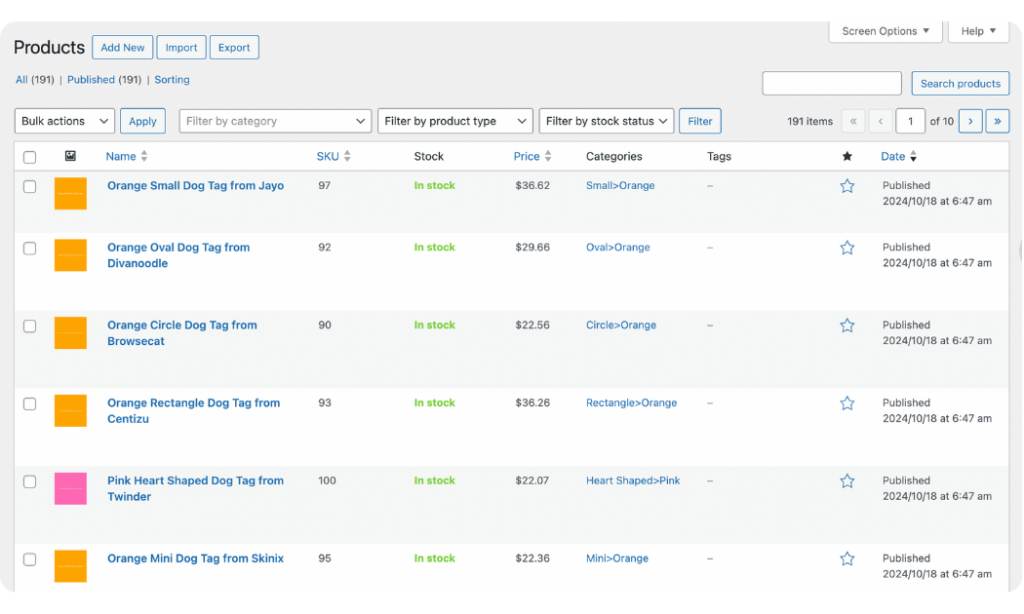
Check your imported products by navigating to Products › All Products. You will see the product list and can review the product data tab for a few products.
Wrap-Up: Easily Import WooCommerce Products From an Excel File
Importing products from Excel into WooCommerce is easy once you have the right tool to get it done. WP All Import is the best product import plugin for importing WooCommerce products from an Excel file. Not only that, the plugin can handle all other WooCommerce and WordPress import needs, so you never have to worry about importing any data into your online store. Some of its key features include:
- Powerful filtering functionality.
- Automatic import scheduling.
- On-the-fly data modification with PHP.
- Support for importing product data from multiple file formats including Excel, CSV, XML, and Google Sheets.
- User-friendly drag-and-drop mapping interface.
If you want to bring ease to your store’s import processes and scale operations, you should download and install the WP All Import plugin today!
Import WooCommerce Products From Excel – Frequently Asked Questions
How Do I Import Products to WooCommerce From Excel?
To import products to WooCommerce from Excel, download and install the WP All Import plugin and WooCommerce Add-On.
- Go to All Import › New Import.
- Upload the Excel file and choose WooCommerce Products as the import type.
- Review the file, add filters, and map the incoming data elements to the product fields.
- Run the import and all your products will be imported successfully.
- Go to your products page to verify the imported data.
How To Bulk Upload Products to WooCommerce?
Every import is a bulk upload of products into WooCommerce. Using an intuitive drag-and-drop interface, a plugin like WP All Import allows you to import thousands of products within minutes. You also have access to a powerful filtering feature that ensures you can specify a subset of products to import, so you always have full control over the products you add to your store.
How To Export and Import Products in WooCommerce?
To export and import products in WooCommerce, download and install the WP All Export on the source site and WP All Import on the destination site.
- Go to All Export › New Export.
- Choose WooCommerce Products as your export type and add filters.
- Select the columns to export and choose the export file type.
- Run the export and download the Bundle file.
- Once you are ready, you can easily import it back using the WP All Import plugin.
How Do I Import Products With Custom Fields in WooCommerce?
You can import products with custom fields in WooCommerce using the WP All Import plugin and WooCommerce Add-On. Once you upload your product import file with custom fields, on the Drag & Drop screen, open the Custom Fields panel. The panel reveals the input fields for mapping your product’s custom fields. Map the fields, and do the same for all the other relevant fields within the various panels. Run the import and your products with their custom fields will be imported successfully.
