Do you want to bulk import WooCommerce products with categories into your online store?
Intuitively categorizing products in your store is an important part of running a high-converting online marketplace. Customers want to find items easily when they visit your site. They get frustrated and leave if there’s no categorization to help them sort through the many products in your catalog.
WooCommerce’s default importer tool only works for importing categories for simple products through a preformatted CSV file. If you sell a mix of product types with complex category structures and need to bulk import them into WooCommerce, the tool would simply not work for you. You would need a plugin to achieve this.
In this article, we will show you how to import WooCommerce products with categories using the all-in-one import plugin for WooCommerce and WordPress – WP All Import.
Why You’d Want To Use A Plugin To Import Products With Categories
As previously mentioned, WooCommerce’s built-in importer tool only supports importing simple products with straightforward category hierarchies. It falls short when importing more complex products, such as variable products, with advanced categorization requirements. You may also want to import only categories without the entire product list, which would be impossible with the built-in tool.
Additionally, it only supports CSV file imports and enforces a fixed rule on how categories must be structured in the CSV file. This is rather restrictive if you receive product catalogs in other formats, such as Excel and XML, and have products that fall under multiple categories with different hierarchical structures.
This is why you’d want to use a WooCommerce import plugin such as WP All Import to import products with categories into your WooCommerce store.
It offers you many valuable benefits, including:
- Support for importing products with simple or complex category structures.
- Support for importing categories on their own without the product list.
- Support for importing products in other file formats such as Excel, Google Sheets & XML.
- Flexibility in the way you structure your file (no strict formatting rules).
- Compatibility with importing various product types, not just simple products.
- Support for importing custom fields unsupported by WooCommerce’s built-in importer.
Now that you understand how WP All Import can bring flexibility and efficiency to your product import process, let’s discuss how to prepare your import file.
Prepare WooCommerce Products Import File Containing Categories
The WP All Import is a versatile plugin that supports importing WooCommerce products with categories in multiple file formats. You can import from Excel, Google Sheets, CSV, or XML.
With the plugin, you can also import products with one category, multiple categories, or hierarchical (parent/child) categories. Your file can be formatted in either one of two ways – all your product categories are specified in a single column, or each category is laid out in different columns.
An example would be if you run a store selling clothing for men and women, and each item has multiple categories and varying hierarchies. You may have a hoodie for men with its category added in one single column of your import file as follows: Clothing › Men › Tops › Hoodies & Sweatshirts | Clothing Collection › Summer 2024 › Eco-friendly Wears. Alternatively, you may have each sub-category listed in separate columns in your file.
You can refer to this guide if you want to learn more about preparing your product import file containing categories.
How To Easily Import WooCommerce Products With Categories
Now you’re ready to start importing products with categories in WooCommerce. We’ll show you how to do this step-by-step with the WP All Import plugin.
1. Install WP All Import and WooCommerce Add-On
The first step is to purchase the WP All Import plugin along with its WooCommerce Import add-on and install them on your WordPress site. The WooCommerce Import add-on is important as it enables support for all WooCommerce fields inside the drag-and-drop interface.
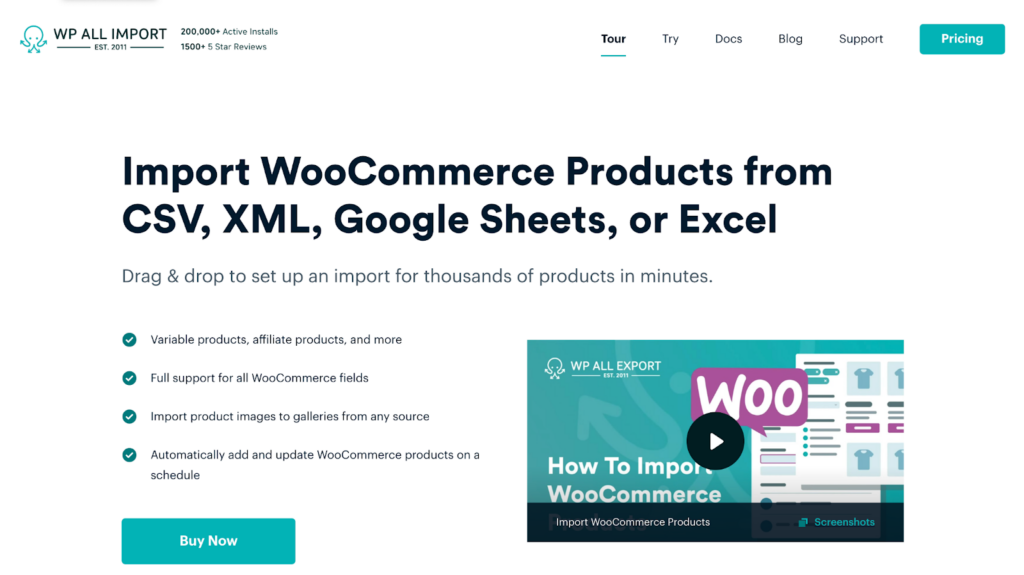
To install both plugins, on your WordPress admin dashboard, navigate to Plugins › Add New Plugin › Upload Plugin › Choose File › Install Now › Activate.
Once done, you can immediately start importing your WooCommerce products with categories.
2. Start a New WooCommerce Product Import
To create a new WooCommerce product import, navigate to All Import › New Import from your WordPress admin dashboard. The New Import screen will display, allowing you to select how you want to import your product data.
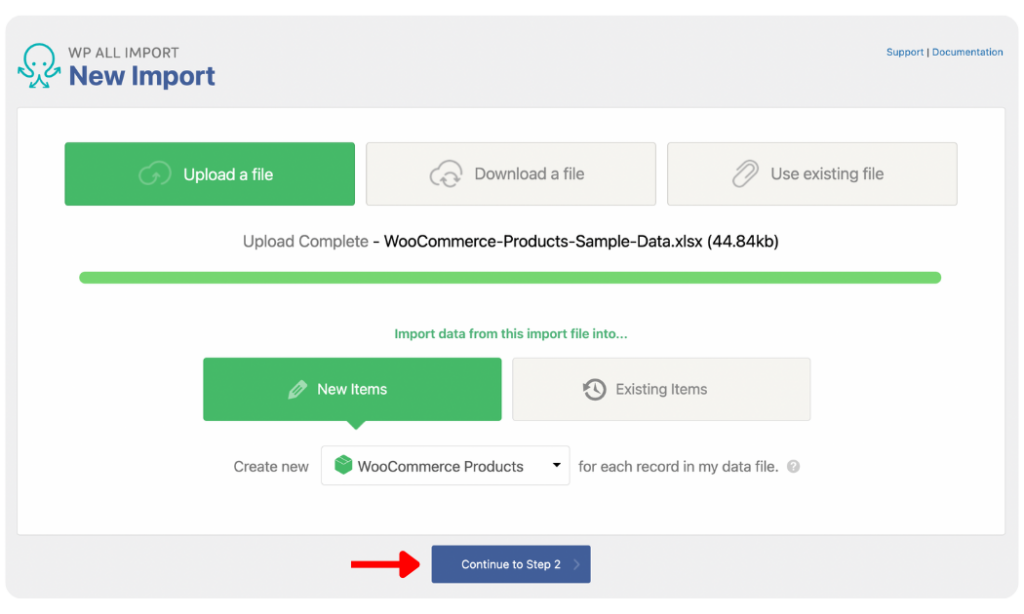
WP All Import provides three options for importing your product data – upload a file, download the file from a URL or FTP/SFTP, or select a previously uploaded file.
Once you have loaded your product data, under New Items, select WooCommerce Products from the dropdown to create a new product for each record in your import file.
Click Continue to Step 2 to proceed to the next step.
Note: If you want to import only categories without the product data, WP All Import supports this import type too. All you need to do is load the categories data file and, under New Items, select Taxonomy and then Product Categories from the dropdown.
3. Review Uploaded WooCommerce Product Data
The Review Import File screen allows you to review the uploaded data and ascertain that WP All Import successfully pulled all the products you want to import.
You can use the left (<) and right (>) gray arrows to review the individual product records.
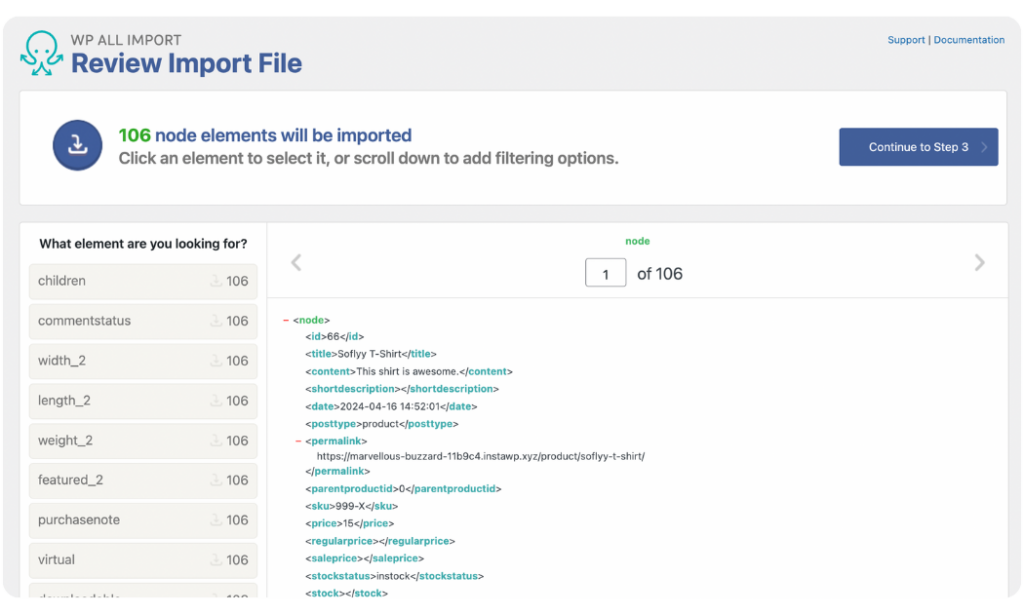
WP All Import also provides a powerful filtering functionality to filter your product data and import only specific products to your site. Scroll down to the Manage Filtering Options panel and open it to reveal the filtering options.
You can filter by any element (column) in your product data file and add relevant filter rules.
For example, let’s assume you run a dog tag store. If you have made each available tag shape a product category, you can set up a filter rule for importing only “Heart Shaped” dog tags. To do this, select “product category” as the Element, choose equals as the Rule, and input “Heart Shaped” as the Value (see image below).
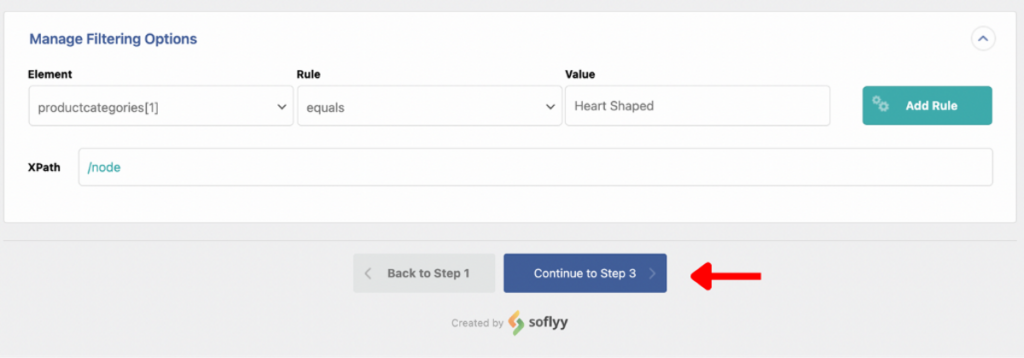
Once you have added filters (if relevant), click Continue to Step 3.
4. Map Product Data to the WooCommerce Fields, Including Categories
The Drag & Drop screen is where the main magic happens!
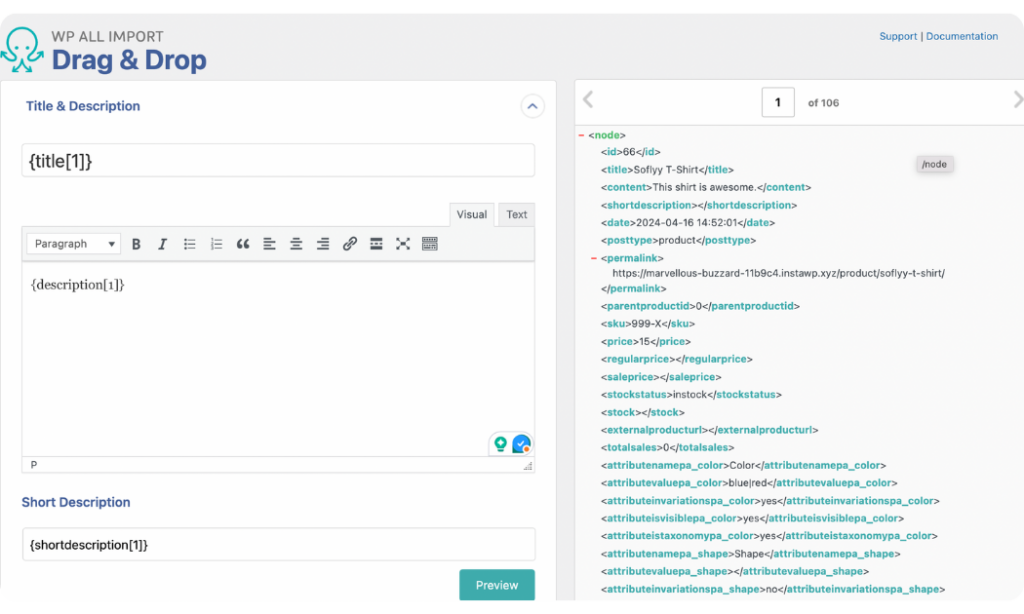
WP All Import designed the drag-and-drop interface to simplify the import process for new and advanced WordPress and WooCommerce users. With the interface, you can easily map all the data from your import file to the corresponding WooCommerce fields, including your product category data.
Title & Description Panel
In this panel, you can drag the incoming elements from your import file that hold data for the Title, Description & Short Description of your products, and drop them in the provided fields.
WooCommerce Add-On Panel
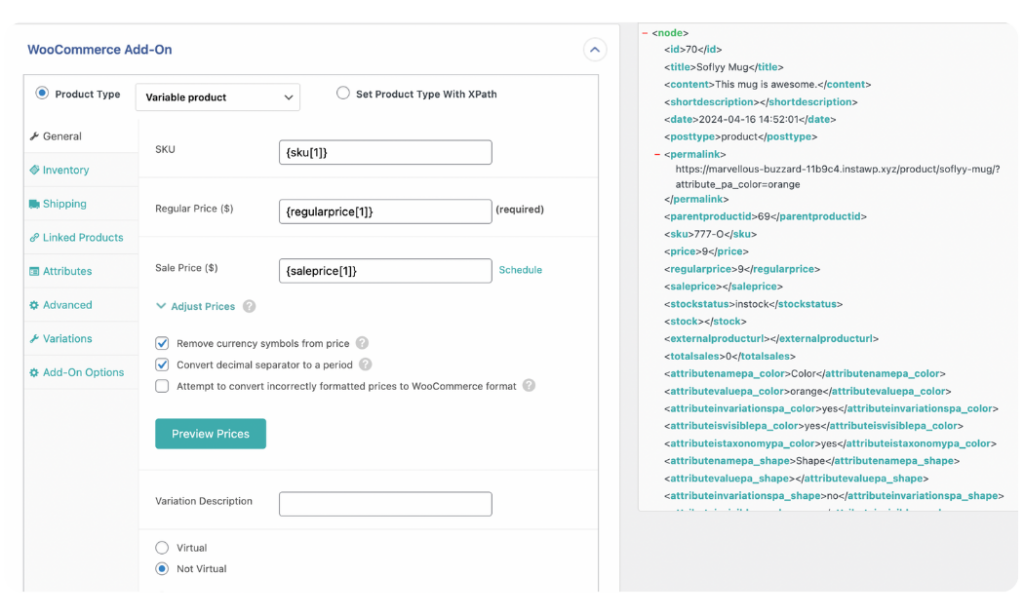
The WooCommerce Add-On panel contains all the standard WooCommerce data fields you will find if you are manually adding a product to your store.
In this panel, you can select the Product Type you are importing – whether Simple, Grouped, Variable, or External/Affiliate products.
Next, map your product’s SKU, Regular Price, and Sales Price from the General tab and then map other incoming data elements into their corresponding fields within the Inventory, Shipping, and Attribute tabs.
Images Panel
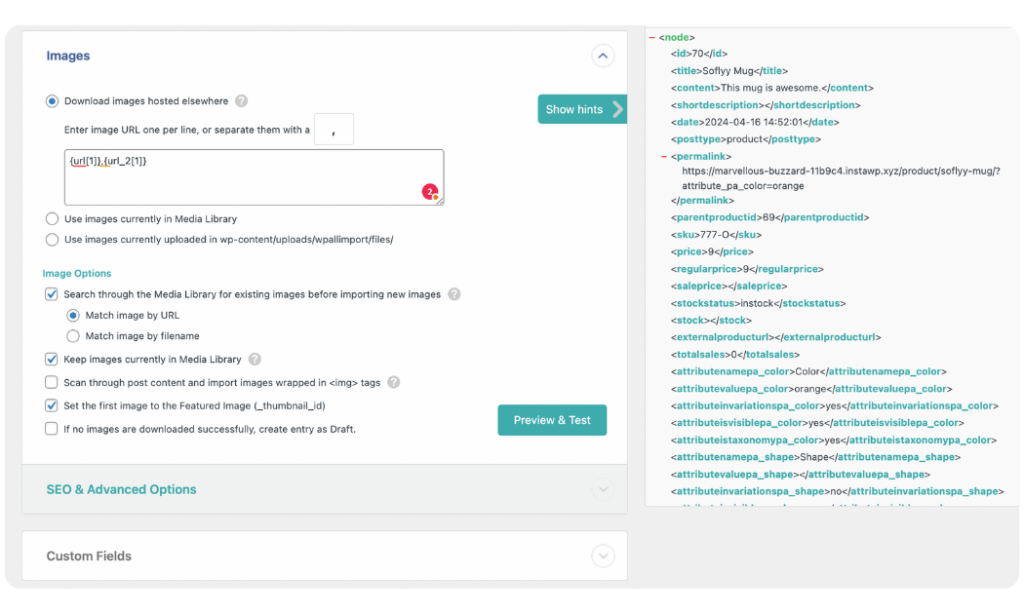
The Images section provides you with options to map your product images. You can import images from a URL, your site’s media library, or a folder in your backend.
You can also set the first image as the Featured Image, assign gallery images, import image SEO & metadata, and more.
Taxonomies, Categories & Tags Panel
The Taxonomies, Categories, Tags panel is where you can map your product categories and tags, and set up how they should be imported. We will focus on the Product categories option for this article.
Enable the Product categories option to see the available settings.
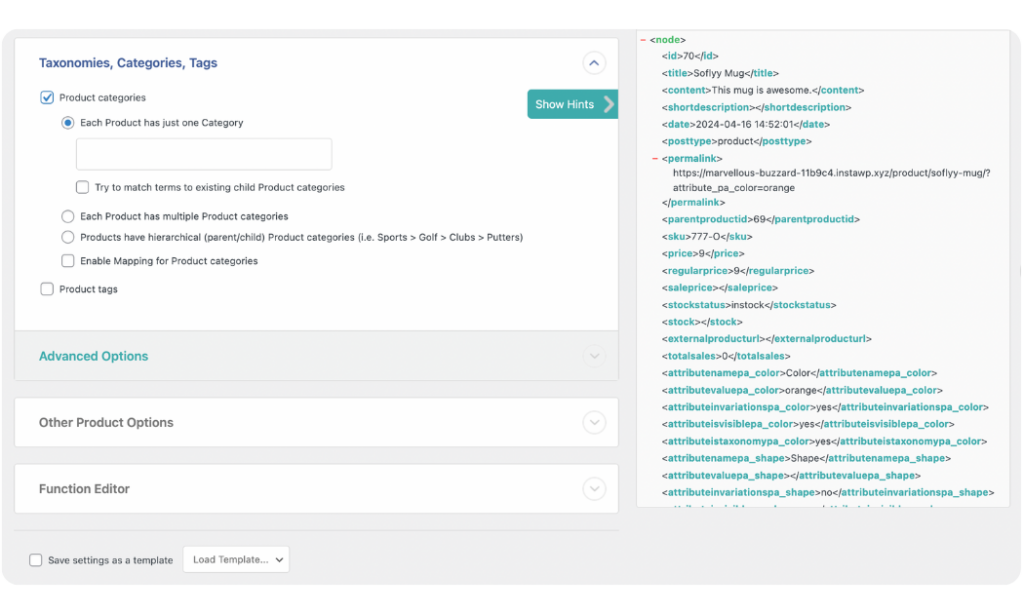
Let’s review each option one after the other.
Each Product Has Just One Category
You should select this option if the products in your import file are each assigned only one category. For example, if your store sells only female accessories, you may assign products to single categories such as “hats”, “bracelets”, “earrings”, etc.
Each Product Has Multiple Product Categories
This option is ideal if you have products that fall under different categories but are not in any hierarchy. For example, in a store that sells electronic devices, AirPods may appear under multiple independent categories such as “audio devices”, “fitness accessories”, and “electronics”. This makes it easy for customers to search through different categories based on their interests and still find the product.
Products Have Hierarchical (Parent/Child) Product Categories
With this option, you can import complex product categories with hierarchies, also known as nested categories or parent/child categories.
WP All Import provides two options for how you can import hierarchical product categories:
- An element in my file contains the entire hierarchy: Enable this option if you added all your product categories and sub-categories within a single column in your import file. For example, if you sell dog tags, you may have a product category column in your import file with the value “Heart Shaped>Matte>Red”. This would mean that Heart Shaped is the parent category, Matte is a child category of Heart Shaped, and Red is a child category of Matte.
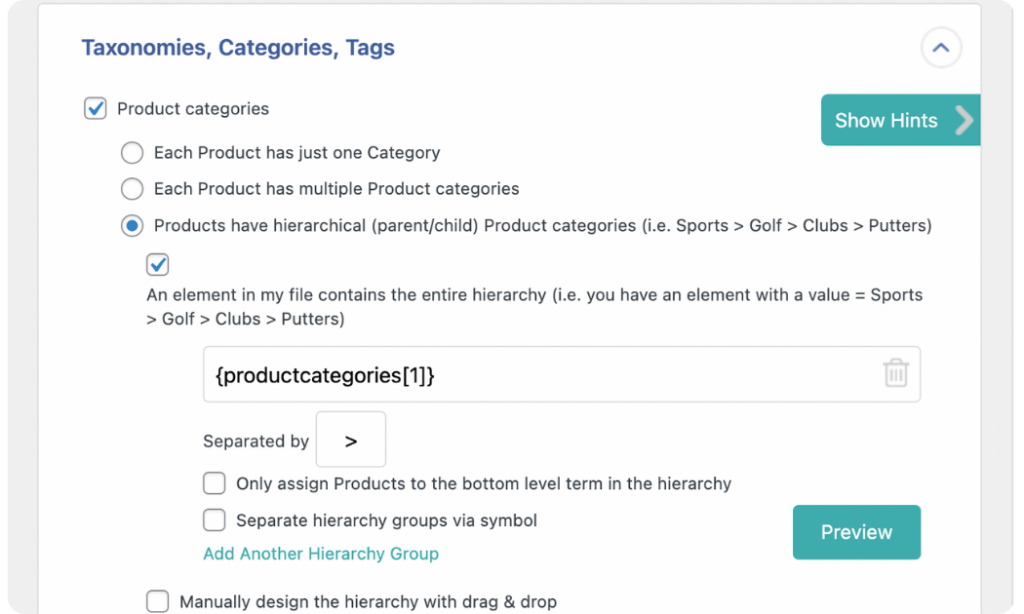
After dragging the product category element into the provided data field, click on the Preview button, and you should see the categories laid out in the correct nested format.
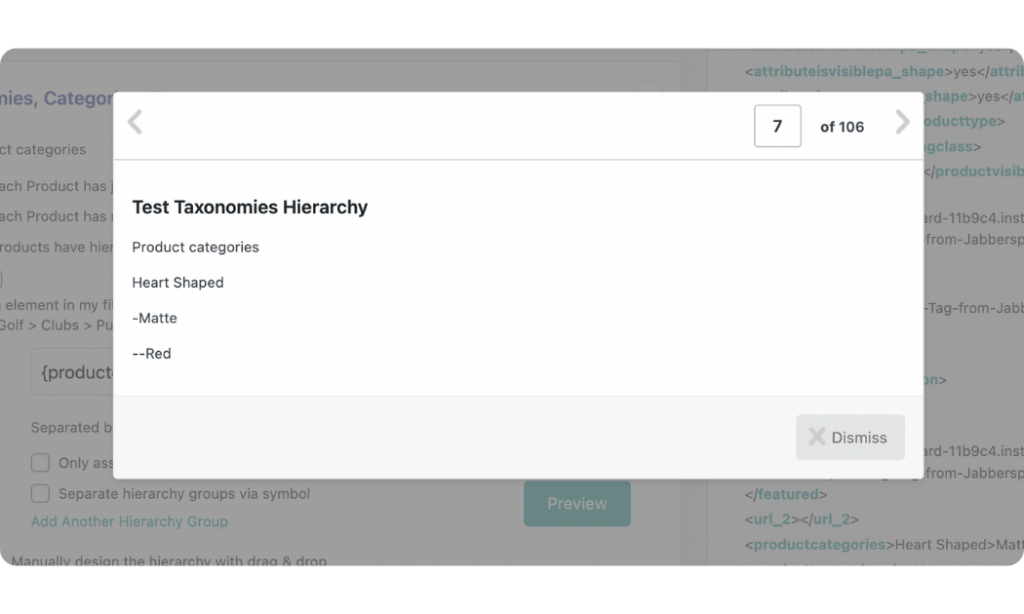
Select the Separate hierarchy groups via symbol option if you have products with multiple hierarchical categories. For example, a dog tag could have “New Arrivals>Summer24 | Circle>Matte>Red” as its two hierarchical categories separated by the “|” symbol.
Note: You can use any symbol to separate your product categories. If you use a different symbol in your import file, indicate it within the Seperated by input box.
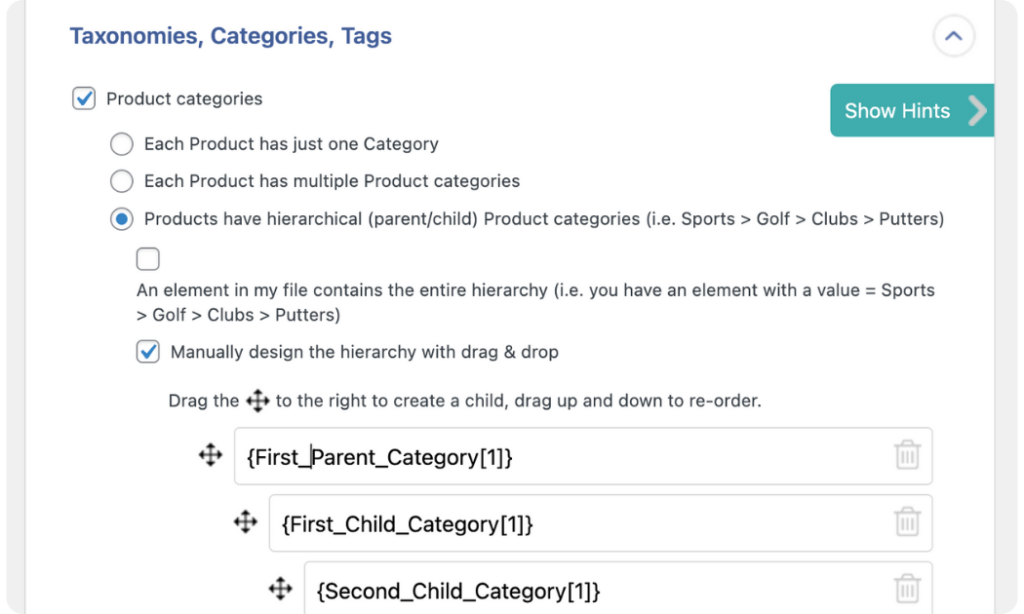
- Manually design the hierarchy with drag & drop: Enable this option if your product categories are listed in separate columns within your import file. It allows you to create a hierarchy by dragging and dropping each product category element into the provided field. You can then use the four-pointed arrows to move the categories to the left or right to assign them as “parent” or “child”. You can also reorder the categories by dragging them up or down.
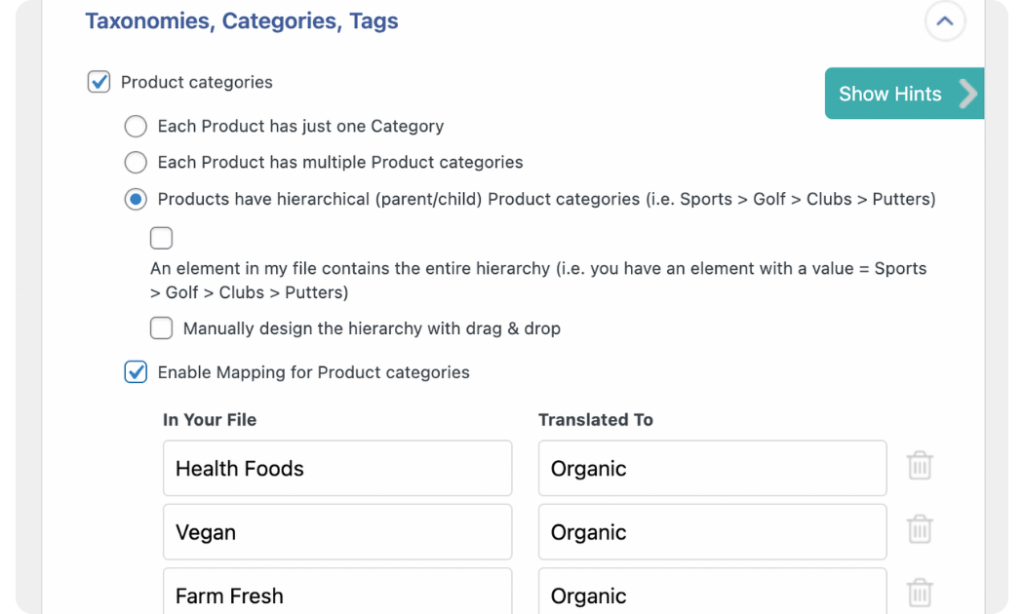
Another neat option that WP All Import provides is the Enable mapping for Product categories option. This setting lets you map imported categories into a different value to keep things organized.
In the In Your File field, you need to enter the data to be mapped from your import file. The Translated To field lets you indicate where you want the previous value mapped.
An example of this is if you run an online grocery store and want to change all instances of “health foods”, “vegan” and “farm fresh” to become “Organic”. You will do this as shown below:
Finally, you can choose to apply the mapping rule before splitting the category via the separator or after the split occurs.
Select the Apply mapping rules before splitting via separator symbol option to enable this. By default, WP All Import splits the categories according to the separator before applying the mapping rules.
Once satisfied with your category mapping settings, scroll to the bottom of the screen and click Continue to Step 4.
5. Apply Additional Import Settings
On the Import Settings screen, you can configure your import settings to specify how your import should run in the future.
The first thing you need to do on this screen is to create a Unique Identifier for your import. The Unique Identifier ensures that if you run the same import in the future, WP All Import will correctly link the records in your updated file to Products created during the current import. This prevents duplicates and keeps your product data clean.
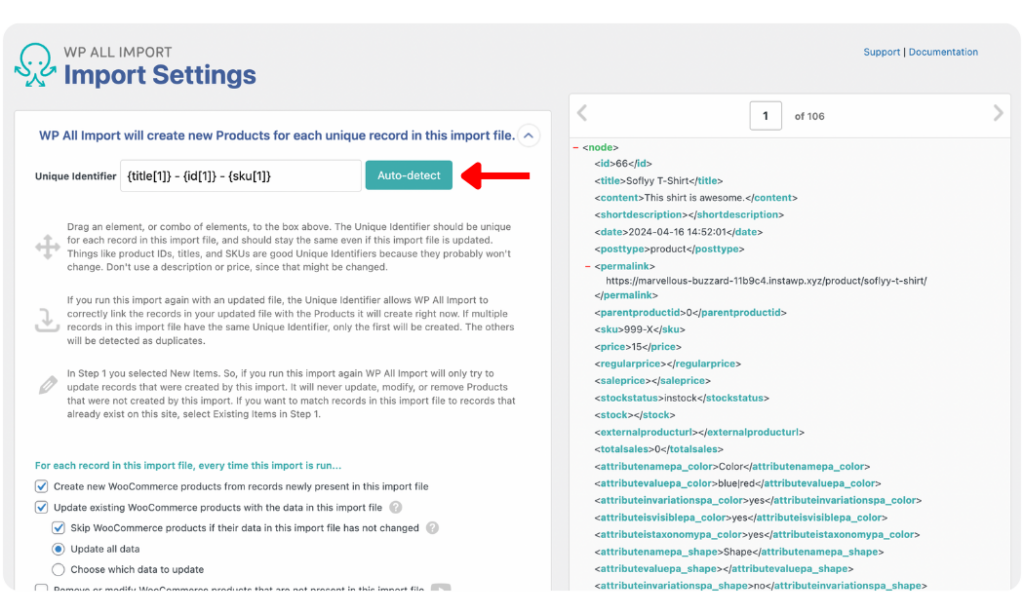
To generate a Unique Identifier, click Auto-detect.
WP All Import provides additional settings below the Unique Identifier field to allow you to specify if products should be created, updated, or deleted during future imports.
From the Import Settings screen, you can also configure import scheduling options within the Scheduling Options panel. Import scheduling allows you to run your product imports automatically at specific times to eliminate the need for repetitive manual imports.
Once you’ve configured everything, click Continue to proceed to the next step.
6. Run WooCommerce Product Import and Verify the Data
Now we’ve reached the final step of the import process!
The Confirm & Run screen is where WP All Import allows you to view a high-level summary of all the import settings you have applied.
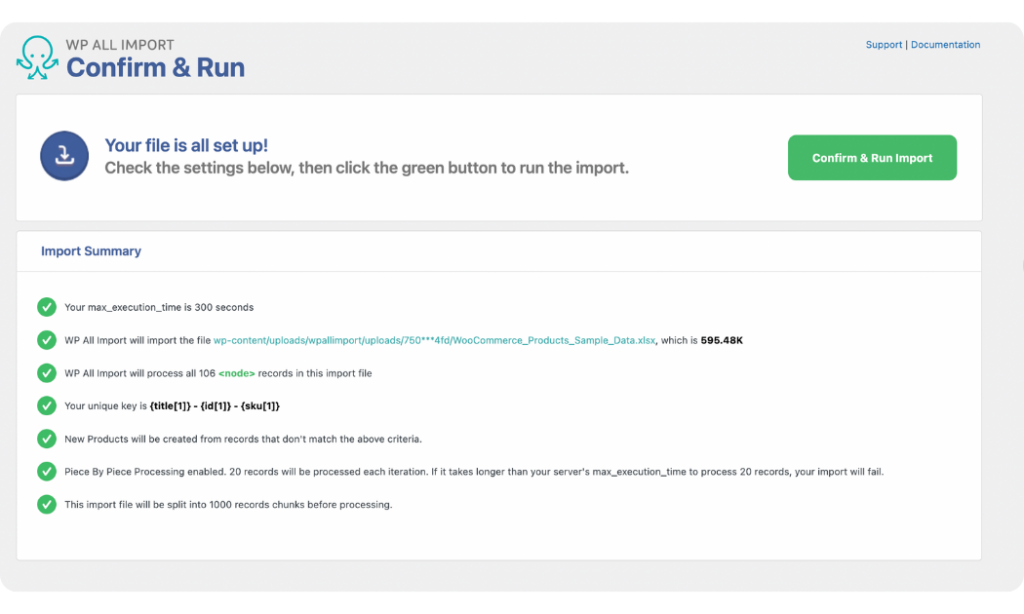
If you notice any mistakes in your settings, you can go back and fix them by clicking or go back to Step 4 at the bottom of the screen.
However, if there are no issues, click the Confirm & Run Import button to start the import process.
Once the import is completed, you will see a notification confirming this.
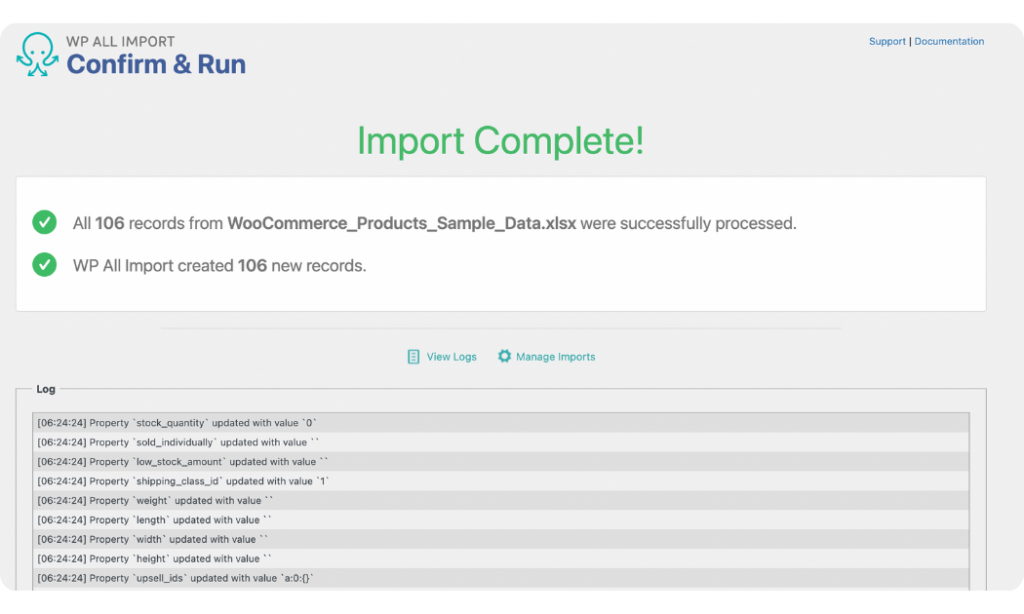
You can check the imported products by navigating to Products › All Products. To check the product categories, navigate to Products › Categories and see all your imported product categories.
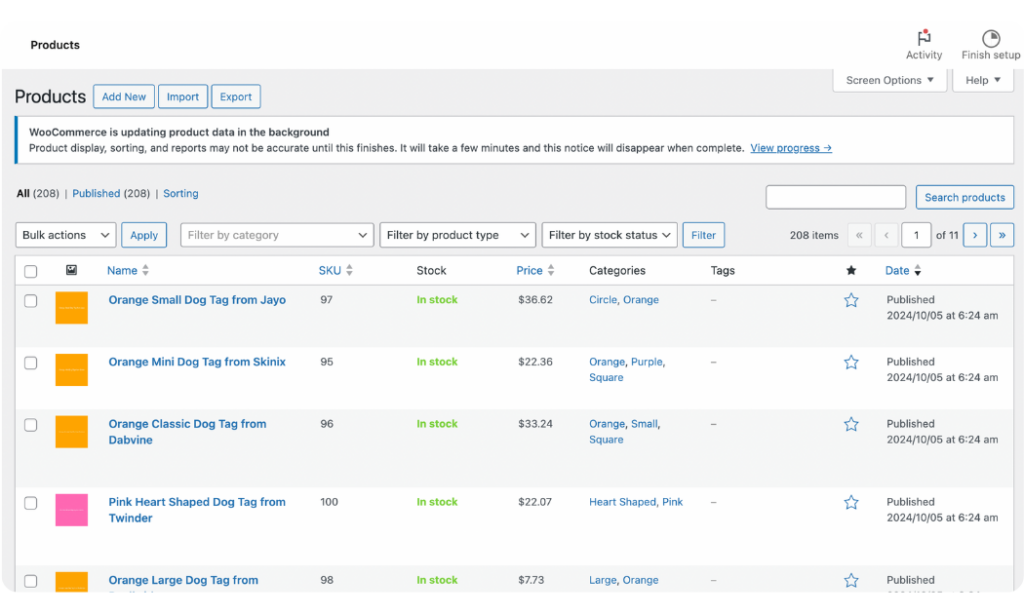
Now that we’ve shown you how easy it is to import product categories into WooCommerce with the WP All Import plugin, we hope you will take advantage of the many valuable product import features that the plugin offers. Ready to start importing your WooCommerce products with categories the easy way? Get the WP All Import plugin today!
Import WooCommerce Products With Categories – FAQs
How Do I Import Product Categories From CSV to WooCommerce?
You can import product categories from CSV to WooCommerce using the WP All Import Plugin. Once installed, navigate to All Import › New Import and upload your CSV file. Under New Items, select Taxonomies › Product Categories. Use the Drag & Drop interface to seamlessly map your product categories, and follow the import wizard to complete the import steps within minutes!
How Do I Import Categories in WordPress?
To import categories in WordPress, install the WP All Import plugin and navigate to All Import › New Import. Specify your import source and select Taxonomies as the import type. Next, choose a specific category as your import target. With the Drag & Drop interface, map the incoming data elements to the appropriate fields and run the import. WP All Import will automatically detect and import the categories into your WordPress site.
How Do I Add Categories to All Products in WooCommerce?
WP All Import lets you add categories to all products in WooCommerce in bulk. Simply create a new import by navigating to All Import › New Import and upload your product import file. Select WooCommerce Product as the import type and then use the drag-and-drop interface to map the incoming product category element(s) into the provided category settings fields. Once you run the import, all your WooCommerce products will automatically be assigned their categories.
How Do I Migrate WooCommerce Products From One Site to Another?
You can use a combination of WP All Export and WP All Import to export and import WooCommerce products:
- Export the WooCommerce products that you wish to migrate using WP All Export.
- Choose the Bundle option when downloading your export file. The bundle file contains an import template in addition to the product data.
- Upload the bundle file on the target site using WP All Import.
- WP All Import will automatically configure itself based on the bundle file.
- Run the import.
- Check your imported products.
