Are you looking to export import WooCommerce orders from one site to another?
Despite its extensive functionality, WooCommerce doesn’t offer a built-in way to export and import orders easily.
In this article, we’ll show you how to efficiently export and import WooCommerce orders using the combination of WP All Export and WP All Import.
Let’s get started!
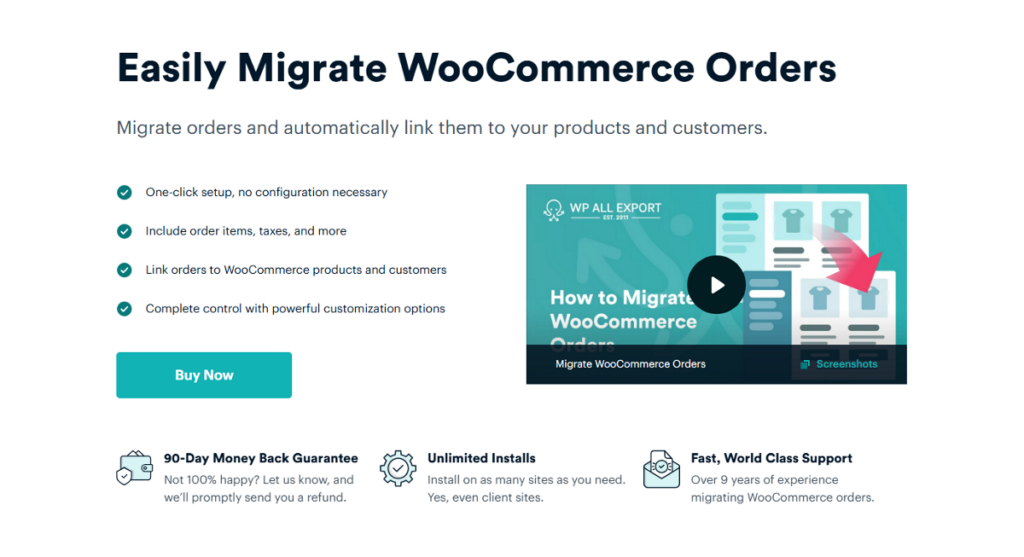
WP All Import Export Suite – The Best Order Migration Plugin
Many WooCommerce order export plugins allow you to download your complete order data in a file format of your choice. However, when it comes to importing that order data, there are very few plugins that can help.
WP All Export and WP All Import integrate seamlessly with each other to offer a comprehensive suite for migrating WooCommerce orders effortlessly.
What’s great about using these plugins is that you only need to learn the basic process once. Both plugins feature a similar, intuitive, and user-friendly wizard that breaks down the export and import processes into a few simple steps.
These plugins are among the best WooCommerce import-export solutions and include features such as:
- Export all order data including order items, tax details, variations, custom fields, and more.
- Powerful customization options with complete control over order data.
- Schedule automatic export and import of orders.
- Nested filter rules to export and import exactly the orders you need.
- Migrate large amounts of order data without slowing down your website.
With these powerful features in mind, let’s look at how to use them to export and then import orders from one WooCommerce site to another.
How to Export and Import WooCommerce Orders – Quick Way
While both the WP All Export and Import Suite plugins are powerful and come with numerous features, they also offer a quick and efficient way to migrate your order data from one WooCommerce site to another.
This straightforward method is ideal for migrating order data as it is, without any customization.
WP All Export provides a Bundle zip file that contains a CSV export file and an import template for the WP All Import plugin to seamlessly map and import the order data. Let’s take a detailed look at the entire process.
But before we begin, make sure you have both the WP All Export and WP All Import plugins installed, along with the WooCommerce Import and Export add-ons.
If you don’t have access to the premium version of these plugins but want to test how the whole process works, you can create a free online sandbox from the WP All Import website. Simply select the WooCommerce Store option and click Create Sandbox.
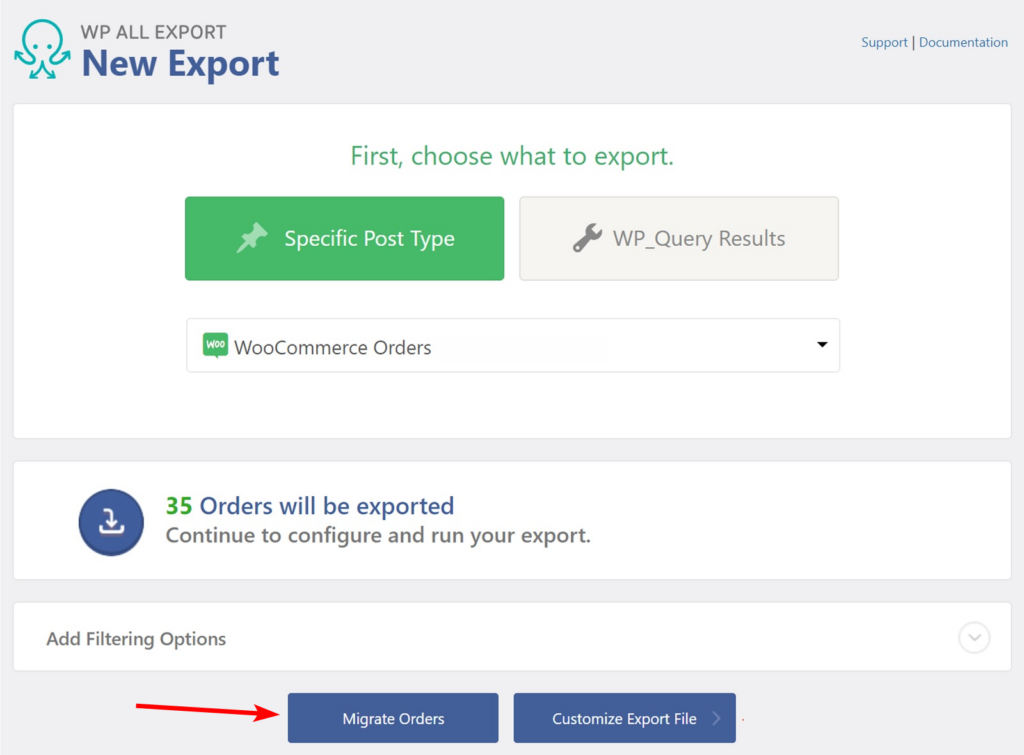
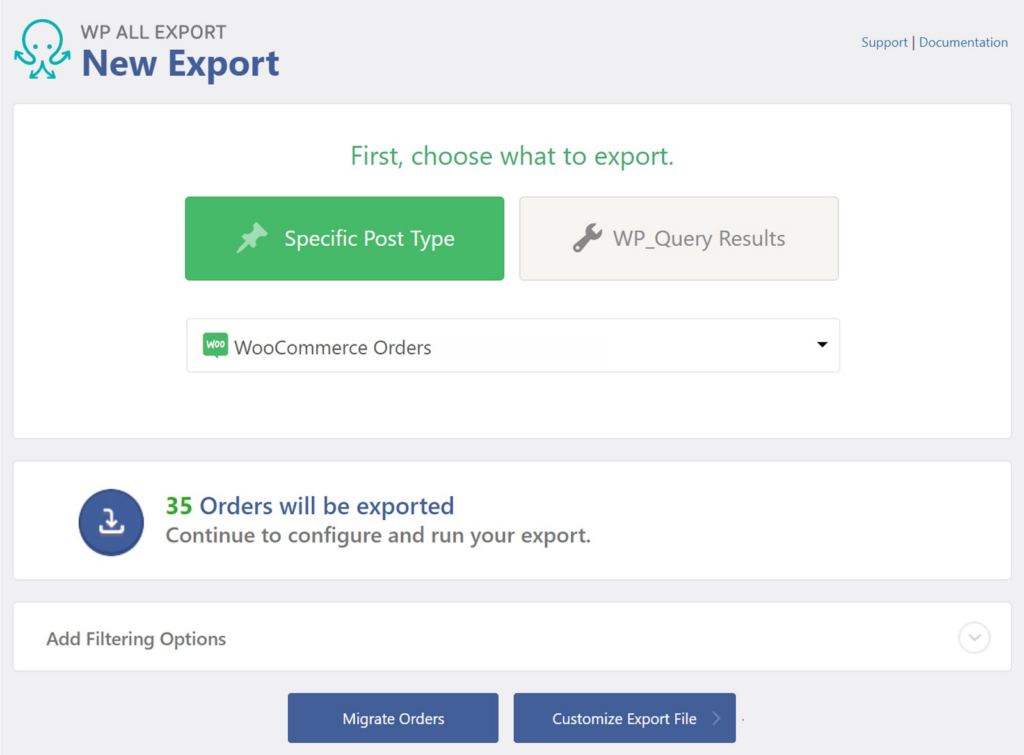
Step 1: Start a New Order Export in WP All Export
To get started, navigate to All Export > New Export on your source site and select WooCommerce Orders as the export type. This will display the total number of orders available for export.
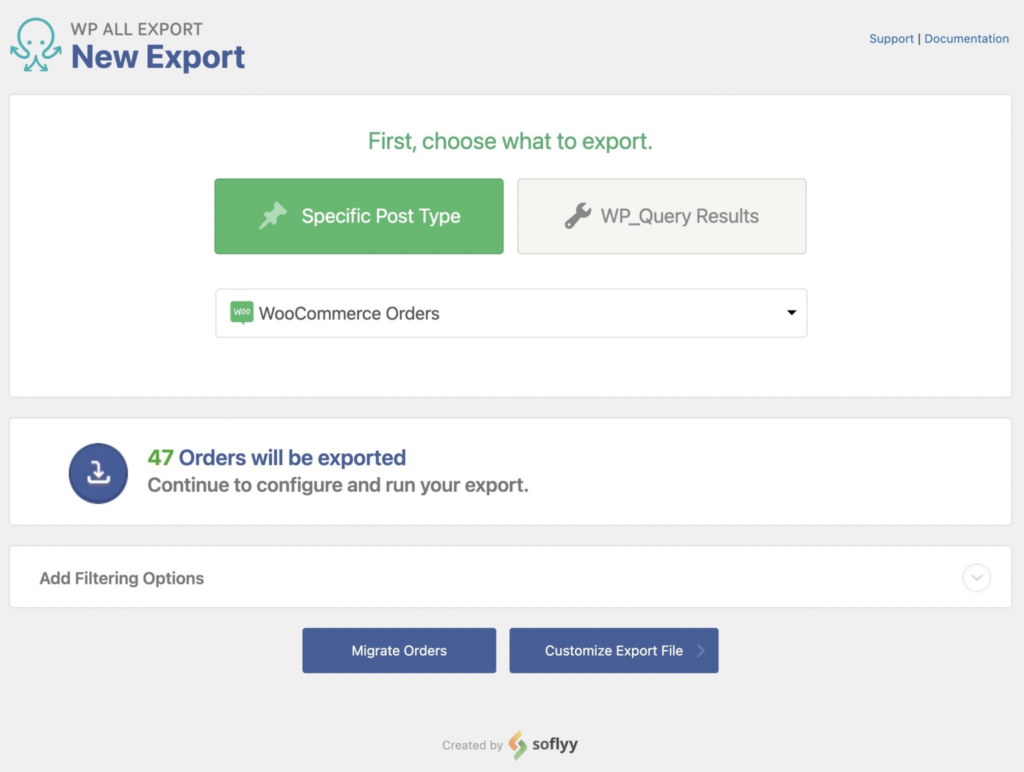
On the same page, click the Migrate Orders button to skip to the Export Settings step.
Step 2: Download the Order Export File
The Export Settings page provides a few options to customize how you want to export the order data. For more details on these options, refer to the same step in the advanced process explained below.
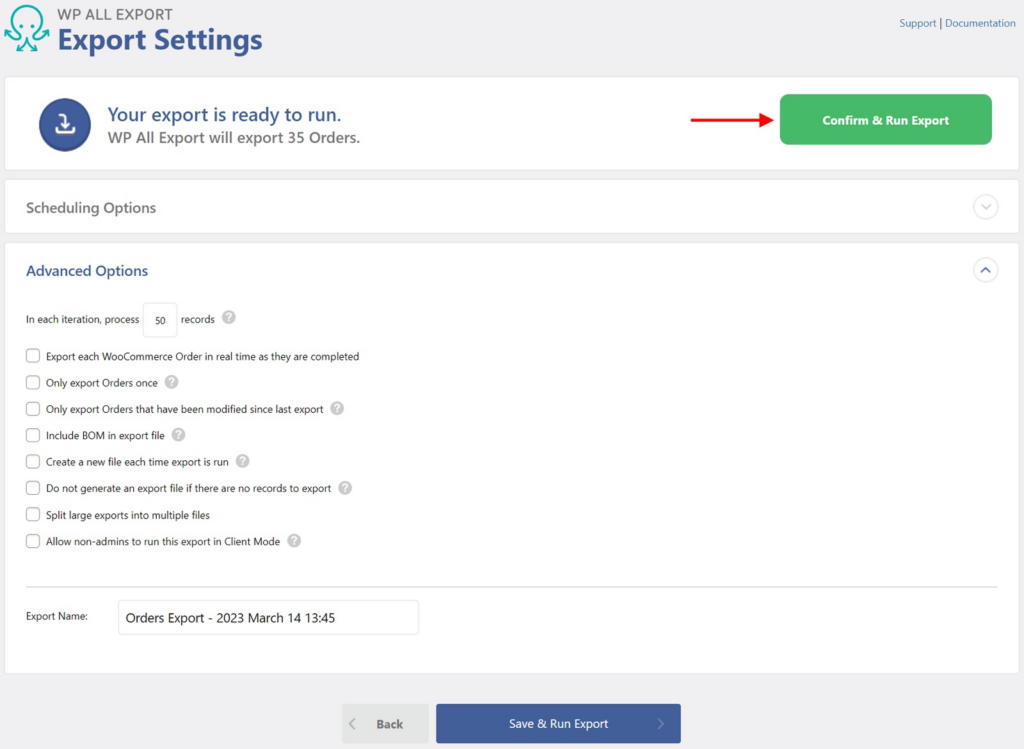
Next, click the green Confirm & Run Export button to proceed. WP All Export will run the export and offer you the option to download the order data as a CSV file or a Bundle ZIP.

Click the Bundle option in the Click to Download section to download your order data for migration.
Step 3: Start a New Order Import in WP All Import
On the destination site, navigate to All Import › New Import and upload the Bundle zip file you just downloaded.
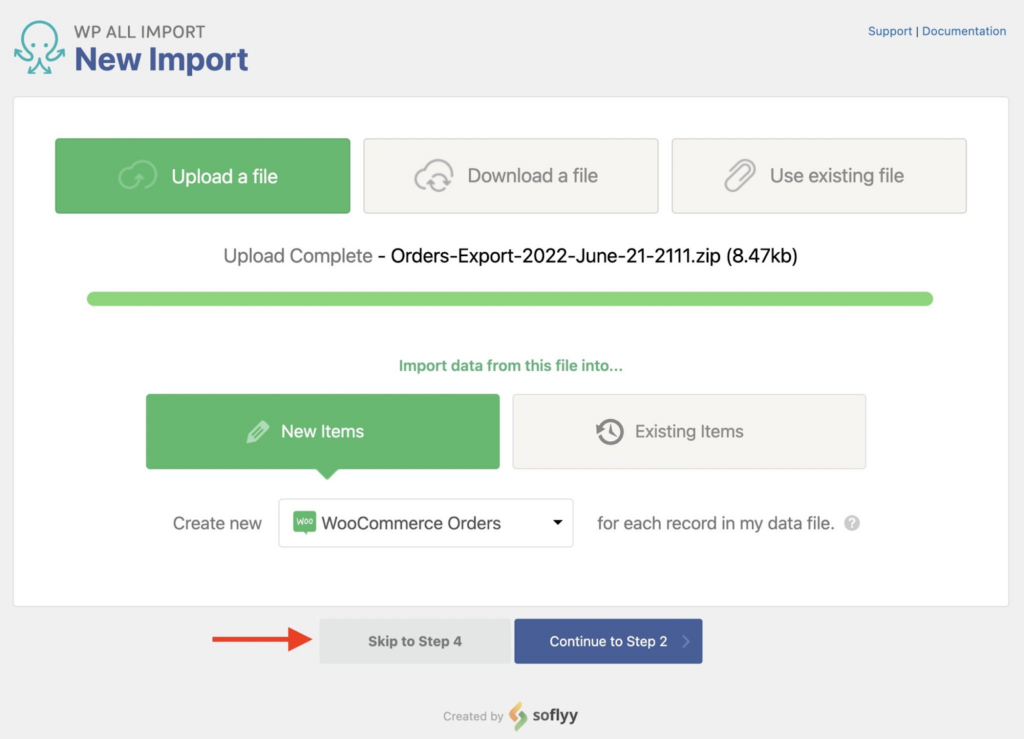
On the same page, click the Skip to Step 4 button to let WP All Import automatically map everything.
Step 4: Configure the Order Import Settings
Clicking the Skip to Step 4 button takes you to the Import Settings screen. The most important option here is to select the unique identifier for the incoming orders, which helps WP All Import differentiate between orders.
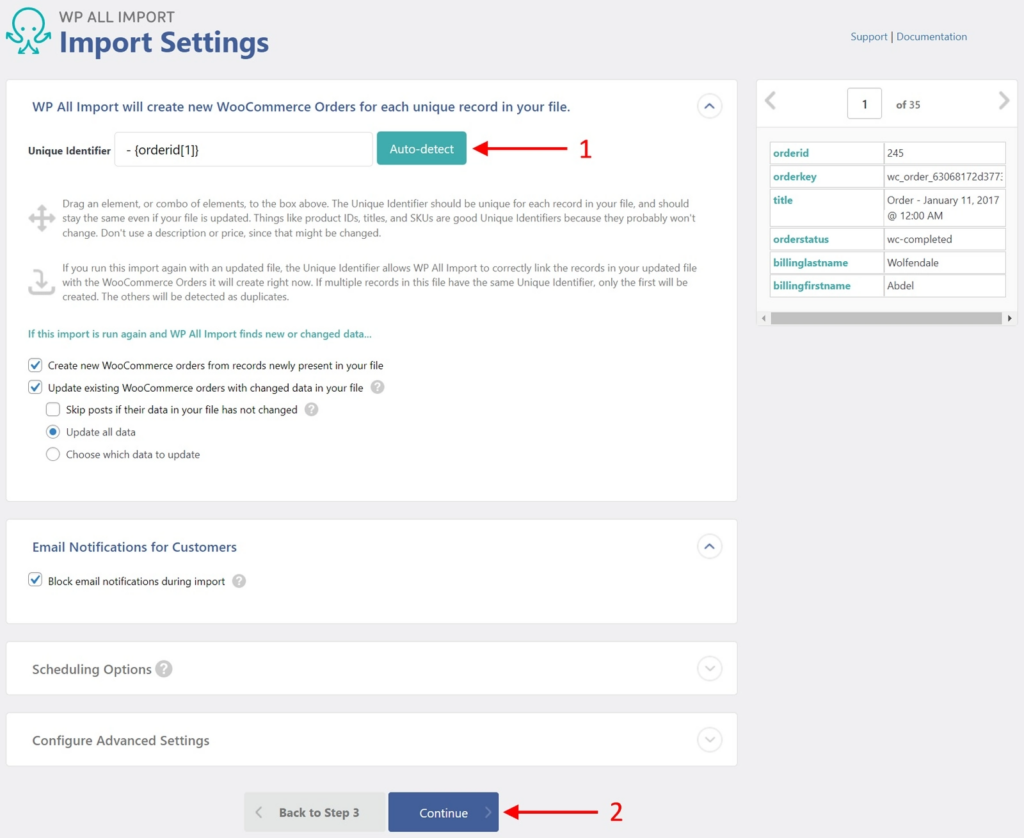
The easiest way to select this value is by clicking the green Auto-detect button. You can enter the identifier value manually, but the auto-detect feature usually does a great job of selecting the best identifier.
There are a few more settings on this screen, including sections for scheduling and advanced settings. You can leave these as they are and click the blue Continue button at the bottom.
Step 5: Run the WooCommerce Order Import
The last step in the WooCommerce order export import process is the Confirm & Run screen.
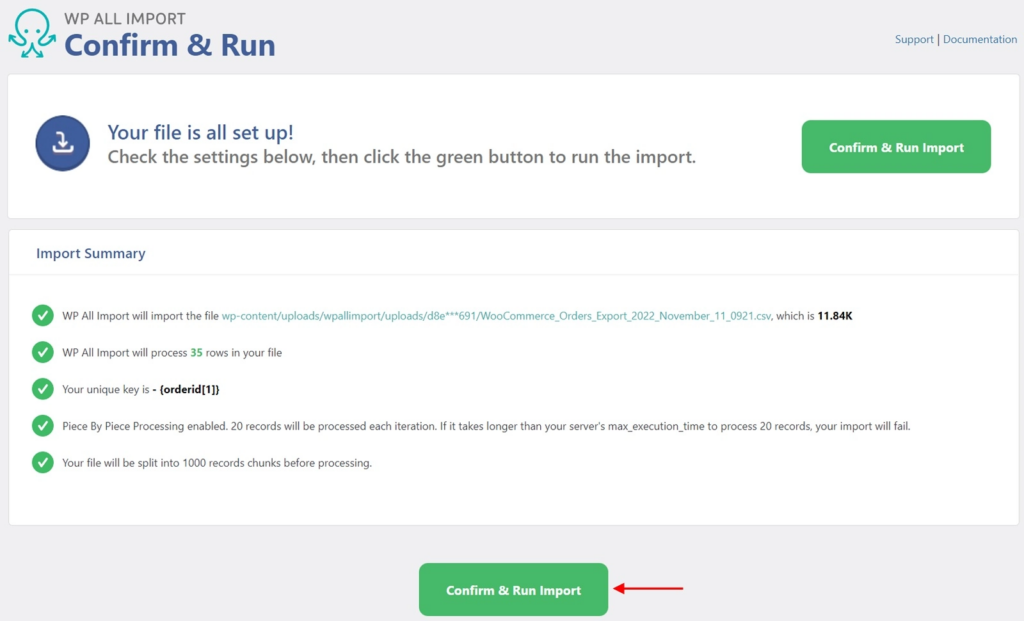
This screen has an Import Summary section that shows you what will happen during the order import process. If you spot a mistake, you can go back to the previous steps and correct any issues.
If everything looks okay, click the Confirm & Run Import button.
When the import process finishes, it’ll display the Import Complete confirmation.
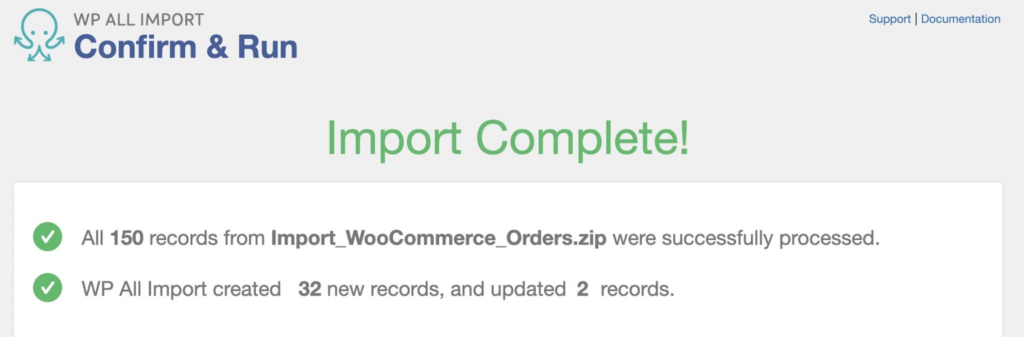
That’s it! You’ve successfully migrated orders from one WooCommerce site to another.
How to Export and Import WooCommerce Orders – Advanced Way
In addition to the quick process, WP All Export and WP All Import include several advanced order export options that allow you to customize order fields or modify the data on the fly.
We’ll divide the entire process into export and import stages. Let’s first look into the export process in detail.
How to Export WooCommerce Orders for Migration
The advanced export method provides you with powerful filtering and customization options to ensure that you migrate exactly the data you need. This flexibility is ideal for tailoring your export to specific requirements, whether it’s based on date ranges, customer details, or specific order statuses.
Step 1: Start a New Order Export and Filter the Order Data
Go to All Export › New Export on your source site and select WooCommerce Orders as the export type.
WP All Export includes powerful filtering options that let you select precisely which orders to migrate to another website. On the same page, expand the Add Filtering Options panel near the bottom.
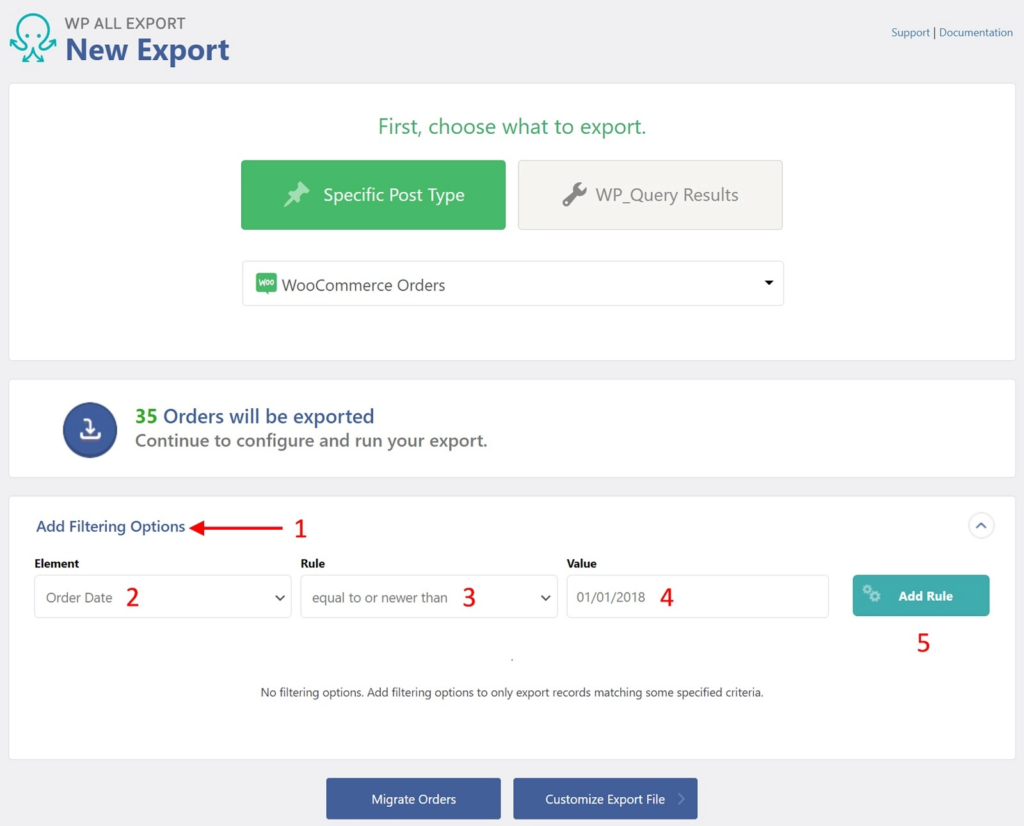
WP All Export will ask you to provide three details for each export filter: Element, Rule, and Value. For the first two options, click the box to select your choice from the dropdown menu. In the final field, enter the value by which you want to filter your orders.
Once you’ve added all three details, click the Add Rule button to apply your filter.
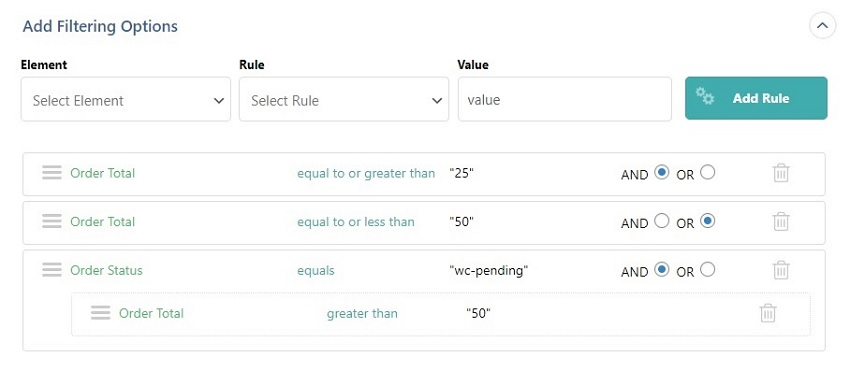
WP All Export also includes advanced filtering that lets you combine and nest multiple filter rules. You can combine multiple rules using the AND and OR logic and use the drag-and-drop interface to nest the filters.
Here’s how the combination of multiple rules and nested filters will look.
Once you’ve configured everything, click the Customize Export File button at the bottom to proceed to the next step.
Step 2: Select Your Order Export Fields and Choose Your File Format
WP All Export features a drag-and-drop interface that lets you easily select order fields from the Available Data section.
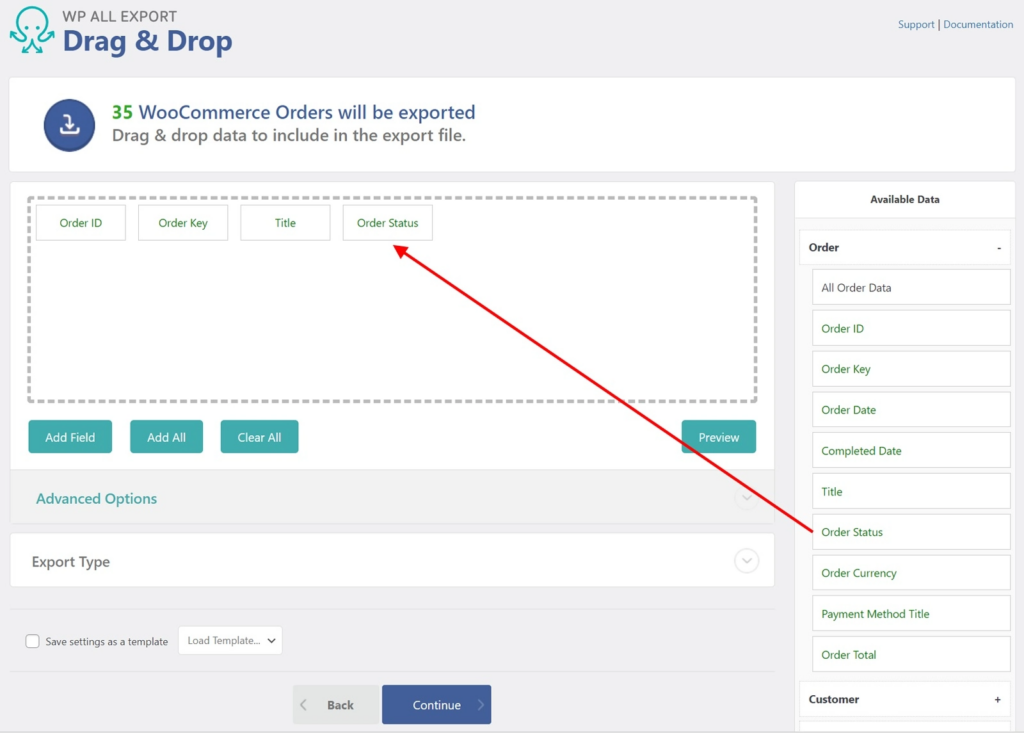
To add a field to your export file, expand one of the order details tabs and drag and drop the field into the export column selection area.
The various order-related categories include:
- WooCommerce Order Data
- WooCommerce Customer Data
- WooCommerce Order Items
- Order Taxes & Shipping
- Order Fees & Discounts
- Order Notes
- Order Refunds
- WooCommerce Order Custom Fields
- All other WooCommerce order fields
Repeat the same process till you’ve added all the fields that you want to migrate. You can use the same interface to rearrange or remove the accidentally added fields from the export file.
WP All Export also allows you to create custom export fields using PHP functions. You can learn more about this feature from the documentation article on the WP All Import website.
Additionally, WP All Export allows you to choose the file type for exporting your orders. On the same page, expand the Export Type panel and choose between spreadsheet and feed format.
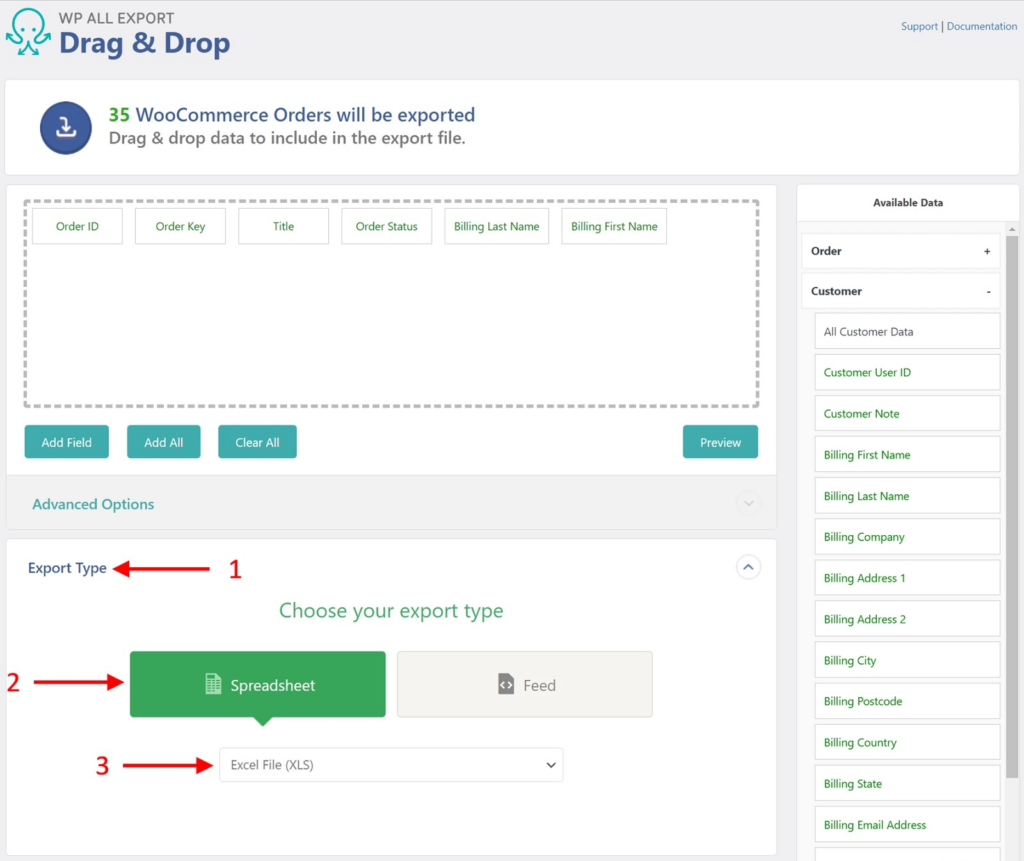
The spreadsheet option lets you export orders in Excel XLS, Excel XLSX, and CSV formats, while the feed option offers Simple XML and Custom XML options.
The Custom XML is a powerful option and lets you create feeds as sophisticated as you require.
Once you’ve selected your preferred file format, click the Continue button at the bottom to move to the next step.
Step 3: Download the Order Export File
The Export Settings screen allows you to configure advanced options. Some of the options you might find useful include:
- The number of orders to process in each iteration/batch.
- Split large exports into multiple files.
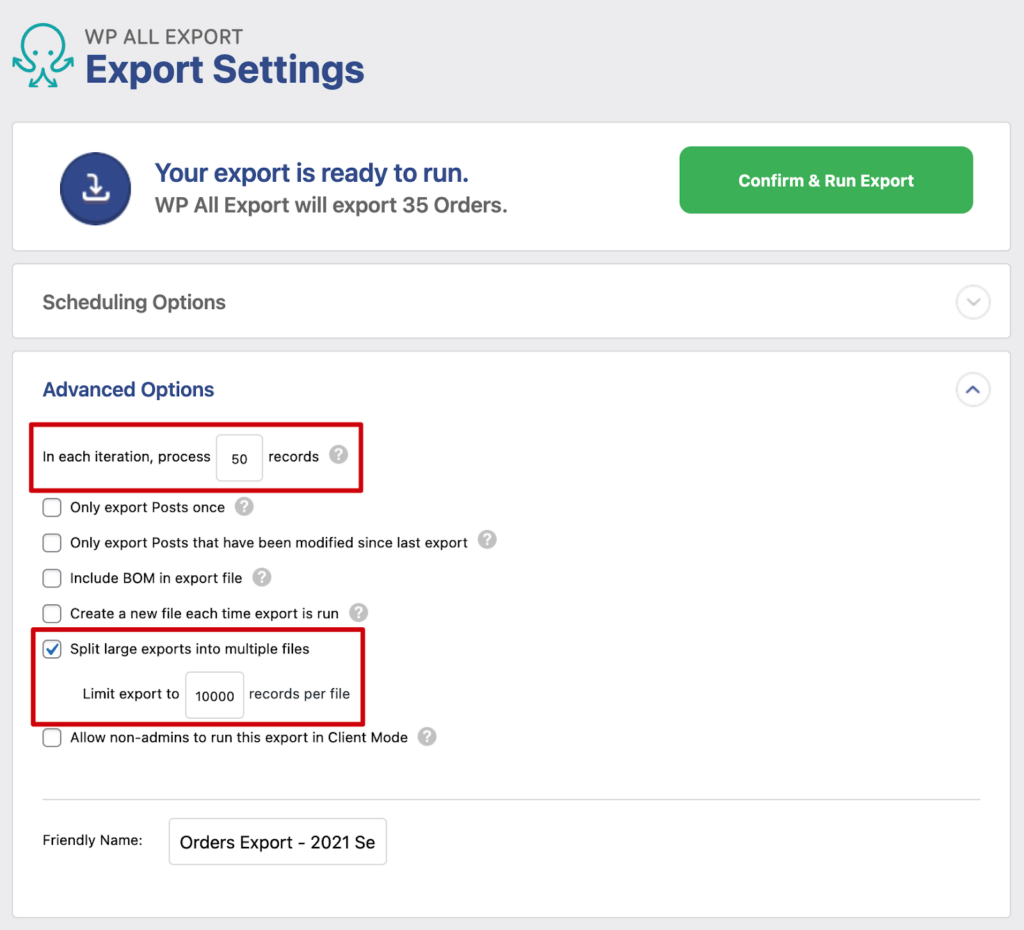
Both options help you avoid overwhelming your server’s resource limits and make it easier to manage large WooCommerce order exports.
The first option controls the batch size used to process the order export. If the export process fails due to a timeout, reduce this number and try again.
To avoid exceeding file-size limits, the second option allows you to split your export file into multiple files, each containing a maximum number of records.
After configuring these options, click the Confirm & Run button to proceed to the next step.
WP All Export will run the export process and offer you two options to download the orders. Depending on the file format you chose in the previous step, you’ll see an option to download the file in that format.
You’ll also get a Bundle option that makes it easy to migrate orders to another WooCommerce website using the sister plugin, WP All Import.
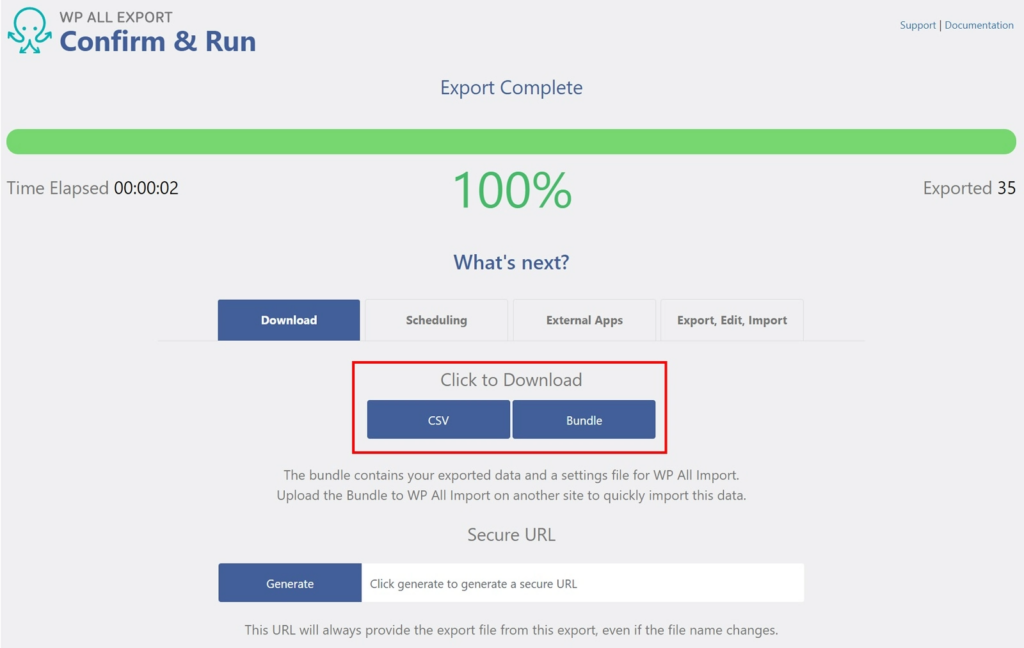
Click the Bundle option in the Click to Download section to download the bundle ZIP file.
Now that we have the WooCommerce order data, let’s look at how to import it to a new website.
How to Import WooCommerce Orders for Migration
WP All Export has a sister plugin, WP All Import, which handles the import side of the process. It includes the same user-friendly wizard that guides you through the import process.
Step 1: Start a New Order Import and Upload the Bundle File
On the destination site, go to All Import › New Import and upload the Bundle file that you just downloaded.
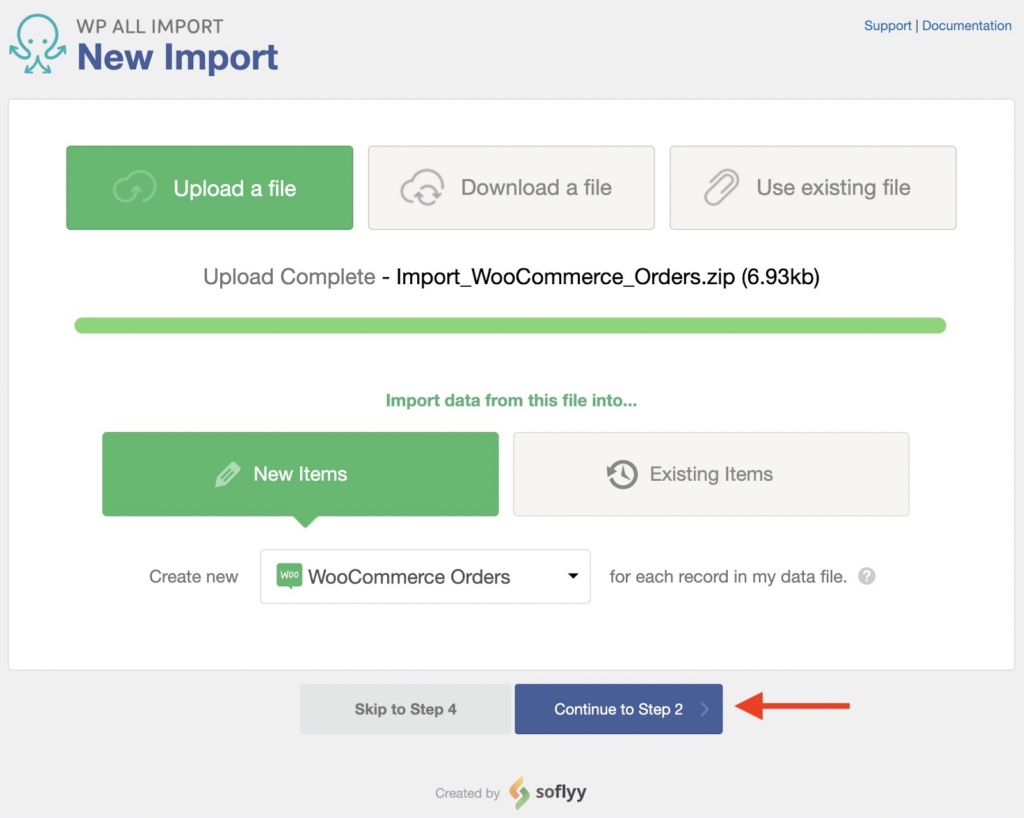
In addition to the upload option, WP All Import lets you import the file by downloading it from a URL or using an existing file on your server.
After you upload the file, select New Items and choose WooCommerce Orders as the target data type.
Next, click Continue to Step 2 button to proceed to the next step.
Step 2: Review the Order Import File
This screen allows you to assess whether the order import data has been correctly interpreted. You can use the arrows to navigate through the records. If you notice any errors, go back to Step 1, fix any issues with your file, and then try again.
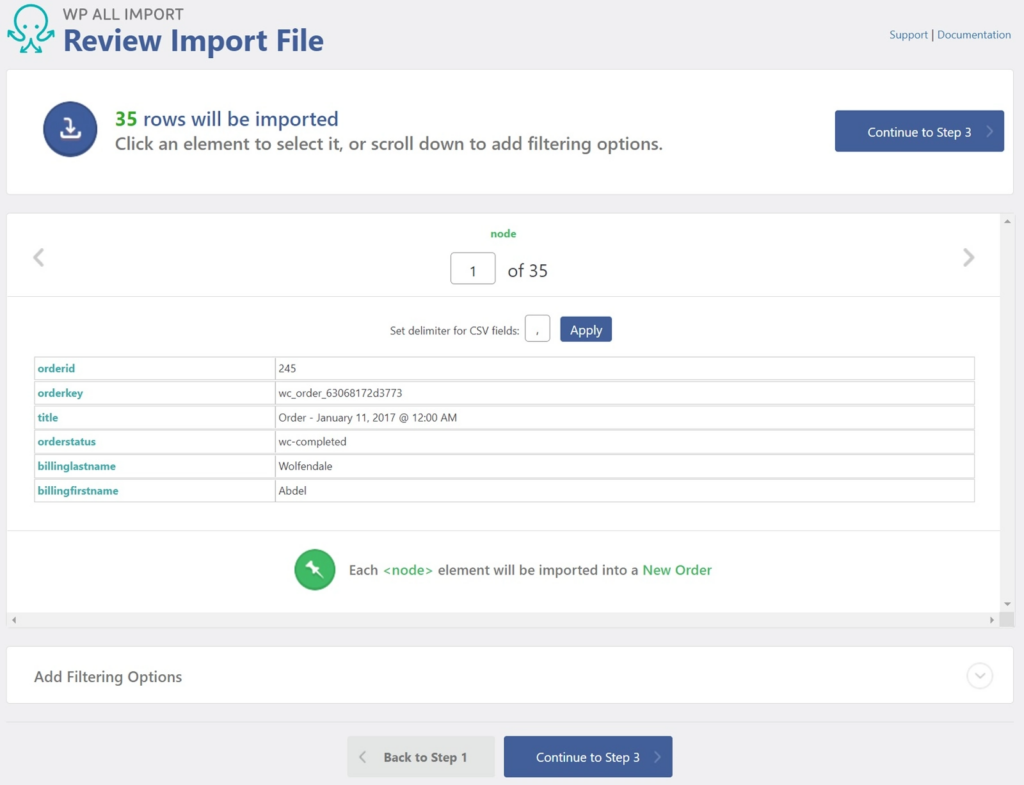
The same screen also includes a filtering option. It works similarly to the filtering we discussed in the WP All Export section.
It will ask you to enter three details for each import filter: Element, Rule, and Value. The only difference is that since the import data is outside the WordPress database, filters have to be applied using the XPath language.
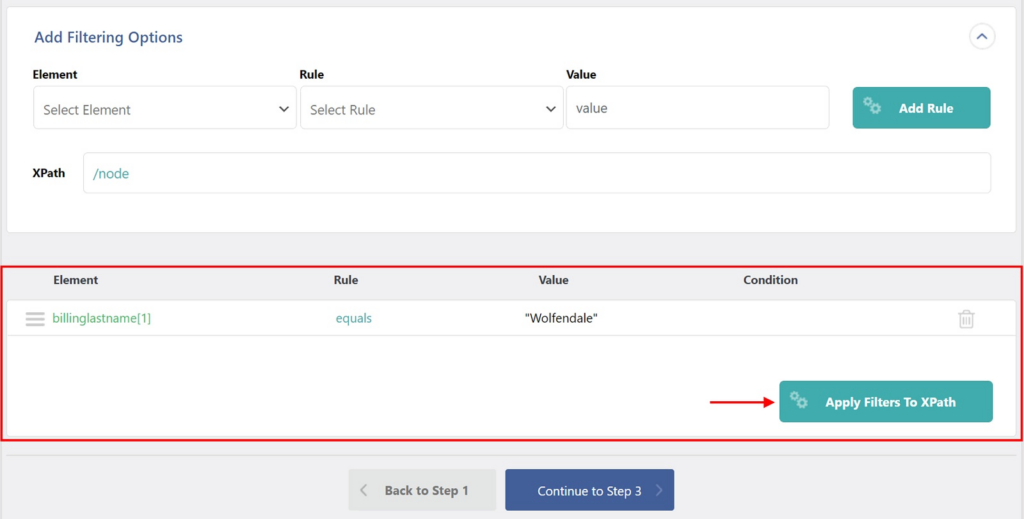
Apply the filters if needed, and then click the Continue to Step 3 button to move to the next step.
Step 3: Map the Order Data Elements to Their Target Fields
The next screen features a drag-and-drop interface that allows you to map the incoming data elements to the WooCommerce order fields.
To map the fields, simply drag the data elements from the panel on the right to the corresponding target fields on the left.
For example, in this screenshot, we’re populating the Order Status field in the Order Details section.
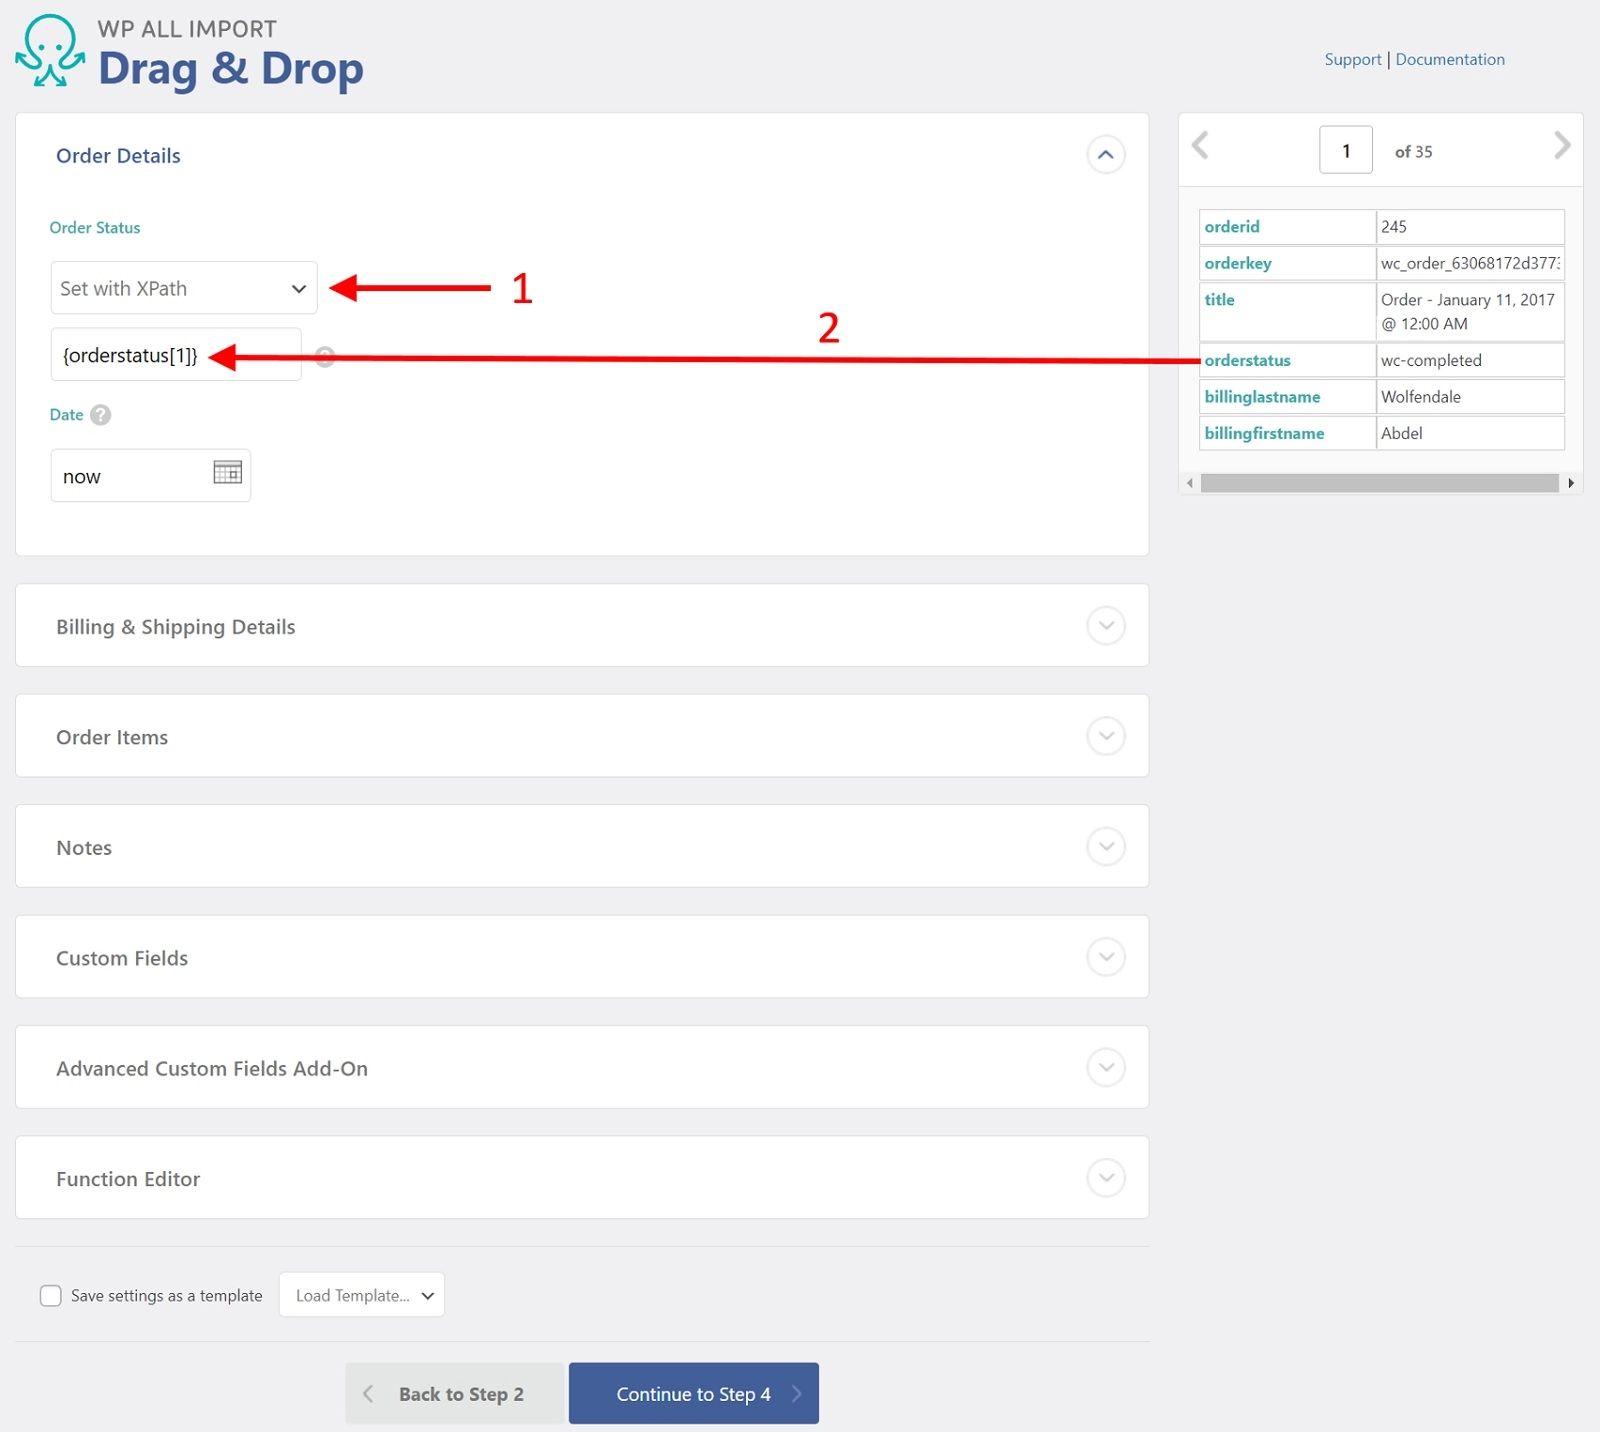
Choose Set With XPath and drag and drop the incoming orderstatus data element into the field edit box.
Repeat this process to complete the mapping of other fields. For more detailed information about mapping other order details, you can refer to the WP All Import’s documentation.

Once you’ve finished mapping the fields, click the blue Continue to Step 4 button at the bottom of the screen.
Step 4: Configure the Order Import Settings
The Import Settings screen appears next. This step allows you to set a unique identifier, which WP All Import uses to differentiate between orders.
The Auto-detect option usually works well in selecting the best identifier. However, you can manually enter the value if needed.
Scrolling down, you’ll find an option to disable sending email notifications to customers when orders are imported.
There are additional settings on this screen, including sections for scheduling and advanced settings. We won’t touch these options for now, but you can learn more about them here and here.
Next, click the blue Continue button at the bottom.
Step 5: Run the WooCommerce Order Import
The Confirm & Run screen allows you to run your import. It provides an Import Summary that details what will happen during the order import process. If you spot any mistakes, you can go back to the previous steps to correct any issues.
If everything looks good, click the Confirm & Run Import button.
Once the import finishes, the Import Complete screen will display details about how many new orders were imported and if any orders were updated.
Now, visit the Orders page in WooCommerce to check if all the details are correctly displayed.
That’s it! You’ve successfully exported and imported WooCommerce orders from one site to another.
Export and Import WooCommerce Orders From One Site to Another – Wrap-Up
WooCommerce does not have a built-in option for exporting and importing orders, which can be a significant limitation when you need to migrate data between sites.
WP All Export and WP All Import are the best plugins to fill this gap. They both work together to provide a seamless migration experience.
They both include key features such as:
- Powerful filtering options allow you to select exactly which orders to export and import.
- Easily select and customize the order fields you want to export using a drag-and-drop interface.
- Manage large order exports efficiently by processing them in batches.
- Automatically map data elements to WooCommerce order fields during import.
These features ensure that you can migrate your WooCommerce orders efficiently and without hassle. Ready to simplify and streamline the process of migrating WooCommerce orders? Download and install both WP All Export and WP All Import plugins.
WooCommerce Order Export Import – Frequently Asked Questions
How Do I Import Bulk Orders Into WooCommerce?
You can easily bulk-import orders into WooCommerce using the WP All Export plugin. Follow these simple steps:
- Go to All Import -> New Import in the WordPress main menu.
- Specify how you want to import your orders (i.e., upload a file, use a URL, etc.).
- Select your import file and choose your import target (i.e., WooCommmerce Orders).
- Use the Drag & Drop interface to map incoming fields to your WooCommerce target fields.
- Run the import.
How Do I Download All Orders From WooCommerce?
You can easily download all WooCommerce orders using the WP All Export plugin. Follow these four simple steps:
- Go to All Export › New Export and select Orders as the export type.
- Select your export fields using the Drag & Drop interface.
- Apply additional settings.
- Run the export and download your order export file.
Can You Export WooCommerce Orders to Excel?
You can easily export WooCommerce orders to Excel using the WP All Export plugin. Just follow these steps:
- Navigate to All Export › New Export.
- Select WooCommerce Orders as the post type.
- Configure the export columns using our Drag & Drop interface.
- Change the Export Type to Spreadsheet › Excel file.
- Run the export and download your Excel file.
How Do I Export WooCommerce Orders for Free?
WP All Export offers a free version available on WordPress.org that you can use to export WooCommerce orders for free. However, please note that the free version comes with limited features. For example, you cannot export order data directly to Excel or apply filters to select specific orders.