Are you looking to securely migrate user data with passwords to another website?
Transferring WordPress users, including their passwords, from one site to another can be a challenging task.
In this guide, we’ll walk you through the steps to export user data from a source site and securely import it into another WordPress site. Follow the steps below to ensure a smooth transition of your user data.
Which Plugin To Use To Import WordPress Users With Password
There are many WordPress plugins available that allow you to migrate user data along with passwords from one WordPress site to another. However, not all plugins are equal.
To ensure that you have a smooth transition, we’ll be using a powerful combination of two plugins:
- WP All Export: We’ll use this plugin to export user data from the source site, including passwords. It’s important to note that these passwords are hashed, which means they’re securely encrypted and not stored in plain text.
- WP All Import: Once we have the user data, we’ll use WP All Export’s sister plugin to securely import users along with their existing hashed passwords into another WordPress site.
You might wonder why we specifically chose these plugins. The simple answer is that the combination of both plugins offers several features, such as:
- Exporting all user data, including basic information, passwords, custom fields, and more.
- Powerful customization options, such as combining multiple fields or modifying data using custom PHP.
- Scheduling automatic export and import of user data between sites.
- Applying combined filter rules to export and import exactly the users you need.
- Migrating a large user base without slowing down your website.
These features make WP All Export and WP All Import an ideal choice for securely migrating WordPress users with their passwords intact.
Now that we understand which plugins to use, let’s explore what hashed passwords are and why they’re crucial in this process.
What is a Hashed Password in WordPress
A hashed password is a secure way of storing user passwords in WordPress. Instead of saving the actual password, WordPress converts it into a long string of characters that looks random.
This is a one-way process, meaning it’s impossible to reverse the process and reveal the original password. This security measure protects user accounts even if someone gains unauthorized access to the database.
During user migration, working with hashed passwords is important as it ensures that user accounts remain secure throughout the migration process, and users can continue to log in with their existing passwords on the new site without any additional steps.
Now that we understand what hashed passwords are and their importance in WordPress user migration, let’s dive into the steps of using WP All Export to export your WordPress users along with their passwords.
How to use WP All Export to Export WordPress Users with Passwords
WP All Export is a powerful WordPress plugin that simplifies the process of exporting various types of data, including user information.
Along with WP All Export, you’ll also need the Export Users add-on installed on the source site. Once you have everything set up, let’s look at how to export all user data from the source site, including passwords. Let’s start the process.
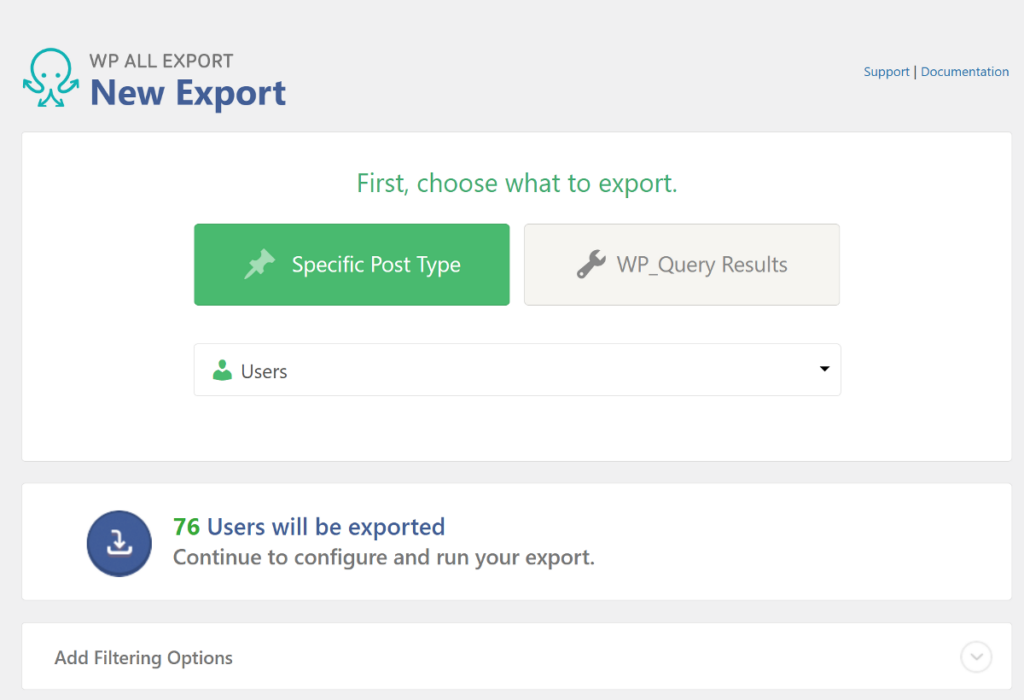
1. Start the Export Process and Select Migrate Users
To begin the export process, navigate to All Export › New Export from your WordPress dashboard. WP All Export provides a user-friendly wizard that breaks down the entire process into simple steps.
In the first step, select Users as the data type you wish to export. WP All Export will scan your site and display the total number of users available for export.
A notable feature of WP All Export is its ability to filter the data to be included in the export file. This is particularly useful if you want to exclude specific users from the transfer.
To apply filter rules, expand the Filtering Options panel and enter the necessary values. For example, if you want to exclude users with administrator access, you can set the filter that looks like the screenshot below.

After applying the filter, click the Add Rule button to update the user count available for export. The filtering option includes even more powerful features such as combining multiple rules or nesting the filter values. To learn more about these features, you can refer to WP All Export’s documentation on filtering exported data.
Since we’ll be importing this data to a new site, click the Migrate Users button to skip the export file customization step.
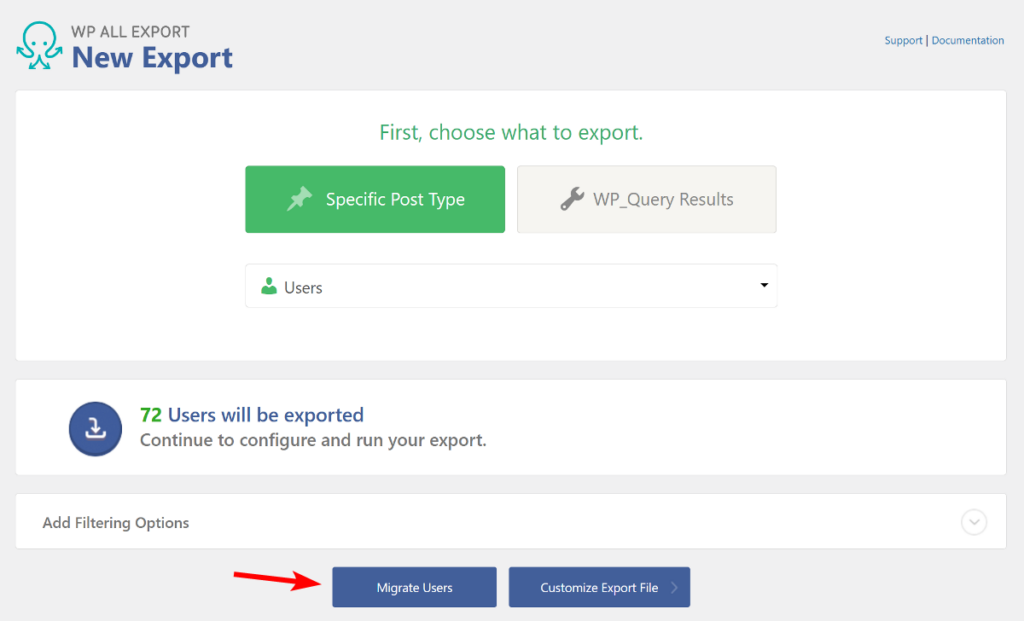
The migrate button will add all user fields from the source site and create an import template for WP All Import to map user fields on the destination site.
2. Apply Additional User Export Settings
Before downloading the data, WP All Export offers additional settings to optimize the export process. These settings are straightforward and can be enabled via checkboxes.
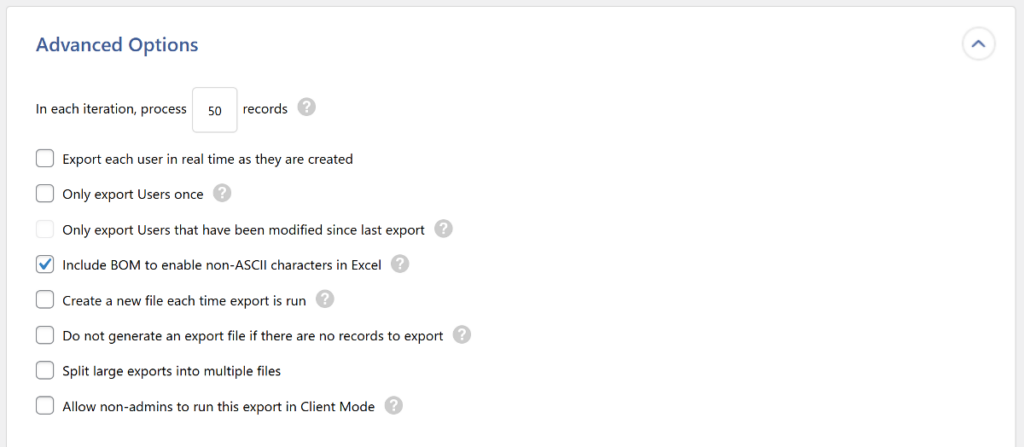
There is also an option to schedule the export, which is beneficial for automatic data transfers between sites. For more details, refer to WP All Import’s documentation on how to schedule WordPress exports.
Once you’ve configured the necessary settings, click the Confirm & Run button to initiate the export process.
3. Download the User Data File Containing Passwords
WP All Export will take a few minutes to complete the process. Once done, you’ll have two options to download the file:
- CSV File: This option will download the user data in a CSV format which you can open to verify and make changes..
- Bundle File: The Bundle option will download a zip file that contains the user data and an import template for WP All Import.
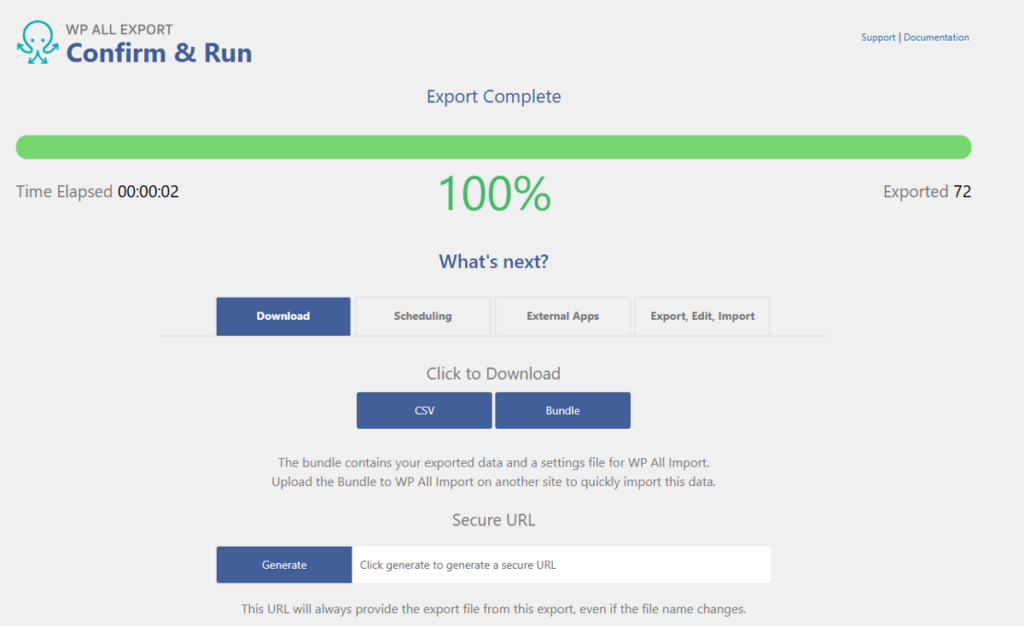
We recommend downloading the Bundle file to simplify the import process. Now that we have the user data from the source site, let’s look at the import process in detail.
How to use WP All Import to Securely Import WordPress Users with Passwords
WP All Import is a sister plugin of WP All Export and allows you to effortlessly map user fields using its drag-and-drop interface.
Before starting the import process, make sure that both WP All Import Pro and the Import User Add-on are installed on the destination website before proceeding.
You’ll also want to make sure that the destination website also includes any third-party plugins that were installed on the source website.
Once you have everything set up, let’s start the user import process.
1. Start the Import Process and Upload User Data
Start the import process by navigating to All Import › New Import from your WordPress dashboard.
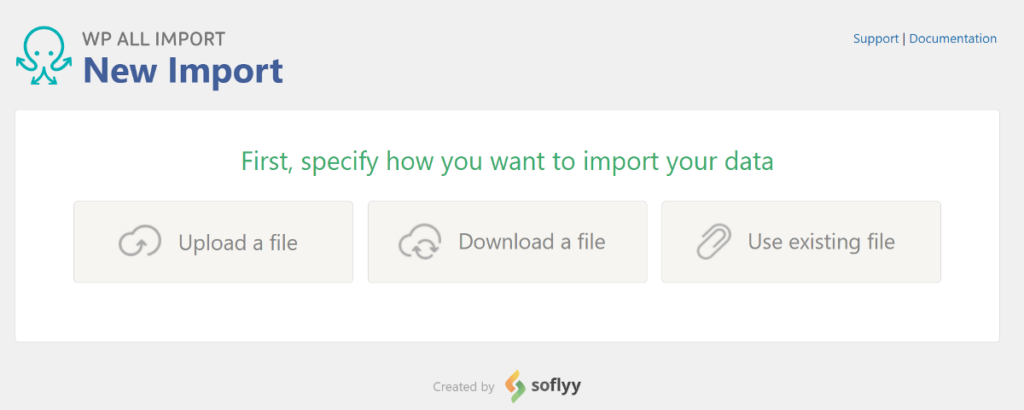
WP All Import provides three options to load the user data:
- Upload a local file from your computer.
- Download from an external URL (e.g., Google Drive or Dropbox).
- Use an existing file on your server.
Since we have the Bundle file on our computer, we’ll choose the Upload a file option. Once the file is uploaded, WP All Import will automatically select Users under New Items.
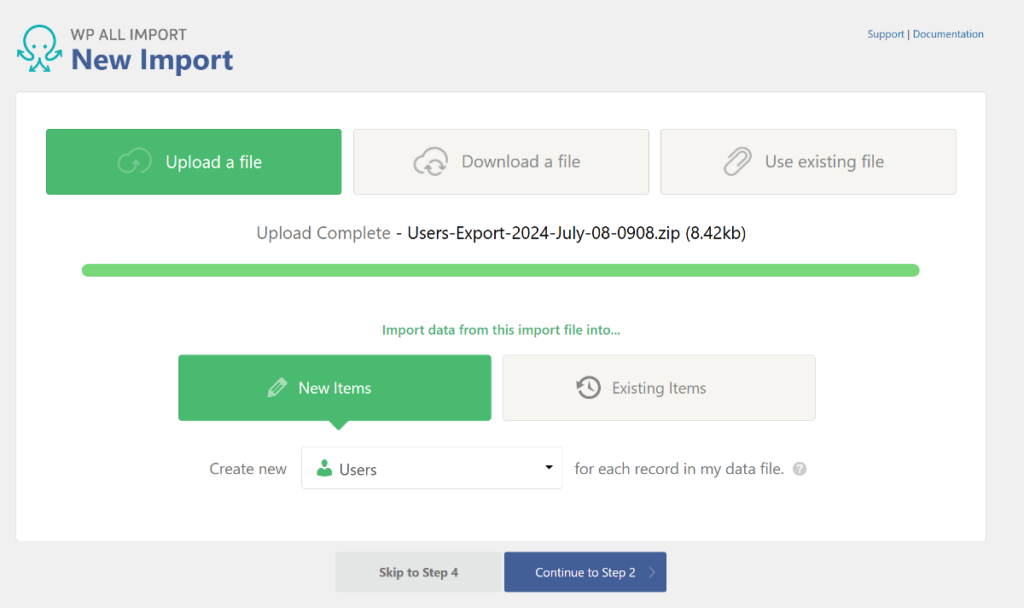
With the Bundle file, WP All Import will also automatically map the fields from your import file to relevant user fields in WordPress. This also includes the password field containing hashed passwords.
To make the import process easier, click Skip to Step 4 to move to the Import Settings step.
2. Configure Additional WordPress Import Settings
The Import Settings page is divided into multiple panels. Let’s look at each settings panel in detail.
- Unique Identifier: It allows WP All Import to distinguish between users and avoid duplicates. You can use the Auto-detect option to automatically set this up for you.
- Email Notification Setting: This option allows you to block WordPress from sending welcome emails containing a password reset link. Since we are importing data from another site and our import file includes the password field, we’ll check the box to block WordPress from sending the email.
- Scheduling Options: Similar to WP All Export, this option allows you to schedule imports at a specific time.
- Additional Settings: It includes options to optimize the import process, such as batch processing and file splitting.
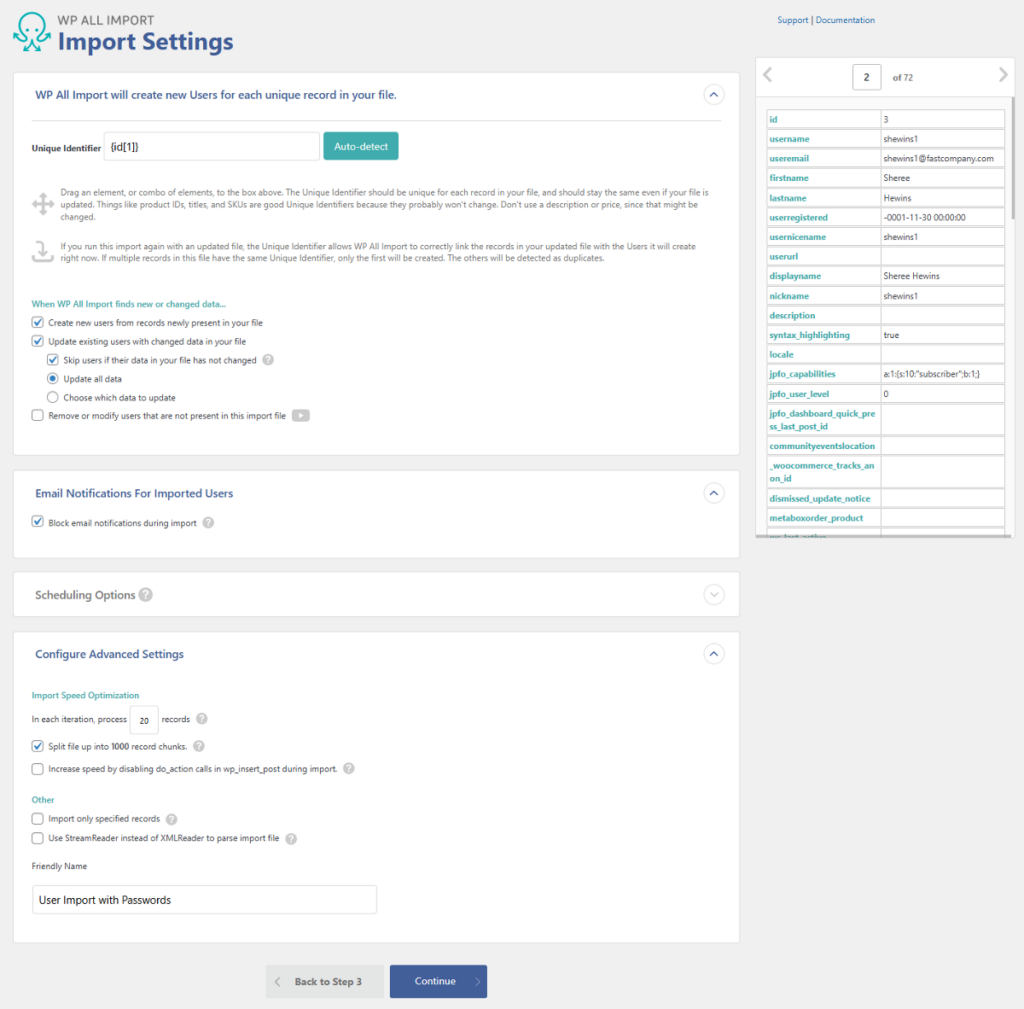
Once you have configured all the settings, click the Continue button to move to the next step.
5. Confirm and Run the WordPress User Import
This is the last step in the user migration process. Before running the actual import, WP All Import gives you a summary of all the steps it’ll take to import users.
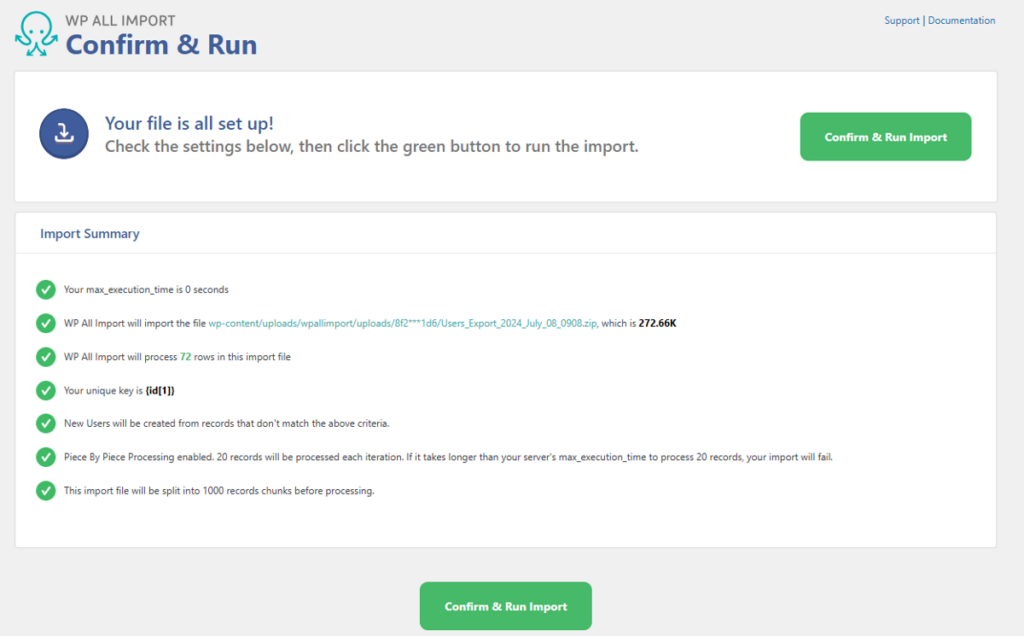
Go through each of the checklists to make sure the settings are correct and you’re importing the right users. If there are any mistakes, you can go to that specific step and modify the settings.
Once everything is correct, click the green Confirm and Run button to start the import. Depending on the number of users, WP All import will take a few minutes to complete the process.
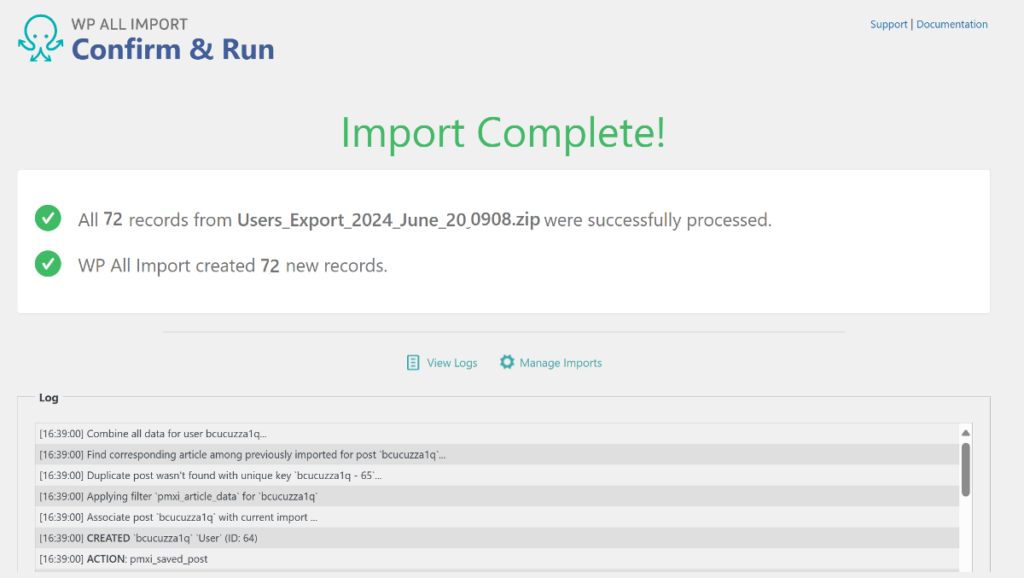
Once done, it will show you the import complete confirmation screen. It will also show you how many users were imported and if any of the existing users were updated.
That’s it! Isn’t it easy to import WordPress users with passwords using the WP All Import plugin?
WordPress Import Users With Passwords – Frequently Asked Questions
How Do I Export Users and Passwords From WordPress?
Follow these steps to add user data and passwords to CSV, Excel, or an XML file using the WP All Export plugin:
- Go to All Export › New Export and select Users as the export type.
- Use the Drag & Drop interface to select your export fields, including passwords.
- Run the export and download your export file.
How Do I Import Users Into WordPress?
WP All Import makes it easy to mass upload users from CSV, Excel, or XML files. Here’s how:
- Navigate to All Import > New Import.
- Load your file and select Users as the import type.
- Use the Drag & Drop interface to map data from your file to WordPress user fields.
- Run the import.
How To Upload Bulk Users in WordPress?
You can use the WP All Import plugin to bulk upload multiple users at once into your WordPress website. To learn more, you can refer to WP All Import’s documentation about the user import process.
How Do I Download WordPress Users As CSV?
WP All Export lets you easily export user data in multiple formats, with CSV being the default format. You can run the export wizard, follow the steps, and click the CSV button in the last step of the wizard to download the user data in a CSV format.