Do you want to run a WooCommerce auto import of products into your online store?
Automatically adding products to your store is one of the easiest ways to boost operational efficiency and scalability. It allows you to save significant time, update your store’s inventory in real-time, and eliminate the chances of unnecessary errors, among many other great benefits.
If you have been manually adding products to your WooCommerce store, or running manual imports often, this guide is for you! We will show you how to take your business productivity to the next level by leveraging the powerful import auto-scheduling feature offered by the leading WooCommerce import plugin —WP All Import.
Benefits of Automatic WooCommerce Product Imports
When running a WooCommerce store, efficiency is the name of the game. To stay ahead of your competitors and keep your customers happy, you must consistently update your store’s product catalog with the latest data from your supplier. This is where the auto-import of WooCommerce products comes in. It provides many valuable benefits for your online store’s operations, including:
- Saving Time: Manual product data entry or recurring manual imports can be time-consuming and inefficient. Automating the process frees up your time and allows you to focus on other important aspects of your business.
- Managing Products in Bulk: When you set up automatic WooCommerce product imports, you can easily update hundreds or thousands of products at once and quickly reflect the updates on your site.
- Reducing Errors: Creating individual products manually on your site leaves room for mistakes and data inconsistencies. Automating the product data import process from the source file prevents this.
- Updating Inventory in Real-Time: If you rely on third-party suppliers for order fulfillment, setting up automatic WooCommerce product imports allows for real-time updates of product data like pricing, stock levels, etc., to prevent selling at a loss or overselling.
- Adding Custom Pricing and Markup Rules: With auto-import plugins like WP All Import, you can create markup rules for your automatic product imports. These rules adjust the price of your products automatically during an import and eliminate the need for manual calculations.
- Scaling Your Product Catalog: As an online store owner, one of your main goals is to grow and expand your offerings to increase your profit margins. Auto imports allow you to achieve this scale without a proportional increase in the time or effort needed to run the business.
As you can see, prioritizing WooCommerce auto import of products is important for any store owner keen on operating more productively while saving time and effort. WooCommerce’s native importer tool does not support automating product imports, so you must use a third-party plugin to achieve this.
In the next section, we will discuss the best plugin for WooCommerce auto import of products, and show you how to set it up in minutes!
How To Automatically Import Products Into WooCommerce
For this guide, we will use the leading WooCommerce product import plugin, WP All Import, to demonstrate how to auto-import products into WooCommerce.
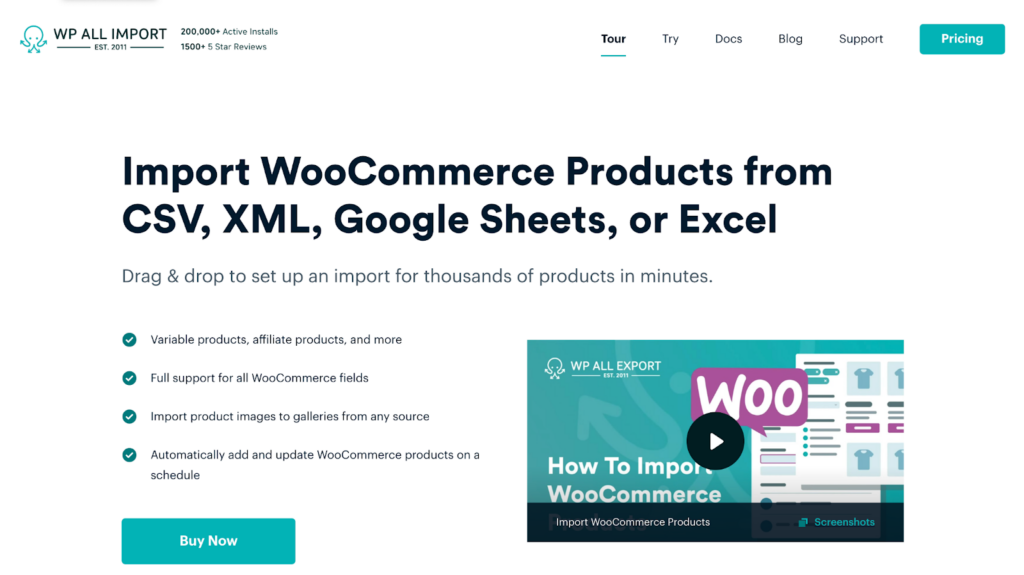
The WP All Import plugin is a best-in-class import plugin that makes bulk-adding WooCommerce products to your store a breeze. Featuring a user-friendly drag-and-drop interface and a sleek 5-step import wizard, it is well-suited for beginner and advanced WordPress users alike. With the plugin, you get complete, granular data control, allowing you to customize your imports to your needs.
Some of the most exciting features you can expect with the WP All Import plugin include:
- Import scheduling to automate and run your product imports on a defined schedule.
- Support for importing products from multiple file sources including Excel, CSV, XML, and Google Sheets.
- Advanced filtering functionality for importing only specific products to your store.
- Support for importing all types of WooCommerce products, including variable products.
- Support for importing all WooCommerce product data, including custom fields.
- Integration with popular plugins like ACF, WPML, Toolset Types, Meta Box, etc.
- Modification of import data on the fly using PHP functions, and more.
With this robust set of features and functionalities, it’s easy to see why WP All Import is our choice for this article. We will now dive into how to install the plugin and set up a WooCommerce auto import of products for your store.
1. Install WP All Import and WooCommerce Import Add-On
The first step in the auto-import setup process is to purchase and download the WP All Import plugin and its WooCommerce Import Add-On. The WooCommerce Import Add-On is needed to map all WooCommerce product fields.
After downloading both the core plugin and the add-on, go to your WordPress admin dashboard, and from the menu, navigate to Plugins › Add New Plugin.
Start by uploading the WP All Import plugin. Click Upload Plugin › Choose file and select the plugin file. Next, click Install Now › Activate Plugin and the plugin will be installed successfully on your site.
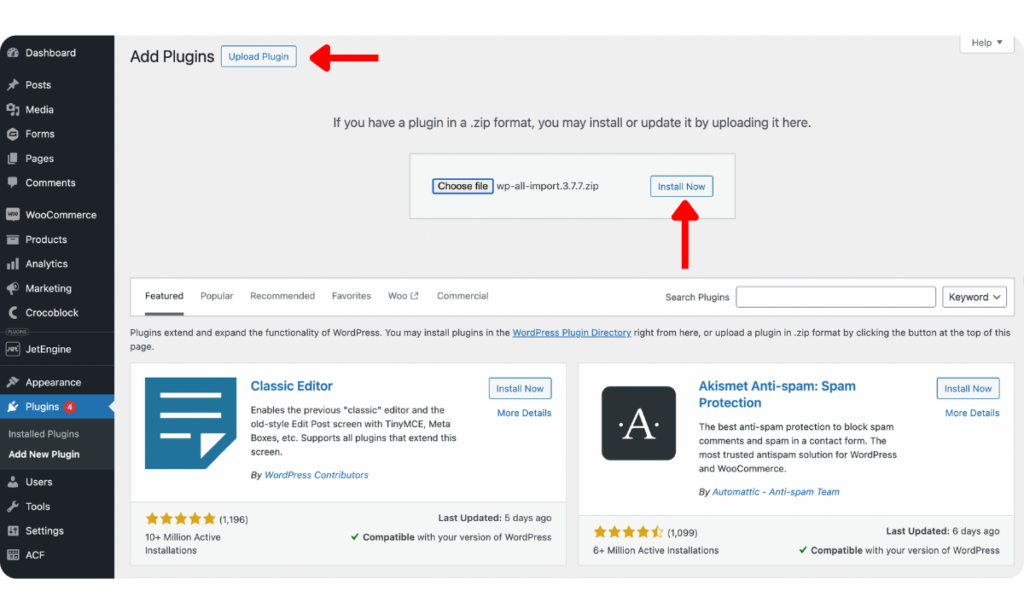
You can install the WooCommerce Import Add-On by following the same steps. Once both have been installed and activated on your site, you can create your first WooCommerce auto import of products!
2. Start a New WooCommerce Product Auto Import
To start a new WooCommerce automatic product import, go to All Import › New Import from your WordPress admin dashboard. This will bring you to the New Import screen, where you can load your product data.
WP All Import provides three options for loading your product data. These are: Upload a file, Download a file, and Use existing file.
To set up a WooCommerce product auto import, you can only select the options to Download a file (from a URL or FTP/SFTP) or Use existing file. If you upload a file from your PC, you cannot set up an auto-import of products during the import.
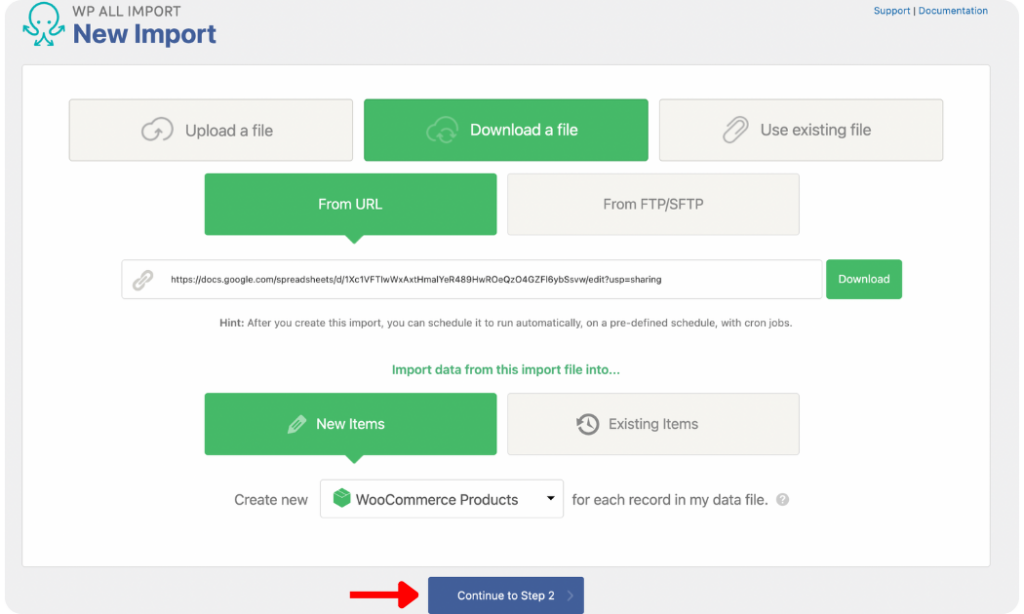
For this article, we will choose Download a file and then select From URL to load our product data from a Google Sheets file. The file link has been made publicly accessible so WP All Import can easily read and download the product data.
Once the link is added in the input field, click Download and the data will be loaded. Next, under New Items, select WooCommerce Products as the import type and click Continue to Step 2 to proceed.
3. Review Loaded WooCommerce Product Data
On the Review Import File screen, you can review the loaded product data to double-check that WP All Import correctly detected all the records in your file. To review, navigate between records with the gray arrows on the left and right of the screen.
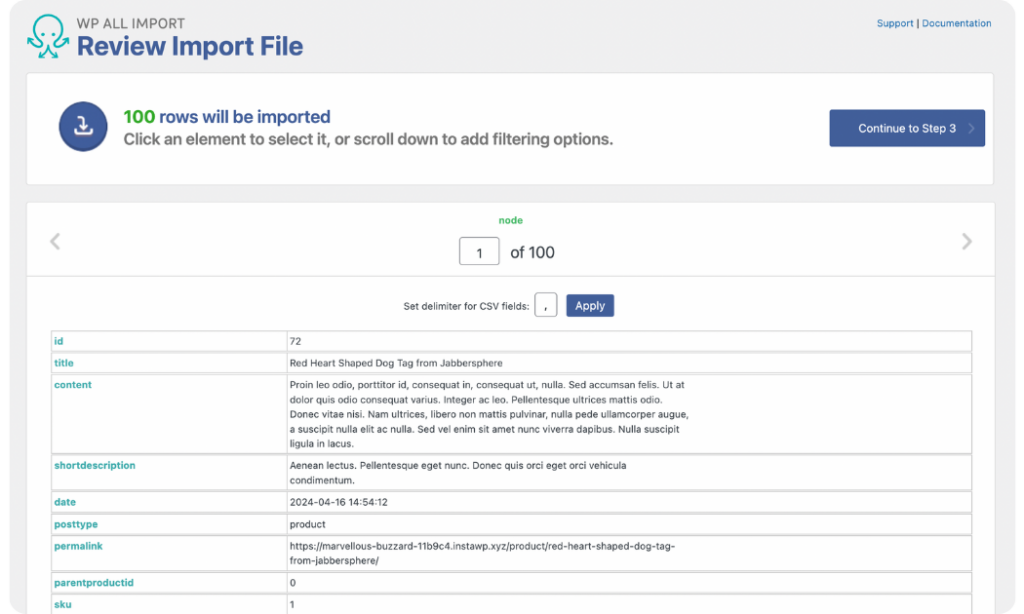
On the same page, scroll down to access the Manage Filtering Options panel. Within this panel, you will find settings to create filter rules and import only products that meet specific requirements.
For example, if your product catalog contains a mix of product types such as simple, variable, and grouped products, you can create a filter to import only simple products to your store. To do this, select the Element containing the product type data, choose equals as the Rule, and set the Value as simple (or whatever name you used to represent simple products in your import file). Next, click Add Rule and then Apply Filter to XPath. Your filter will immediately be created.

After you have reviewed your import file and created relevant filters, click Continue to Step 3.
4. Map Product Data Columns to WooCommerce Fields
The Drag & Drop screen is the most important step in the import process. Here, you can seamlessly map your incoming product data to product fields. WP All Import provides a user-friendly drag-and-drop interface to simplify mapping for WordPress users at any experience level.
Map Title & Description
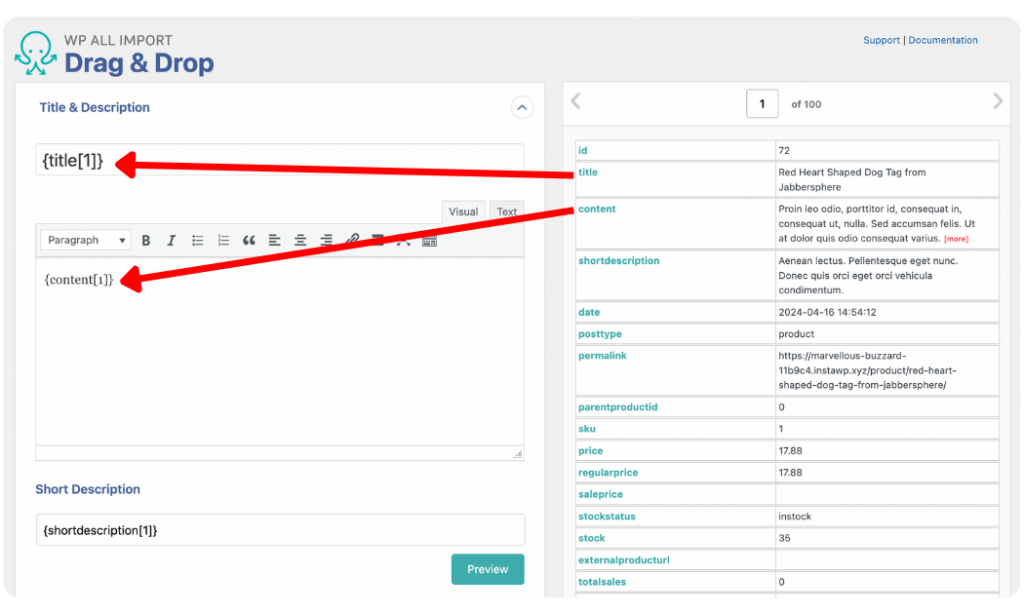
From the Title & Description panel, you can map the title and description of your product by dragging the elements from your incoming data file on the right and dropping them into the corresponding fields.
Map WooCommerce Add-On Panel
The WooCommerce Add-On panel lets you map the standard WooCommerce product fields just like you would fill them out if you added a product to your site manually.
The first thing to do on this panel is to set your Product Type. WP All Import supports importing all the standard WooCommerce product types including simple, grouped, external/affiliate, and variable products.
Once you have set your Product Type, the product tabs and mapping fields will update accordingly. If your selected Product Type is simple or variable, the General tab will display the SKU, Regular Price, and Sale Price fields. Map them by dragging and dropping the elements from your incoming data file.
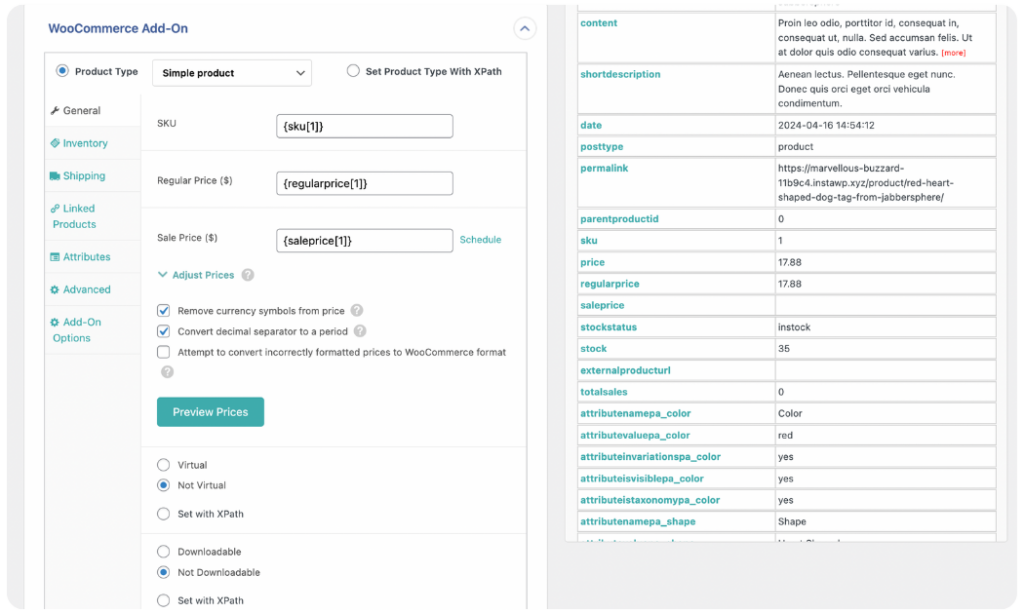
Below the mapping fields, you will see some settings with WP All Import’s default selections. These selections are standard and work well for most imports, but you can change them if necessary.
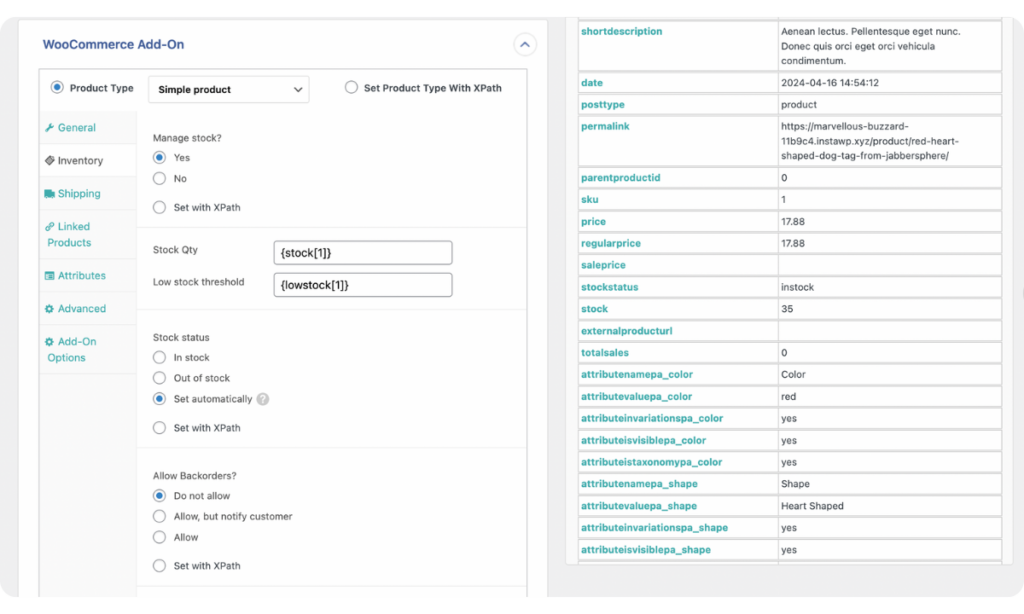
Open the Inventory tab to manage the settings for your product stock. Under Manage stock?, select Yes if you want to manage your stock levels. Next, map the Stock Qty and Low stock threshold fields. Like the General tab, additional settings are provided for managing your product stock below the mapping fields. Tweak them if needed, or leave the default selections.
The Attributes tab is another important tab under the WooCommerce Add-On panel. You can map your product attributes here by dragging and dropping the Name and Value elements from your incoming data file. You can also specify from the Advanced selections if the attributes should be used in variations, set as visible, used in a taxonomy, or auto-created as new terms.
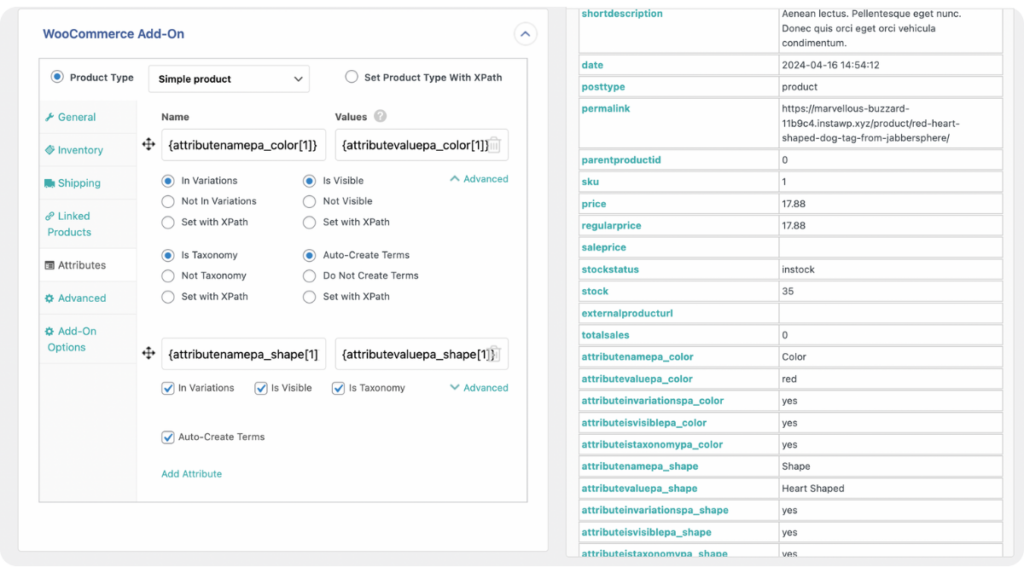
If relevant to your import, open the other product tabs (Shipping, Linked Products, Advanced) and map the fields before moving on to the next panel.
Map Product Images
The Images panel offers three ways to import your product images. You can Download images hosted elsewhere, Use images currently in Media Library, or Use images currently uploaded in wp-content/uploads/wpallimport/files/.
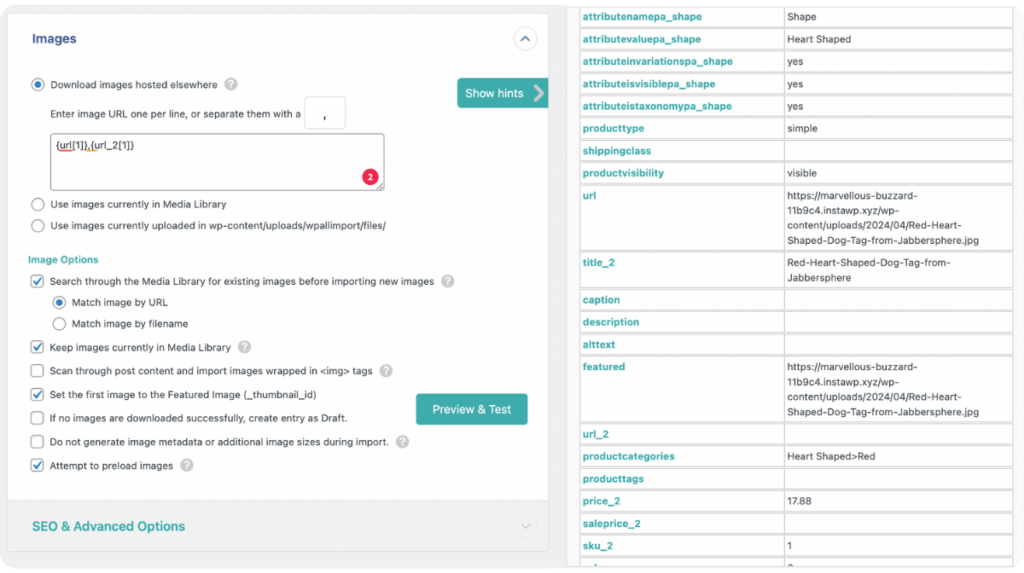
Choose the option that best applies to your import and map the image element(s) to the provided field.
The section for Image Options displays settings for speeding up your image import and specifying the featured and gallery images. We recommend keeping the default selections. But if you experience issues importing your product images, you can tweak the settings and re-run the import.
Map Taxonomies, Categories, Tags
Open the Taxonomies, Categories, Tags panel to map your product categories and tags. Select the Product categories and Product tags options to reveal their mapping fields and settings.
For Product categories, you can select one of three options — Each product has just one category, Each product has multiple product categories, or Products have hierarchical (parent/child) product categories. Once you choose an option, the mapping field will appear. Drag and drop the category element to map it.

Similar options apply to Product tags. You can choose if Each product has just one tag, or if Each product has multiple product tags, and map the field that appears after your selection.
Map Other Panels
WP All Import provides other panels for add-ons such as Custom Fields, Meta Box Add-On, Advanced Custom Fields Add-On, JetEngine Add-On, etc., to allow you to map additional product details. However, we will not detail those panels in this article.
Once you have mapped all applicable fields for your product import, scroll to the bottom of the screen and click Continue to Step 4.
5. Enable Automatic Scheduling of Product Import
This page allows you to apply additional settings to your product import, including scheduling it to run automatically.
First, click the Auto-detect button to set a Unique Identifier for your import. The Unique Identifier helps WP All Import prevent product duplicates by correctly linking records in your current import to those in an updated file if you re-run the import.
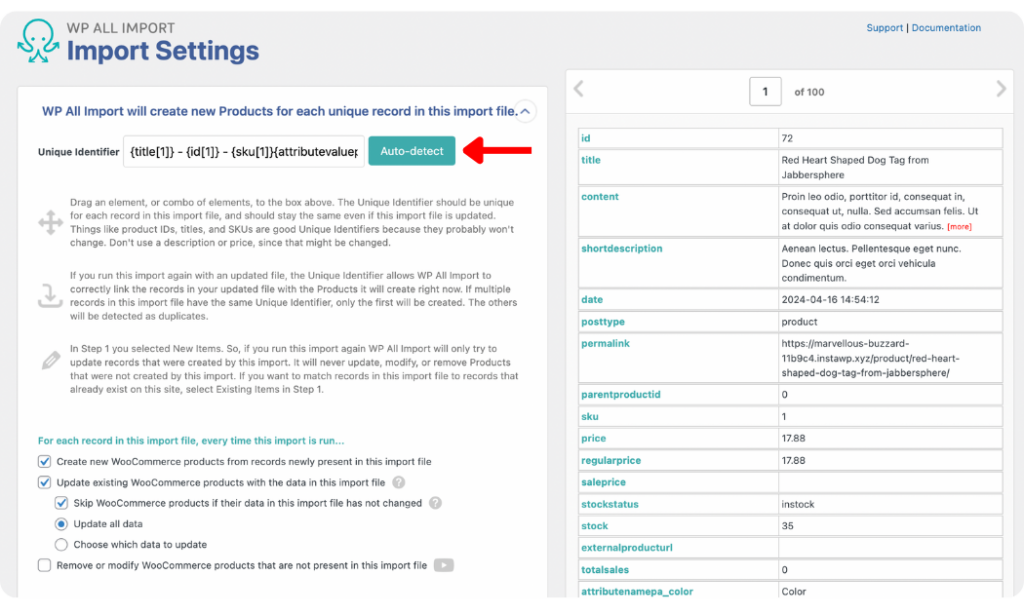
Below, you will see the settings to dictate how WP All Import should handle records in your import file every time the import runs. You can choose if products should be created, updated, or removed during each import. Modify the settings for your import as needed.
Scroll down the screen to reveal the Scheduling Options and Configure Advanced Settings panels.
The Scheduling Options panel offers settings to control your WooCommerce auto import of products. WP All Import allows you to choose between Automatic Scheduling or Manual Scheduling of your imports.
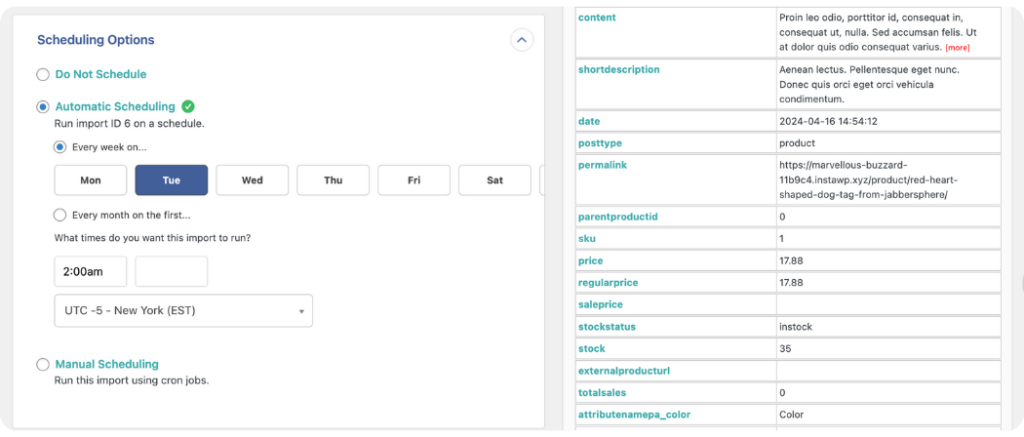
Automatic Scheduling is a paid service offered by WP All Import. It lets you set up recurring imports with just a few clicks directly from the Import Settings screen. All you need to do is select the days of the week (or month) the import should run and include the times. The service will then contact your site at the scheduled time(s) to run your import and ensure they are completed correctly.
The Automatic Scheduling service costs $19/month and allows you to run unlimited recurring imports on unlimited sites.
The Manual Scheduling option, on the other hand, uses manually created cron jobs on your site’s server to schedule and automate your import. WP All Import provides the two URLs needed to set this up — a trigger URL and a processing URL. You will also find the import secret key listed below the URLs.
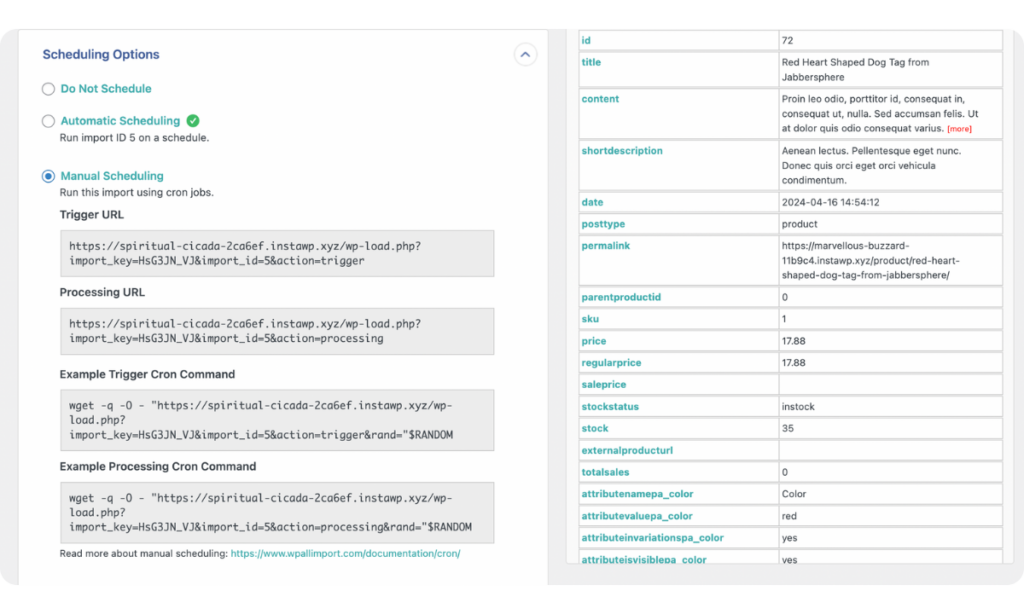
The trigger URL should be set up to run within the timeframe you want your import to recur. For example, you can set it to run every week or every 12 hours.
The processing URL should be set to run every two minutes to ensure your import is fully run and completed successfully. This is because many hosts set a maximum script execution time, and it may time out before your script finishes processing.
Setting up cron jobs can be a bit technical, so if you do not want to deal with the technicalities, you can ask your web developer to handle this aspect or opt for the Automatic Scheduling service.
You can also learn more about manual scheduling by reading the Scheduling Imports Using Cron Jobs guide.
Open the Configure Advanced Settings panel to access settings to optimize the speed of your imports and prevent time-outs.
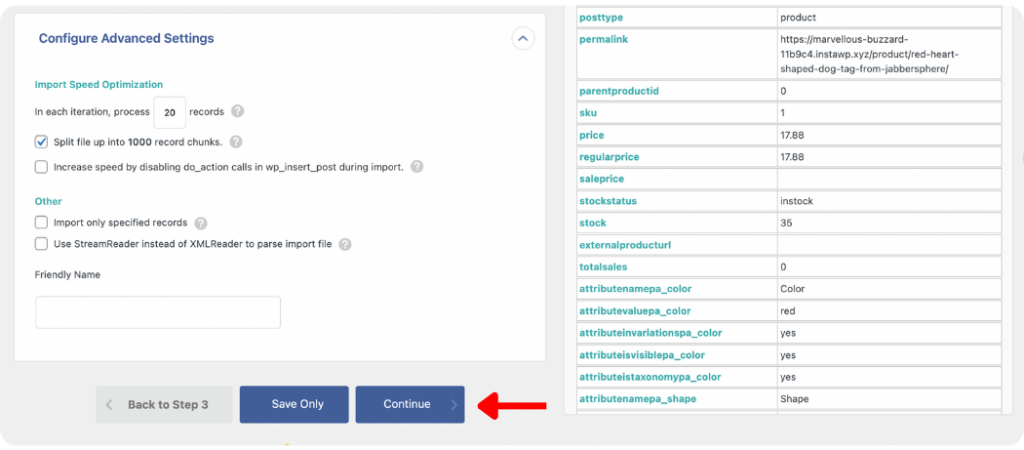
We recommend keeping the default settings and only tweaking them if you encounter issues during your initial import.
Click Continue at the bottom of the screen to proceed to the final step.
6. Run and Enable Auto Import of WooCommerce Products
The Confirm & Run screen is the final step of setting up your WooCommerce auto-import of products with WP All Import.
WP All Import summarizes your import settings on this screen so you can double-check to ensure the right settings have been applied. If there are any mistakes, go back and fix them before running the import.

However, if everything is as it should be, click the Confirm & Run Import button to start the import process. Once the import is completed, you will see an Import Complete notification.
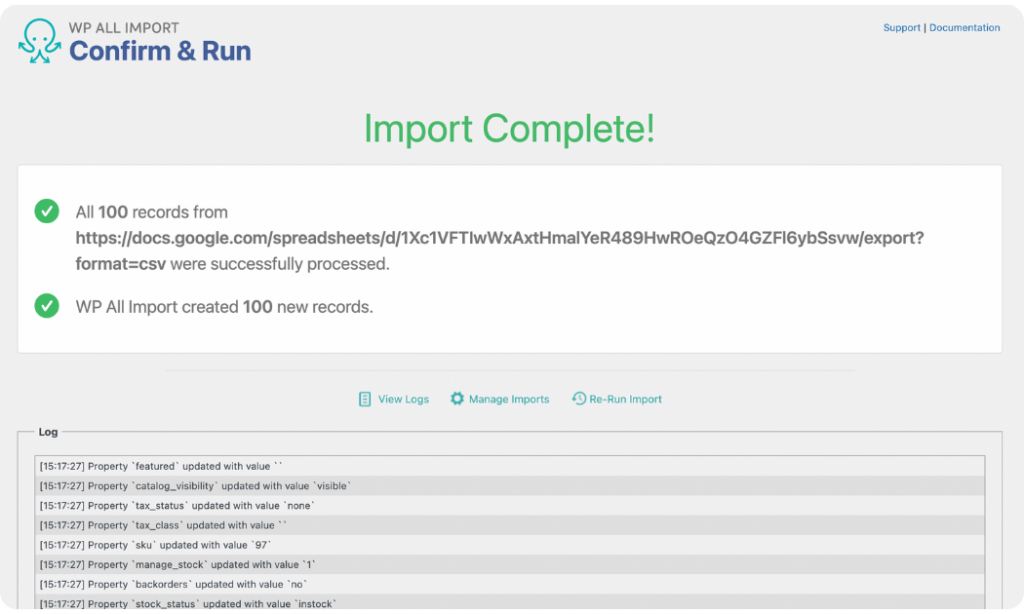
To verify, navigate to Products › All Products to see a list of your imported products.
Subsequently, the import will run automatically on the days and times you set during the import creation process, saving you time and increasing your operational efficiency.
WooCommerce Auto-Import Products – FAQs
1. How Do I Import a Product in WooCommerce Programmatically?
You can import a product in WooCommerce programmatically using the Manual Scheduling feature that the WP All Import plugin offers. When you create an import of your WooCommerce products with the plugin, you can select the Manual Scheduling option to create cron jobs on your server for scheduling and automating the import of products to your site. If you want a more convenient way, it also offers an Automatic Scheduling option that lets you do this without any programming.
2. What Is the Best Product Importer for WooCommerce?
The WP All Import plugin is the best product importer for WooCommerce. It offers a user-friendly drag-and-drop interface with robust import features to meet all your product import needs. It also supports importing all WooCommerce data types such as orders, customers, reviews, etc., as well as WordPress post types such as pages, users, posts, etc. This makes it the only import plugin you will ever need to handle all imports on your WooCommerce site.
3. How Do I Import Products From Excel to WooCommerce?
You can import products from WooCommerce to Excel by installing the WP All Import plugin and its WooCommerce Import Add-On.
- Go to All Import › New Import.
- Upload the Excel file for your product import.
- Select WooCommerce Products as the import type.
- Map the incoming data to the product fields on the Drag & Drop screen.
- Run the import and your products will be imported successfully to your store.
4. How Can I Import Products From Any Website to My WooCommerce Website?
You can import products from any website to your WooCommerce store with the WP All Import plugin. The plugin supports importing products from multiple sources and file formats including CSV, XML, Excel, and Google Sheets (URL). The interface adjusts depending on your import file type, allowing you to map the product data before running the import. Once the import is run, the products will be added to your store.
