Are you a WooCommerce store owner looking for an easy way to import variable products into your WooCommerce store?
We get it. Manually importing variable products into your WooCommerce store can be quite a painstaking task. If you run an online store and sell hundreds of products that have multiple variations such as size, material, color, etc., the last thing you would want to do is spend hours adding each product variation one after the other. That’s valuable work time lost, and let’s not talk about how extremely boring that would be!
In this article, we will show you step-by-step how to import variable products in WooCommerce easily by using our best-in-class WP All Import plugin.
Table of Content
- Variable Products vs Simple Products
- Benefits of Importing WooCommerce Variable Product
- How to Easily Import WooCommerce Variable Products
Variable Products vs Simple Products
WooCommerce allows store owners to sell various kinds of products to customers. Two of the most commonly used product listing options are the Variable Products & Simple Products.
Variable products, as the name implies, allow you to sell products that have different variations (or options) with prices varying based on the shopper’s selection.
An example of this would be a store that sells mobile phones. You could offer an iPhone 14 with various options for color and storage space. One customer could be interested in purchasing a midnight (black) iPhone 14 with 256GB of storage space while another may prefer the purple version with a 512GB storage capacity. Their selection becomes the determinant of the amount that they pay at checkout.

On the other hand, simple products allow you to offer unique products with single Stock-Keeping-Units (SKUs) and just one price option e.g. art, antiques, books etc.
Benefits of Importing WooCommerce Variable Product
So, why would it make sense for you to import variable products in WooCommerce? Here are a few key reasons:
- Saves You Time: Manual data entry is extremely time-consuming and wastes valuable productive time. When you bulk upload variable products into your WooCommerce store instead of adding them manually, you can operate your business more efficiently and channel your time into doing more important work.
- Allows You To Edit Multiple Products at Once: If you’ve ever needed to update the prices of numerous products on your WooCommerce store, then you would know that making the changes one by one is no fun. A more intuitive way to edit many product variations in WooCommerce at once would be to use a spreadsheet to make changes and then import the variable products back into your WooCommerce store in one go.
- Prevents Unnecessary Mistakes: When you try to add data for many variable products in WooCommerce, you can mistakenly add the wrong variation details for some products – especially when you get exhausted from the repetitive nature of the task. Bulk uploading your WooCommerce variable products allows you to reduce the chances of human errors occurring.
- Saves Labor Costs: If you run a WooCommerce store with thousands of variable products, you may need to hire a team to assist with adding these products to your store or updating them as needed. This becomes an unnecessary extra operational cost. Bulk uploading your variable products allows you to save on this avoidable cost.
In short, if you are keen on running your online store with more efficiency and precision to grow and scale your business at cost, importing your product variations in WooCommerce is the way to go.
How To Easily Import WooCommerce Variable Products
While there are several options for importing WooCommerce variable products, the WP All Import plugin stands out as the best plugin for WooCommerce store owners to easily import variable products in WooCommerce.
The plugin features a modern and intuitive drag-and-drop interface that is dead simple to use, whether you are a beginner or an advanced WooCommerce store owner.
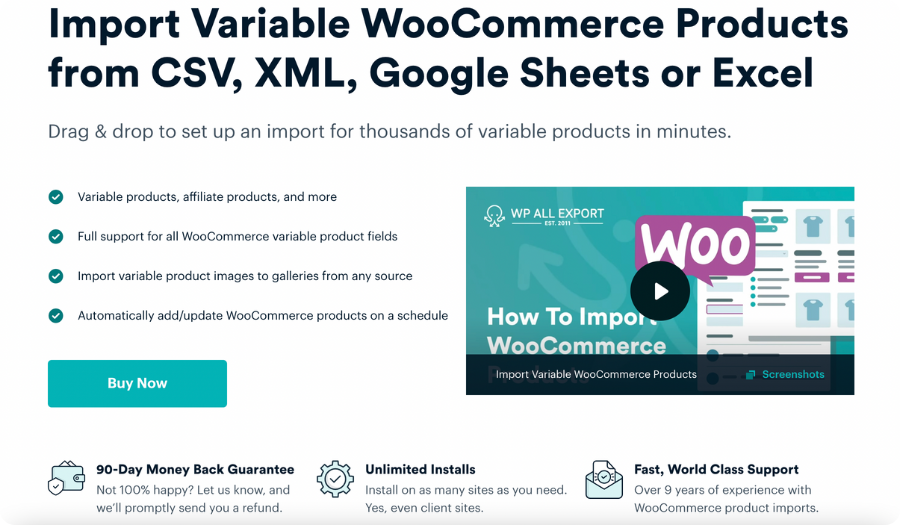
Some of the exciting features you get with the WP All Import plugin include the flexibility of:
- Importing your variable product data in XML, CSV & XLSX file formats
- Importing a huge number of variable products at once
- Customizing every aspect of your variable product import data – you have full control!
- Automating your imports via our scheduling service or cron jobs
- Applying filters to select which specific products you want to import
If you’re ready to start importing your variable products in WooCommerce with ease, let’s show you how to do it using the WP All Import plugin!
1. Install WP All Import and WooCommerce Add-On
The first step you need to take to get started importing product variations in WooCommerce is to install the WP All Import plugin and the WooCommerce Import add-on on your WordPress site.
To install the WP All Import plugin and the WooCommerce Import add-on, you will need to first purchase and download them from our website.
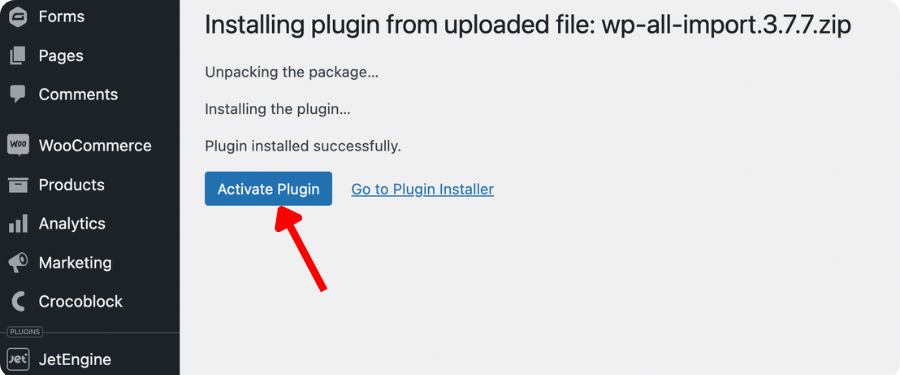
Once you have downloaded both plugins, log in to your WordPress admin dashboard and navigate to Plugins > Add New Plugin.
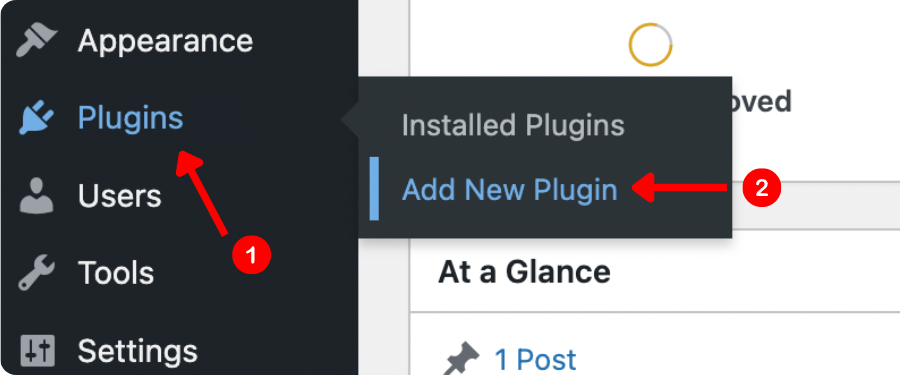
Next, click the Upload Plugin button at the top left corner, then Choose File to upload the downloaded WP All Import plugin file. Click the Install Now button to begin the plugin installation process.
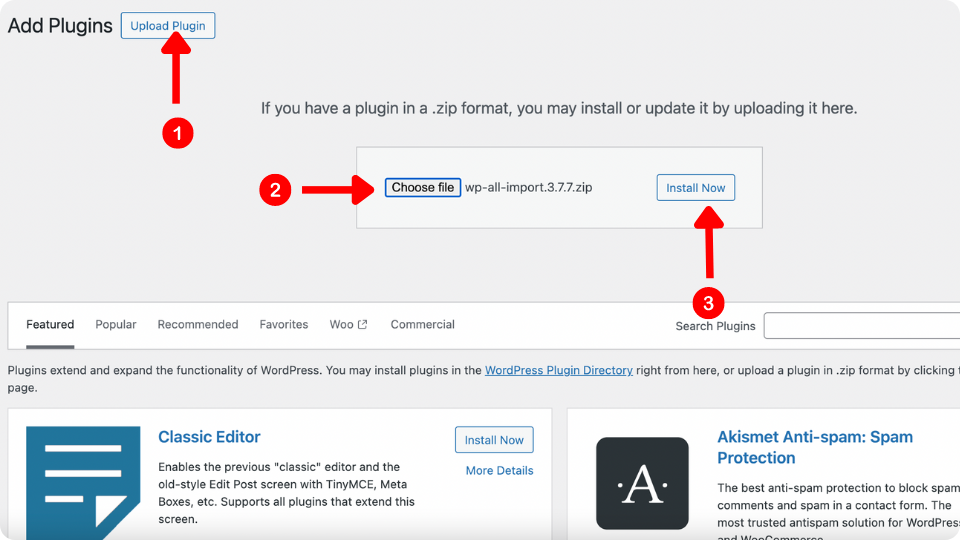
Once the process is completed, click Activate Plugin on the screen that appears and the plugin will be ready for use!
Repeat the same steps to install the WooCommerce Import add-on.
2. Create a New Variable Product Import
Now that both plugins have been installed and activated, the next step is to create a new variable product import.
From your WordPress admin dashboard, navigate to All Import > New Import and decide how you would like to upload your data. There are three options available for data import which are:
- Upload File – This option lets you import WooCommerce variable products in CSV, XLS, XLSX or XML formats directly from your computer.
- Use Existing File – This option allows you to use an existing file that was added from a previous import.
- Download a File – With this option, you can download your import file directly from an external source such as Google Sheets or Dropbox via a URL or FTP/SFTP.
Once you have uploaded your variable product data file using any of the options, you should select the New Items option.
The Existing Items option is used when you want to update specific data pieces, such as price, or stock. It’s not recommended when you want to add variations to existing products as it can’t maintain the relationship between parent products and their variations. For more information on why this is not recommended, refer to the documentation article on import types.
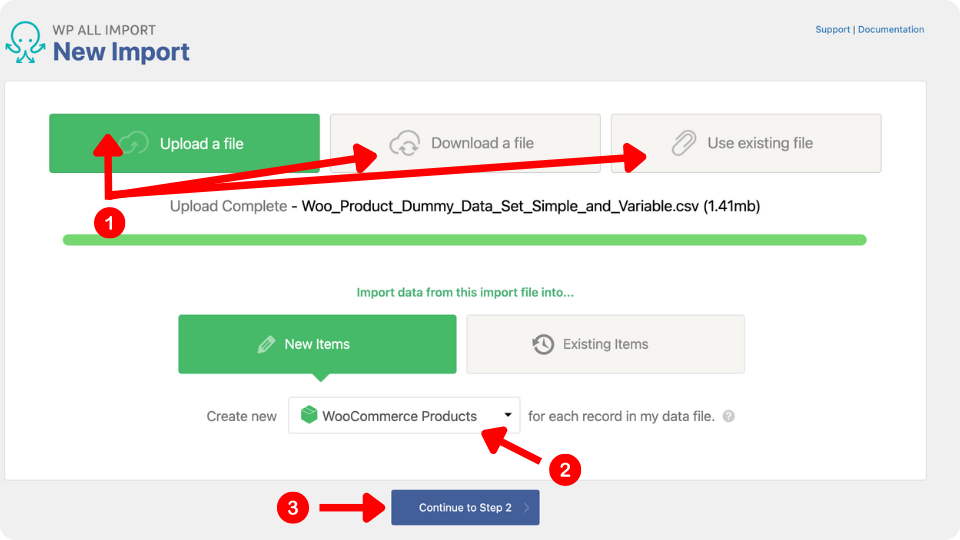
Next, from the dropdown list, choose WooCommerce Products as the data import type and click Continue to Step 2.
3. Review Uploaded Variable Product Data
On the Review Import File screen that appears, take a moment to double-check that the imported data is correctly detected and aligned to the right columns and rows.
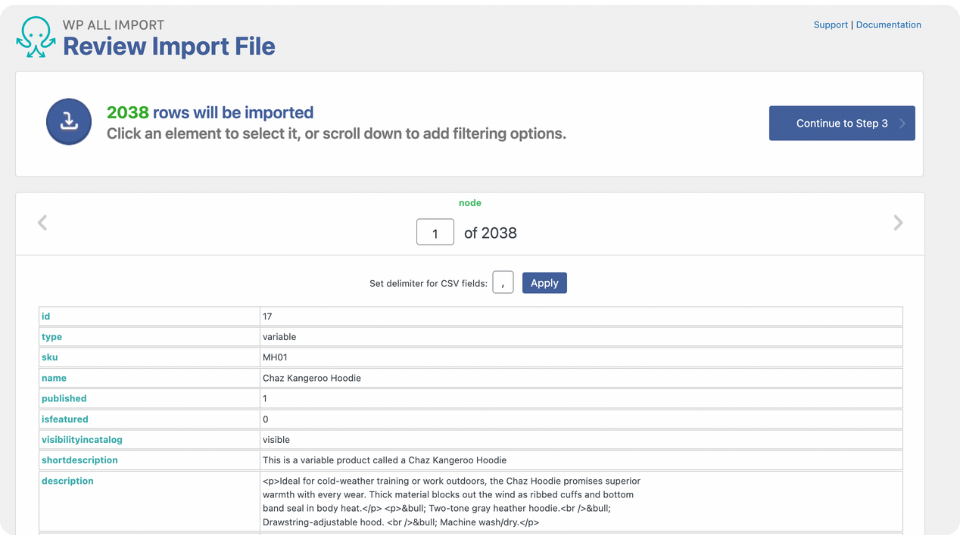
If you imported your WooCommerce variable products in CSV format, you can change the delimiter used. With XML files, you can choose the parent node to be used in the import process.
If you scroll down, you will see the Manage Filtering Options section, which allows you to filter which products to upload during your import. You can filter by various element types such as SKU, ID, Product Description, Price, Category, Tags, etc.
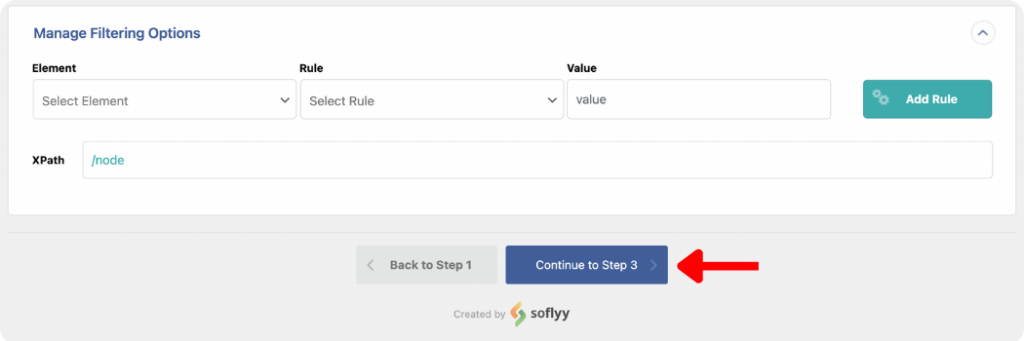
Once you have finished reviewing your uploaded data and filtering as needed, click Continue to Step 3.
4. Map Variable Product Data to the Appropriate WooCommerce Fields
The Drag & Drop screen is where all the magic happens!
Here, you get to map your imported product data to the correct WooCommerce fields by dragging and dropping the various elements on the right side of the screen. The drag-and-drop functionality ensures that the mapping process is easy, even if you are a complete beginner.
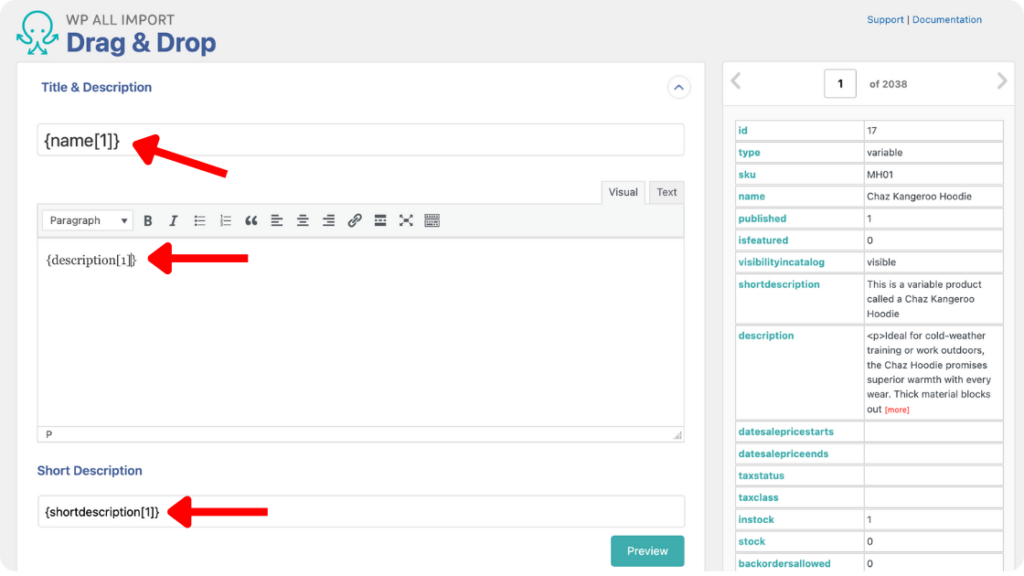
Import Title & Description
In this section, you want to map the title and description elements for your variable WooCommerce products table to the provided fields as shown in the image below.
Import Variable Product Fields With the WooCommerce Add-On
Expand the WooCommerce Add-On section and select Variable Product as the Product Type from the dropdown list. This is the most important panel which includes many of the variable product fields we would like to import.
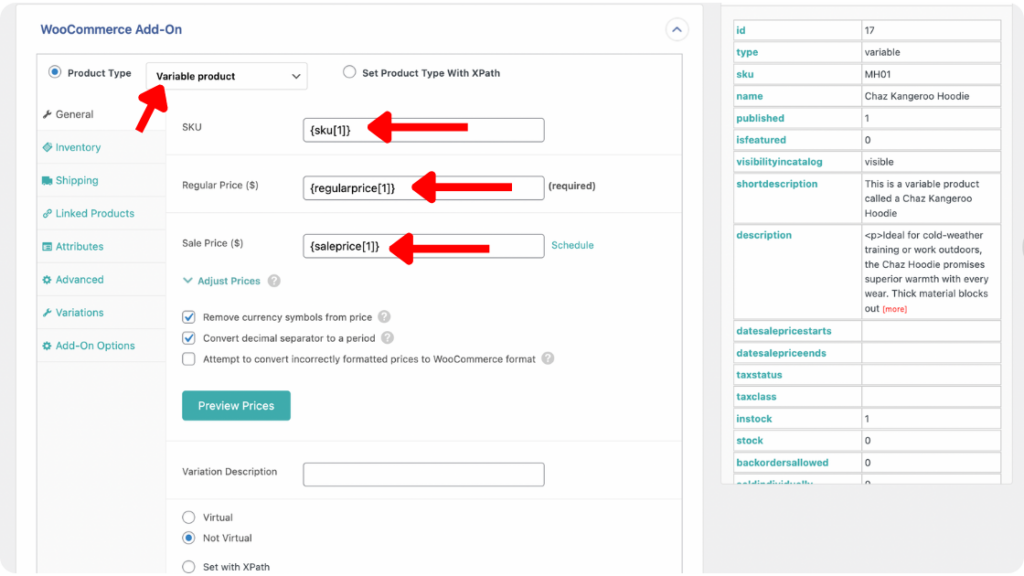
Here, you need to map elements to the various product data tabs to configure them, similar to how you would fill them out if you created a product manually in WooCommerce.
In the General Tab, drag and drop the SKU, Regular Price and Sale Price (if applicable). You can also change the other provided settings within this tab or leave them in their default mode.
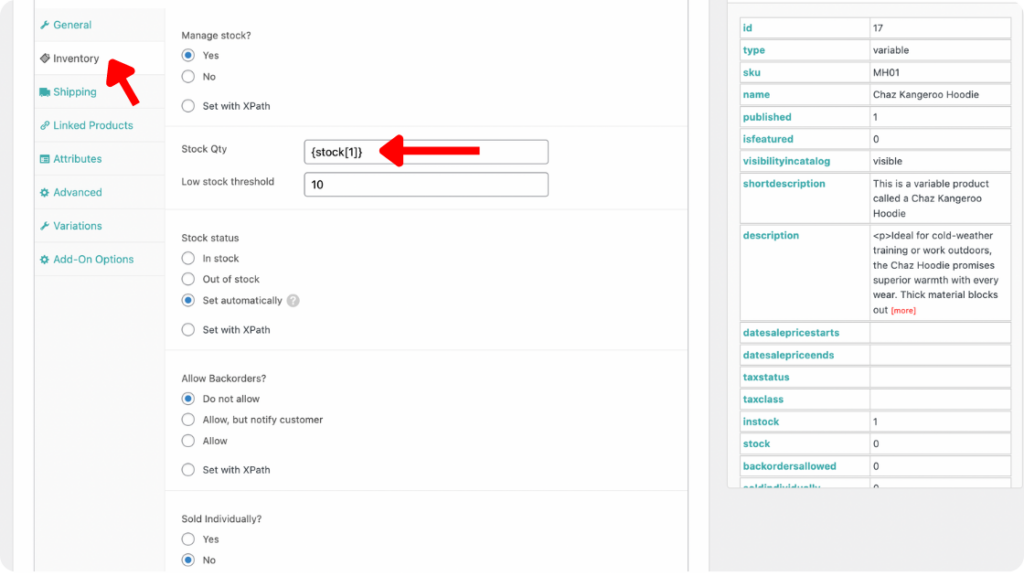
The Inventory Tab allows you to choose if you’d like to manage stock and map the Stock Qty element into the field.
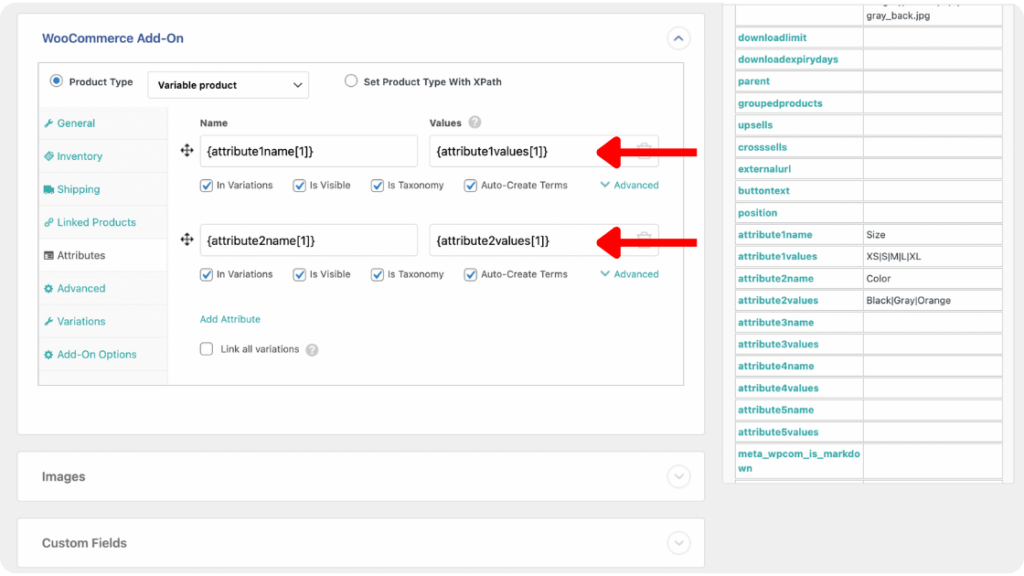
Next, select the Attributes Tab to add variation attribute names such as size, color, material, etc, and map their corresponding values from the product data list.
The final important tab to fill is the Variations Tab. In this tab, you can specify how you want to link multiple variations together to create a single variable product. There are six possible scenarios based on the file structure of your imported product data.
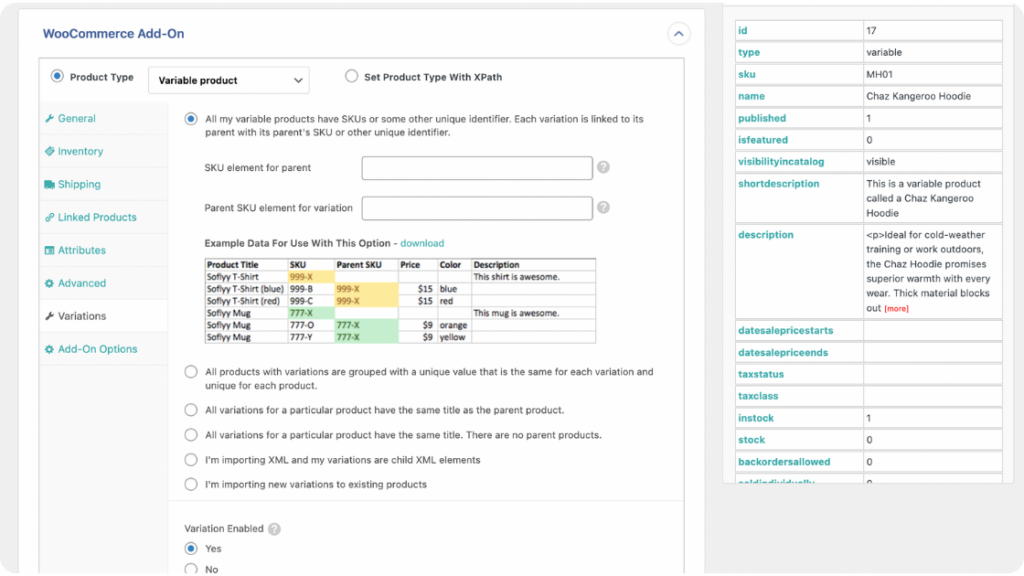
WP All Import provides visual data examples for each scenario to help you easily determine which option is the closest match to your imported variable product data.
For a more detailed explanation of each variation scenario, refer to WP All Import’s guide on how to link multiple variations together to form a variable product.
Import Variable Product Images
The next panel on the page is Images. Open up the Images section to map your variable product images into the provided field.
To do this, drag and drop the image elements from your product data list on the right into the Enter Image URL field of the Download Images Hosted Elsewhere option.
You also have the option to use images already in your media library or those uploaded in the WP All Import file repository.
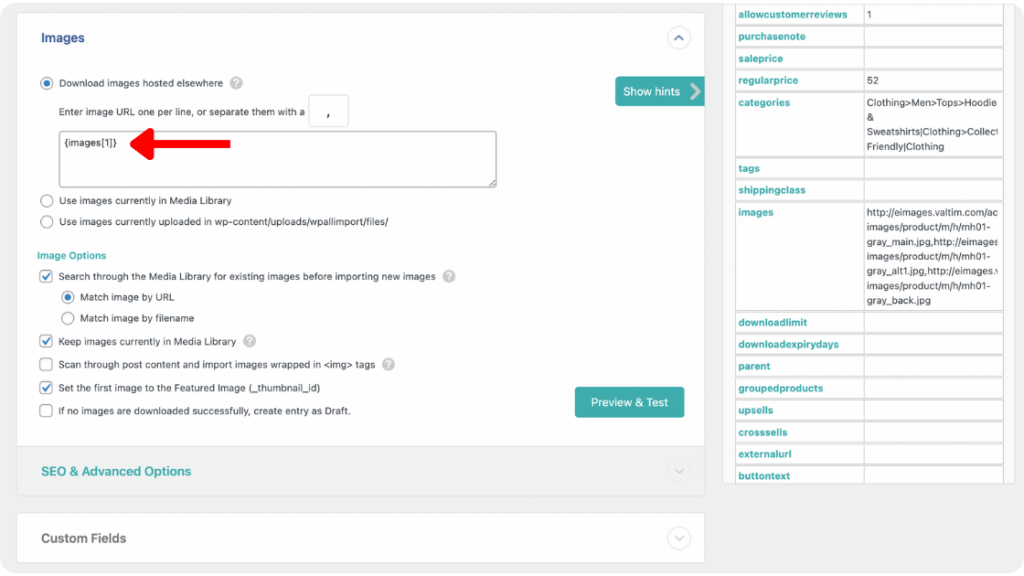
Once you have added your image elements, you can change the other provided Image Options or leave the default settings.
Import Taxonomies, Categories & Tags
In this section, you can map and configure the correct categories and tags for variable products.
Select the appropriate Product Categories mapping option from the options provided and drag and drop the category elements into the fields.
You can map categories based on hierarchy, or assign single or multiple categories to parent product.
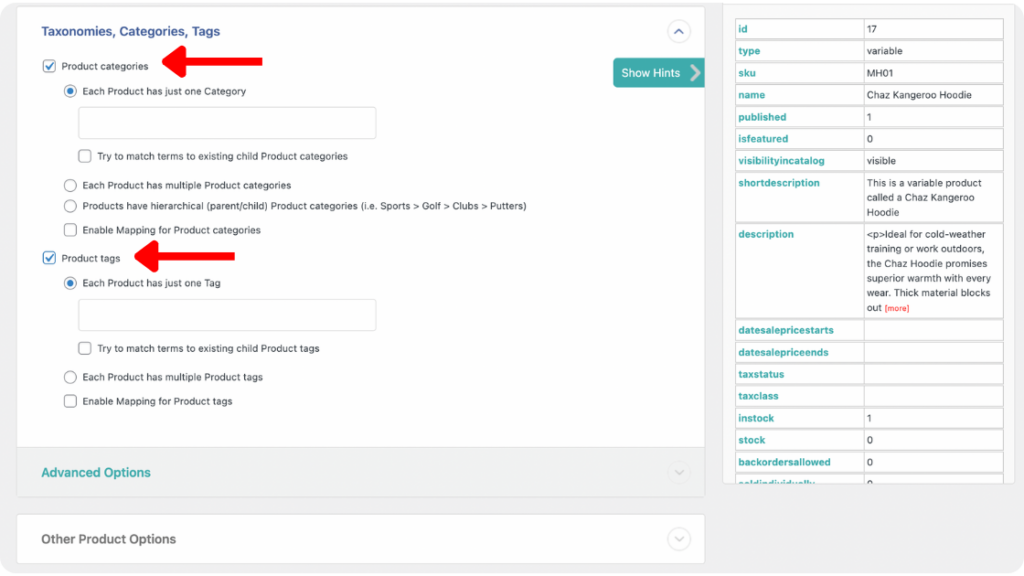
Similar settings apply to the Product Tags option.
Import Other Sections
To ensure you can fully customize your variable product data import, WP All Import provides additional sections including Custom Fields, Meta Box, Other Product Options, Function Editor and more.
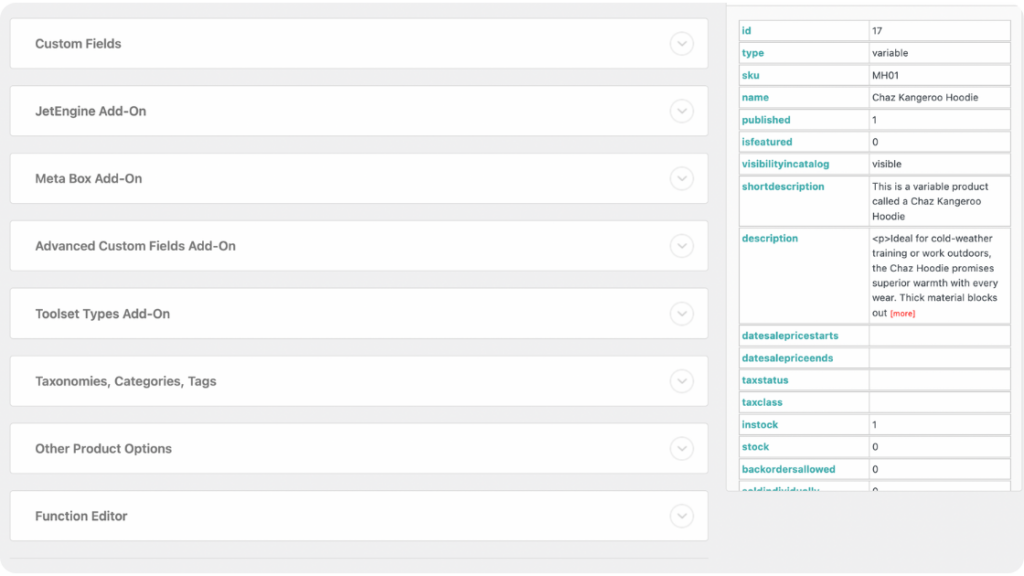
We won’t go into details on how to configure each of these sections in this article, but you can learn more using our in-depth documentation guides.
Once you have mapped all product data as appropriate, scroll to the bottom of the screen and click Continue to Step 4.
5. Configure Additional Variable Product Import Settings
On the Import Settings screen, you can configure your import settings to your taste.
The first step here is to click the Auto-detect button to generate a unique identifier for your import. A unique identifier ensures that if the import is run again in the future, WP All Import can correctly link the records in your updated file with the Products it will create newly. This helps avoid duplicate entries.
You can also manually create a unique identifier by dragging and dropping unique elements such as SKUs and product IDs from your product data list on the left into the provided field.
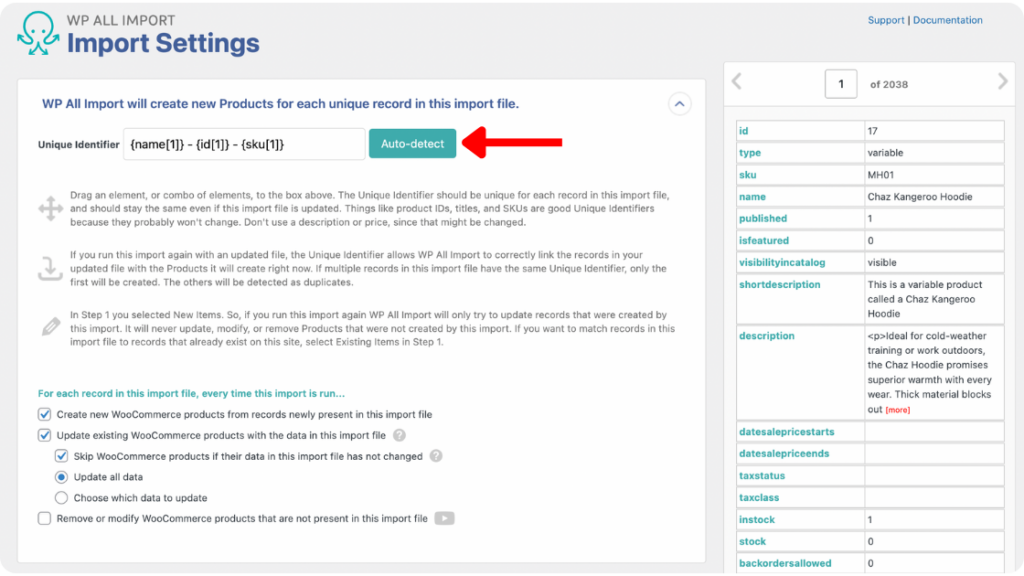
Options are provided in the panel below for you to specify to WP All Import how you want future imports to be handled. You can select whether to create new products, update specific product data or delete products.
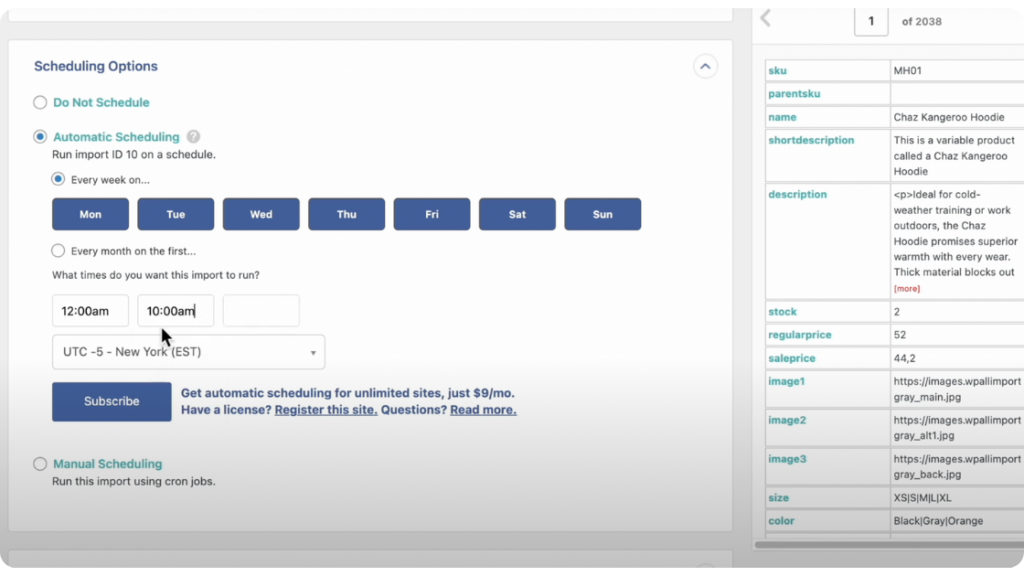
There’s also a tab for Scheduling Options. This allows you to automate your import using our Automatic Scheduling service or the Manual Scheduling tool leveraging cron jobs.
Note that the Automatic Scheduling service is a paid optional service that allows you to run your imports on specific days of the week or month at specific times, and costs $19/month.
Finally, you can expand the Configure Advanced Settings tab to configure debugging settings, import only specific records, etc.
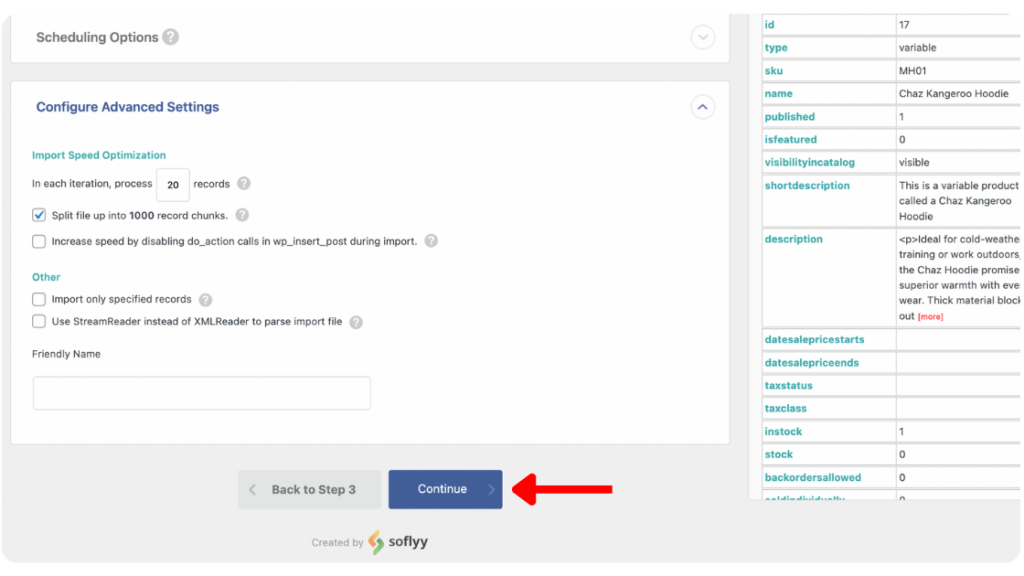
Once you complete the configuration of your import settings, click Continue.
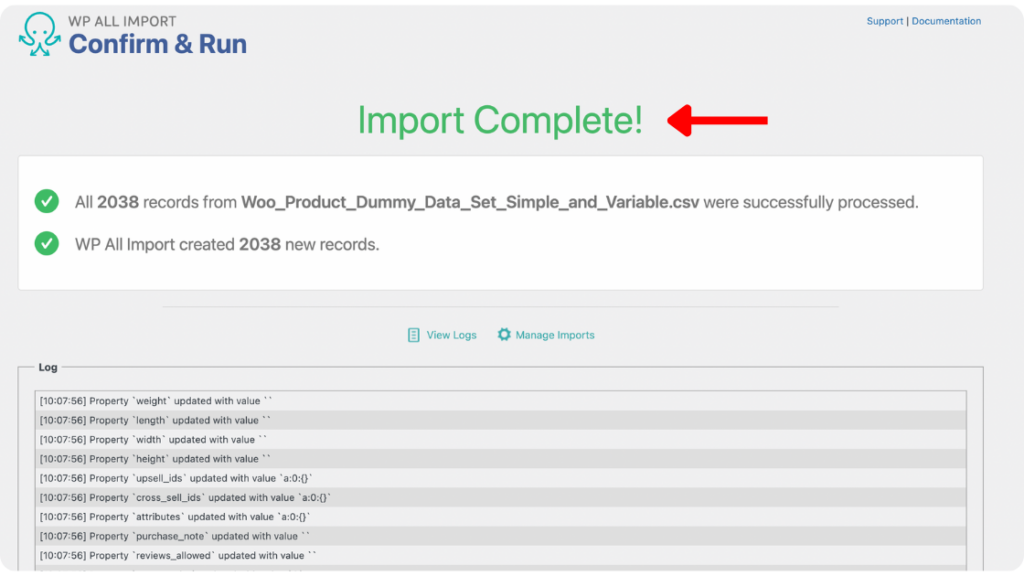
6. Run Variable Product Import and Verify the Data
The Confirm & Run screen is the last step in the import process.
On this screen, you will see a summary of your import to allow you to verify that all settings are correct.
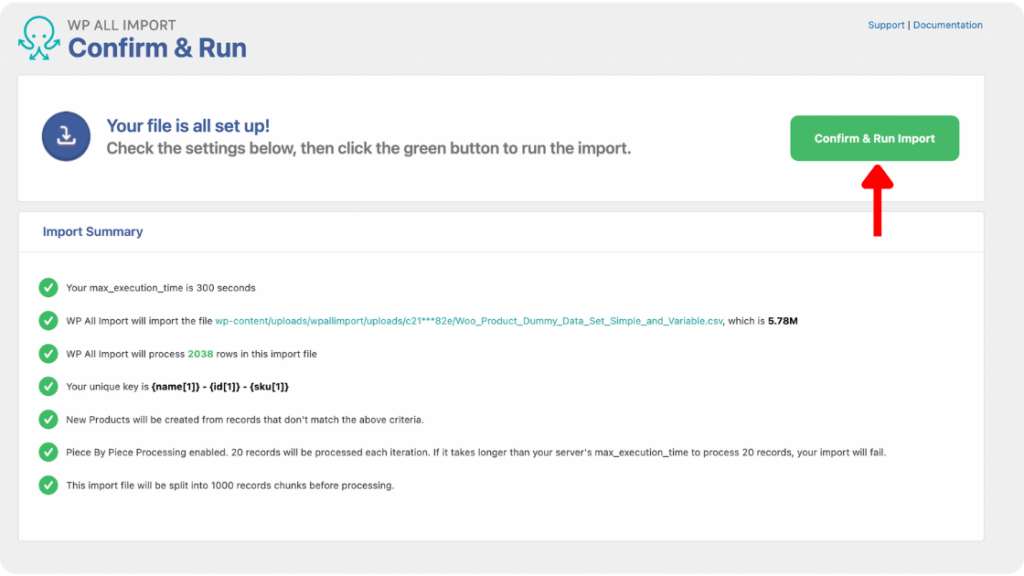
Once you have reviewed the summary, click Confirm & Run Import to complete the import process.
You will see a notification confirming the completion of your import once it’s done.
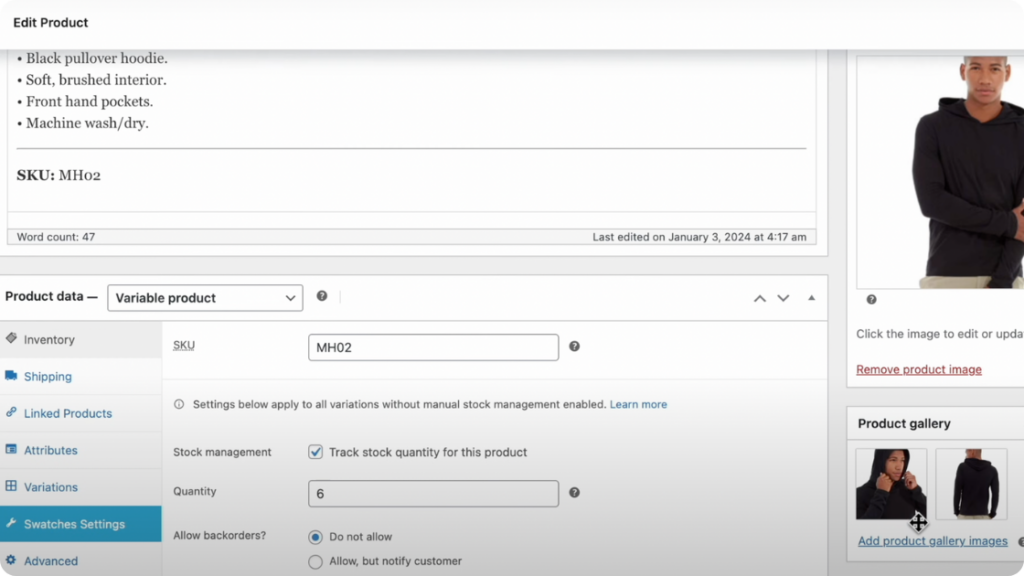
To confirm the successful import of your variable products, navigate to Products > All Products from your WordPress admin dashboard. You should see all your imported products and their associated data on the page that appears.
To further validate all the data fields from your WooCommerce variable product import and ascertain that everything was imported correctly, click on any of the imported products to see the Edit Product page that contains all the product variation data for the selected product.
You can also view your imported products on your store’s front end.

And that’s how you import variable products in WooCommerce the easy way!
Ready to bring ease and efficiency to your online store operations? Try the WP All Import plugin today to import multiple variable products in WooCommerce.
Import Variable Products in WooCommerce – FAQs
How To Import Product Attributes in WooCommerce?
To import product attributes in WooCommerce, you can use the WP All Import plugin and the WooCommerce Import add-on.
With an intuitive drag-and-drop functionality, you can easily drag and drop your product attributes from your product import data list into the WooCommerce attributes field to automatically map the correct attributes to each imported product.
How To Add Variable Product Prices in WooCommerce?
The WP All Import plugin is the easiest option for updating specific data pieces of variations such as prices in WooCommerce.
Once you install the WP All Import plugin and the WooCommerce Import add-on, you can drag and drop the prices of your variable product from the table into the Regular Price and Sale Price fields in the WooCommerce General Tab. For more details, you can read this documentation article on updating product prices.
How Do I Import Products With Custom Fields in WooCommerce?
You can import products with custom fields in WooCommerce by using the WP All Import plugin.
The WP All Import plugin has built-in functionality that allows it to auto-detect custom fields during an import. It also allows you to manually Create Custom Fields during an import and add your desired Name and Value for each field.
How To Export Variable Products From WooCommerce?
The WP All Export plugin allows you to export variable products from WooCommerce.
You can export your variable product data in CSV, XML, XLS or XLSX formats, or as a compressed zip file that has the export file along with a template to use with the WP All Import plugin when you need to import the data.
You can learn more about exporting WooCommerce variable products using the WP All Export plugin here.