Are you looking for an efficient way to export WooComemrce orders to a CSV file?
Whether you’re looking to send your sales data to third-party tools or simply want to keep a backup of your transactions, exporting WooCommerce orders is something you’ll frequently need to do.
In this article, we’ll explore straightforward methods to export your WooCommerxe orders to a CSV file. We’ll cover two methods – exporting with and without a plugin.
Let’s first look at how to do it without a plugin.
How To Export WooCommerce Orders to a CSV File Without a Plugin
WooCommerce comes with a built-in reporting feature that allows you to export basic WooCommerce order data in CSV format. This method is straightforward and does not require installing a WooCommerce export plugin.
Here’s how to export your orders to CSV:
- Log into your WordPress admin dashboard and go to WooCommerce › Reports.
- Click on the Orders tab, which will show you different report options such as:
- Sales by date
- Sales by product
- Sales by category
- For each report type, you can also select the specific date range for which you want to export orders.
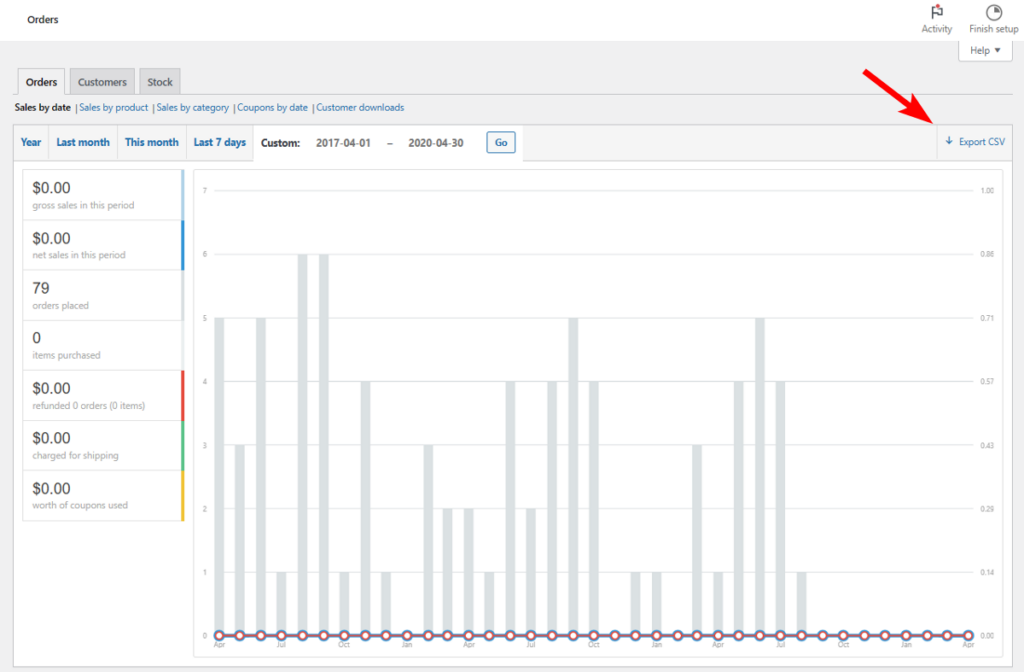
- Once you’ve filtered the data you want to include, simply click the Export CSV button in the top right corner. As soon as you do that, it will download a CSV file containing your selected WooCommerce order details.
While this method is easy and straightforward, it fails to give you all of the order details. You cannot customize the export file with the specific order fields you need, nor does it allow you to include custom details in the order export file. It works great if you just need to get basic order information.
For advanced order export, you’ll need to use a specialized WooCommerce export plugin like WP All Export.
Best WooCommerce CSV Order Export Plugin – WP All Export
There are many WooCommerce CSV order export plugins available in the market, but WP All Export stands out as a popular choice among thousands of WooCommerce sites. What makes it stand out is its simple and user-friendly drag-and-drop interface. You also get a four-step wizard that walks you through the entire export process.

Apart from this, here are some of the key benefits of using the WP All Export:
- Flexibility in data selection
Dedicated plugins offer more granular control over which order details you want to include in the export file. This allows you to extract the exact information you need. - Advanced filtering
A WooCommerce export plugin also gives you advanced filtering options to filter down to specific orders based on various rules like region, product, date range, order status, and more. - Automated scheduled or real-time export
An advanced export plugin allows you to set up recurring exports, so you can receive updated order data regularly. - Integrations with other tools
A dedicated plugin may also include a built-in option to seamlessly send order data to tools like Zapier. This opens up possibilities to connect with other business tools like accounting software, CRM, and cloud storage. - Custom file format options
In addition to CSV, WP All Export also lets you download the order data in Excel and XML format.
Now that we’ve covered the benefits of using WP All Export, let’s look into how to use it to export WooCommerce orders to a CSV file.
How To Export WooCommerce Orders to CSV Using WP All Export
WP All Export is a premium advanced export plugin that can handle every type of WooCommerce and WordPress data, including order data.
The plugin not only simplifies the export process but also provides you with various customization options to give you exactly the data you need.
To get started, you’ll need to purchase the premium version of the plugin from its website. After you receive the zip file, proceed to install and activate it from your admin dashboard.
Once you have the plugin added to your website, let’s look at the export process in detail.
1. Create a CSV WooCommerce Order Export
To start the export process, navigate to All Export › New Export and select WooCommerce Orders as the Post Type.
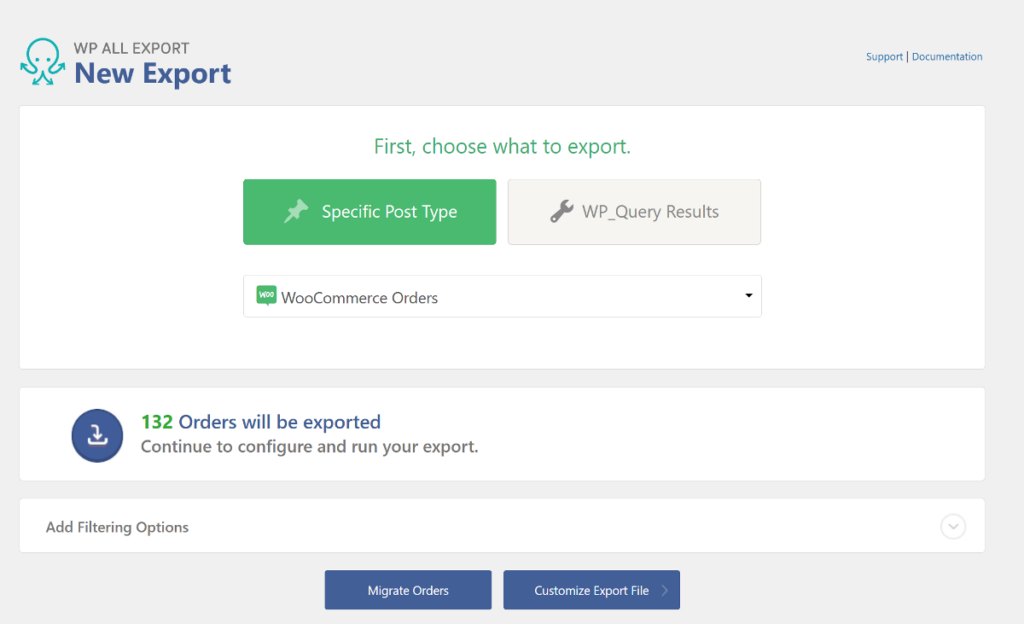
WP All Export lets you export orders to multiple file formats, with CSV being the default.
2. Filter WooCommerce Orders for CSV Exports
One of the powerful features of WP All Export is its ability to filter your WooCommerce order data before exporting. This comes in handy when you only need to export a specific subset of orders, rather than your entire order history.
For example, you may only want to export orders from a particular country that are above a certain order value. WP All Export makes this easy with its powerful filtering options.
On the same New Export page, expand the Add Filtering Options panel to set up specific conditions for your export.
Each export filter rule consists of three components:
- Element: The specific order detail you want to filter.
- Rule: The condition to apply.
- Value: The criteria you want to match.
After you’ve added all three components, the export filter will look like this.

Next, click the Add Rule button. If this is your only rule, the system will select all orders that are from the United States.
WP All Export also lets you combine rules using AND and OR logic to create more complex filters.
For example, you can use the AND operator to add another rule to select all orders with an Order Total equal to or greater than $500. This will give you a targeted export containing only high-value US orders.
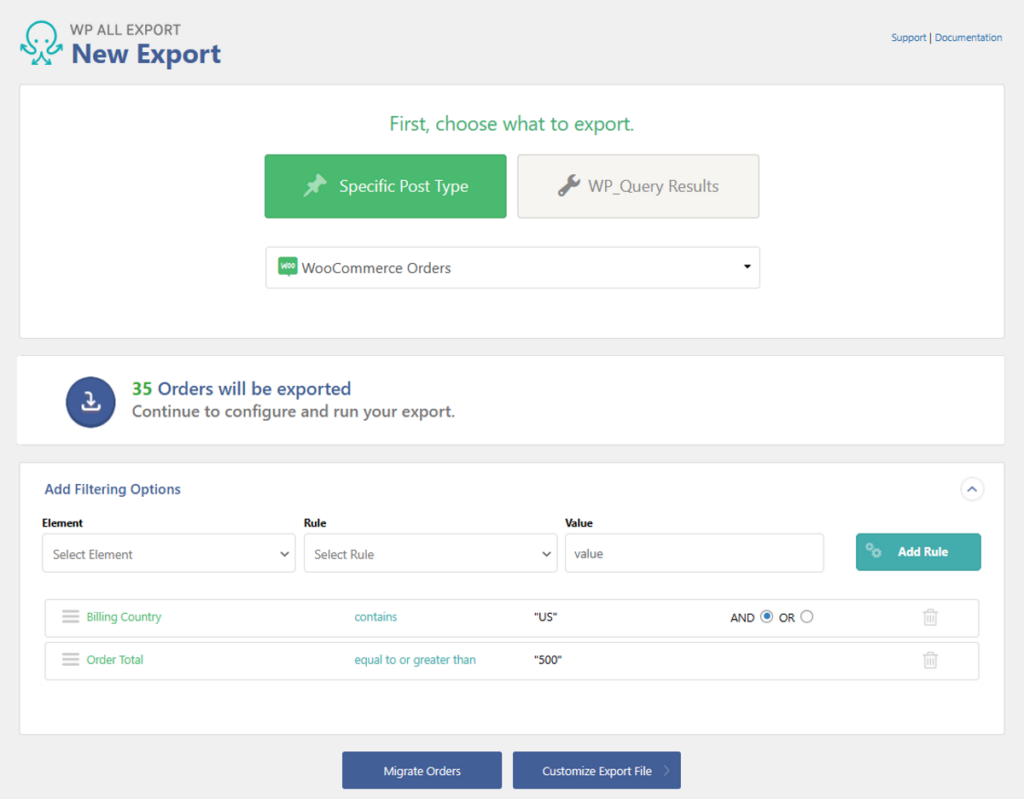
When you have finished adding all your filters, click the Customize Export File button to proceed to the next step.
3. Select Order Export Columns
One of the standout features of WP All Export is its intuitive drag-and-drop interface, which allows you to select specific order fields to export.
It supports all order information, including custom fields. You can expand the various tabs listed in the Available Data section on the right-hand side to add order-related fields. The tabs include:
- Order
- Customer
- Items
- Taxes & Shipping
- Fees & Discounts
- Notes
- Refunds
- Custom fields
By default, a few order fields are added to the selection area to get you started. To add additional columns, simply expand one of the tabs and drag the desired field into the selection area. For example, we have added the Order Status and Order Total fields from the Order tab.
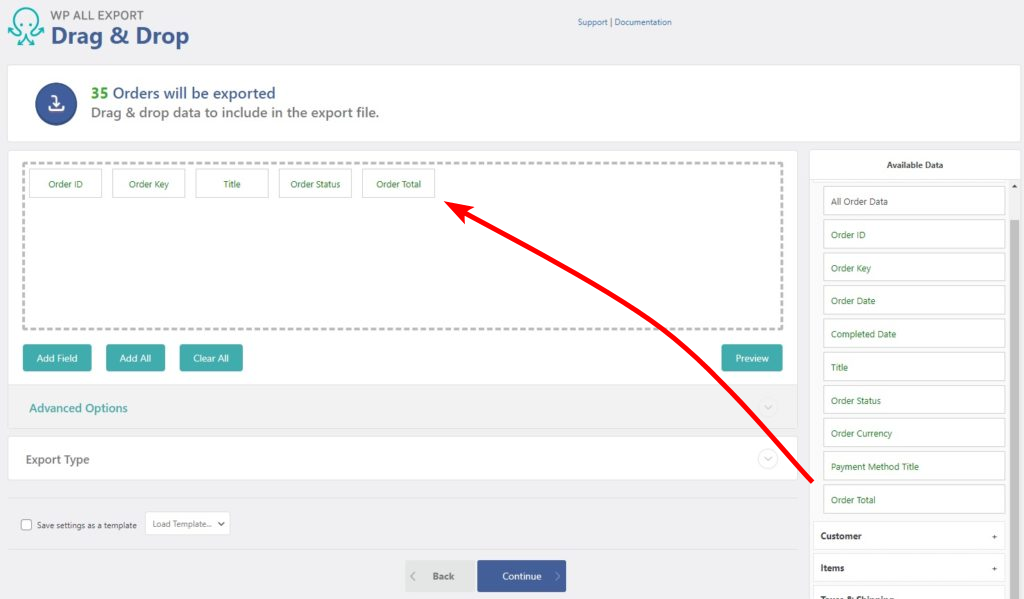
You can use the same interface to rearrange, remove, and rename columns in your CSV file.
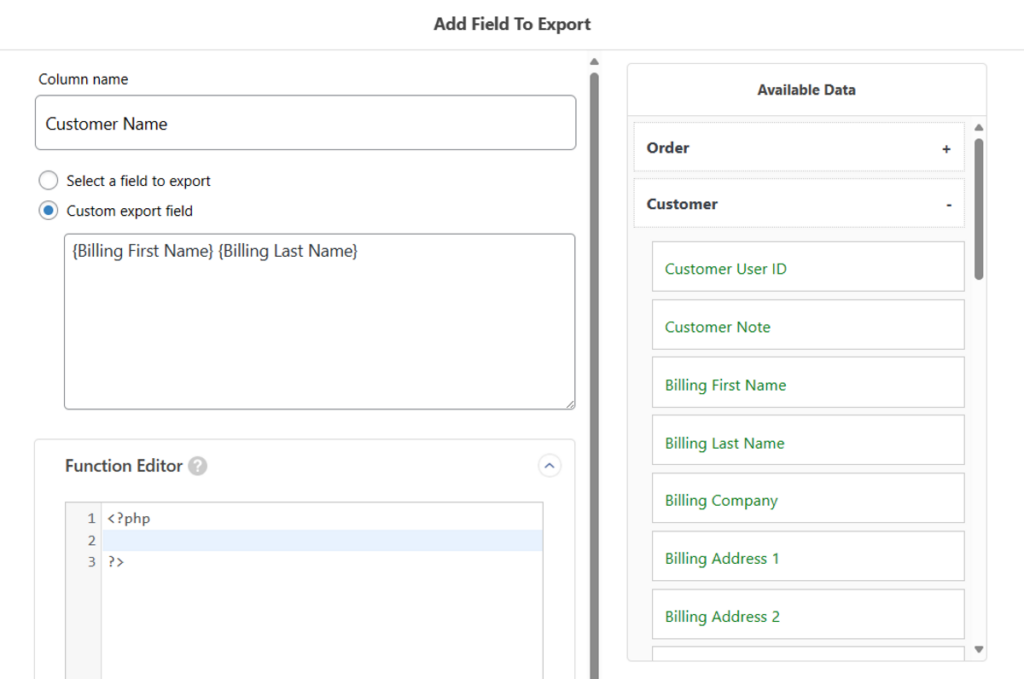
WP All Export also includes advanced features that allow you to present multi-value fields in separate columns or combine multiple fields into a single column.
Once you have added all the fields, click the Preview button to generate a preview of the first 10 orders.
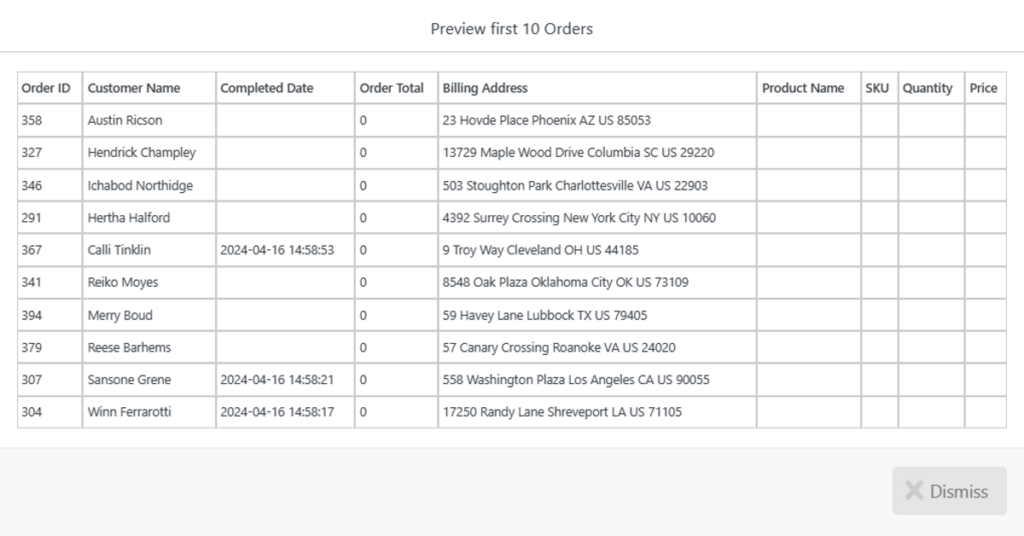
After reviewing the preview and ensuring it meets your requirements, click the Continue button at the bottom of the screen to move to the next step.
4. Schedule WooCommerce Order Exports to Run Automatically
If your WooCommerce store receives thousands of orders a day, you need to regularly export data to keep it updated. WP All Export offers a scheduling option that allows you to create automatic exports of your order data.
It uses cron jobs to automate the export. You can either manually configure cron jobs on your server or use the optional paid Automatic Scheduling service provided by WP All Export.
To set up automatic export, simply expand the Scheduling Options panel and click the Automatic Scheduling option.
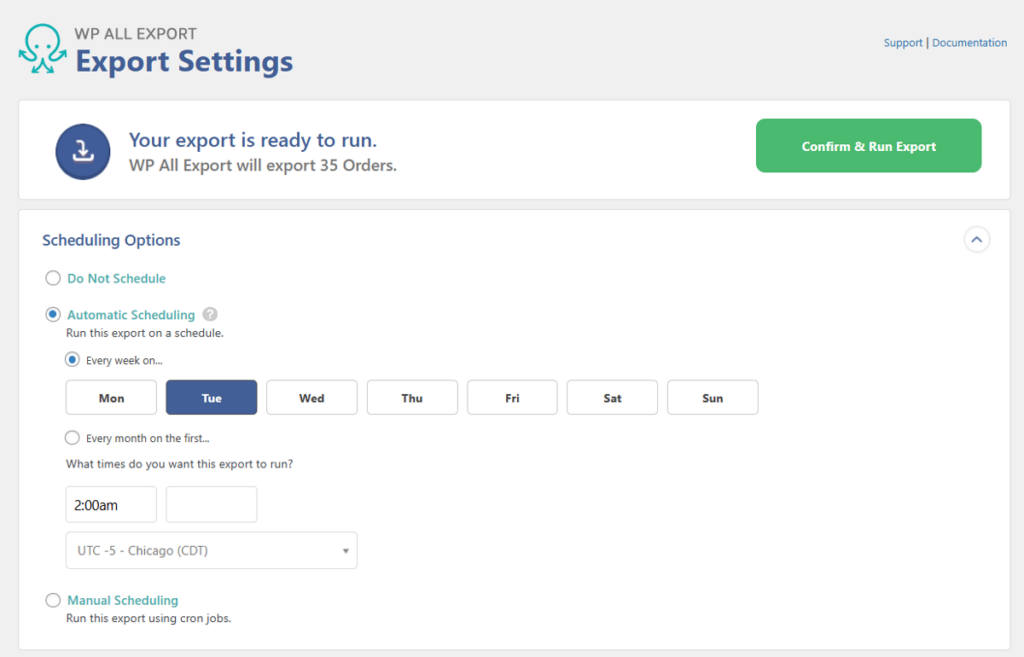
This screen is straightforward and allows you to select the frequency of your export. You can choose to run it weekly or monthly and then select the specific day and time.
For example, in the screenshot below, we have requested that this export be run automatically every Tuesday at 2:00 a.m. UTC -5 (Chicago) time.
5. Configure Advanced Order Export for WooCommerce
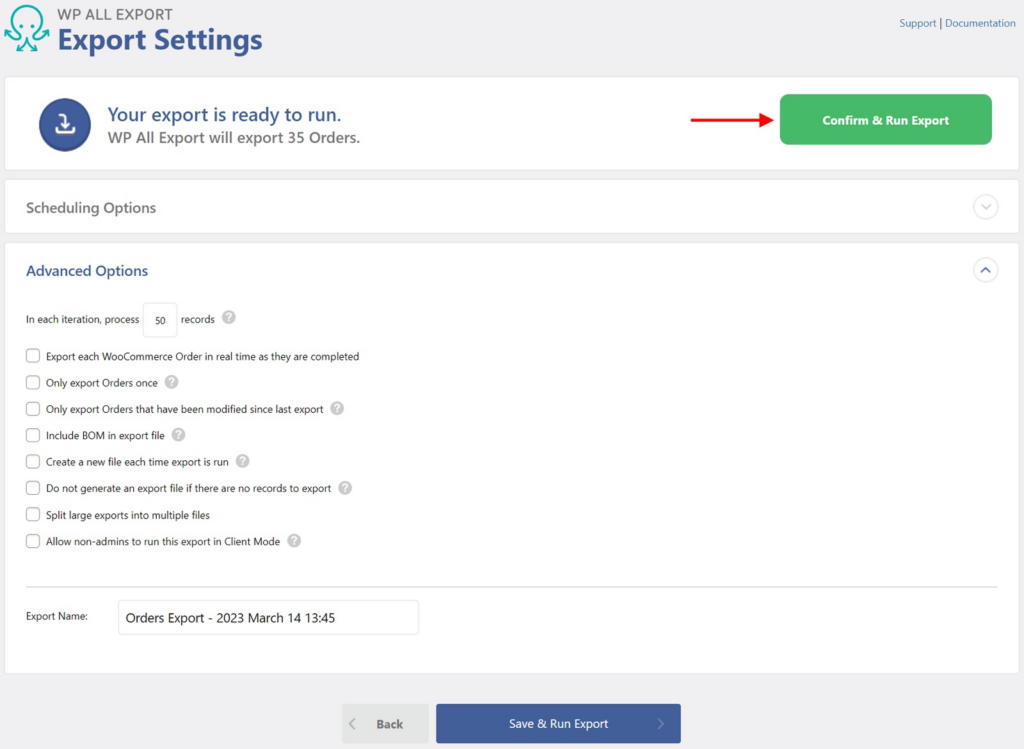
In addition to export scheduling, WP All Export includes advanced features such as setting up real-time exports. On the same screen, expand the Advanced Options panel to see the list of advanced settings.
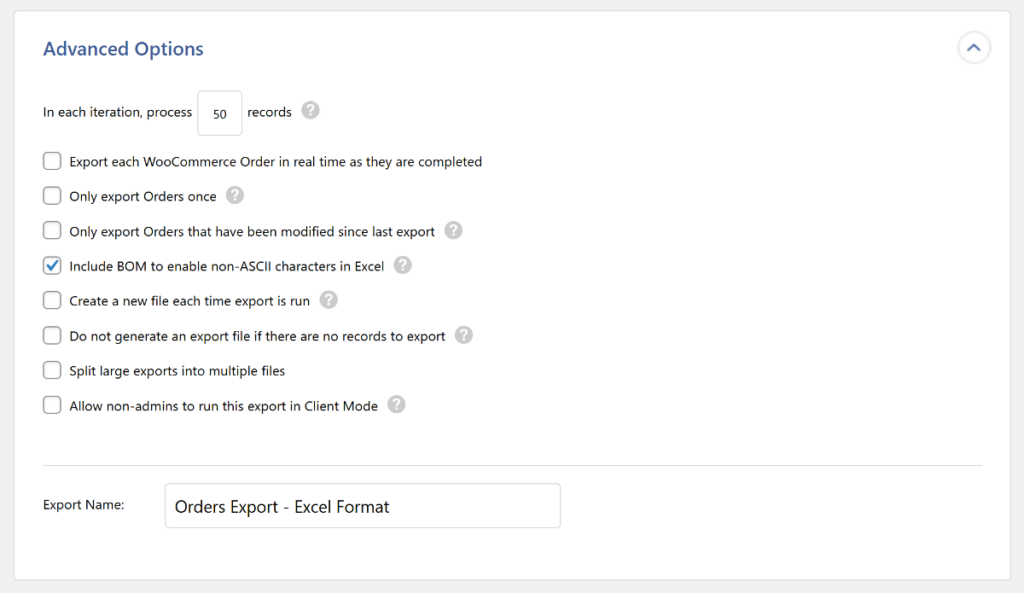
All of these options are self-explanatory and can be enabled by clicking the respective checkboxes. The options include:
- WP All Export runs export in batches to prevent your server overload You can define the number of orders to process in each iteration.
- Whether to export each order in real-time as they are completed. You can pair this feature with Zapier to connect to over 5,000 apps.
- For future exports, only export orders that have been newly created or modified since the previous export.
- Create a new export file each time you run the export, instead of overwriting the existing file.
- If you have a large number of orders, split the export file into multiple files.
- Set role permissions to allow non-admin roles to export the file.
After selecting the advanced options, rename the export file if you want, and click the Save & Run Export button to proceed to the next step.
6. Complete Your WooCommerce Order CSV Export
To complete your export, simply click the green Confirm & Run Export button on the right-hand side of the Export Settings screen.
Depending on the number of orders, WP All Export will take a few minutes to complete the export process. It will notify you once the file is ready for download.
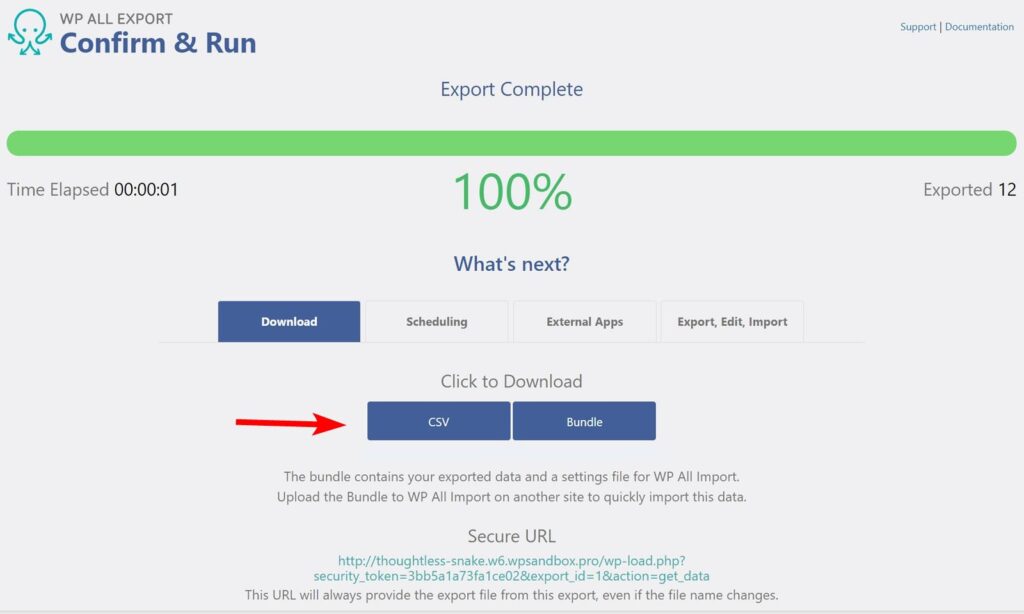
Once done, click the CSV button in the Click to Download section to download your file.
That’s it! Isn’t it easy to export WooCommerce orders to a CSV file using the WP All Export plugin?
Next: Migrate Your WooCommerce Orders to Another Site
On the Confirm and Export screen, WP All Export provides you with a Bundle option along with a CSV file. The Bundle option downloads a ZIP file that contains an import template in addition to the export data.

This makes migrating orders from one WooCommerce store to another as simple as:
- Downloading the Bundle file from your source site.
- Importing the Bundle file to the destination site using the WP All Import plugin.
Ready to effortlessly export your WooCommerce order data? Download and install the WP All Export Plugin today!
Export WooCommerce Orders to CSV – Frequently Asked Questions
Can You Export WooCommerce Orders to Excel?
You can easily export WooCommerce orders to Excel using the WP All Export plugin. Just follow these steps:
- Navigate to All Export › New Export.
- Select WooCommerce Orders as the post type.
- Configure the export columns using our Drag & Drop interface.
- Change the Export Type to Spreadsheet › Excel file.
- Run the export and download your Excel file.
How Do I Download All WooCommerce Orders?
To download all WooCommerce orders using the WP All Export plugin, follow these four simple steps:
- Go to All Export › New Export and select Orders as the export type.
- Select your export fields using the Drag & Drop interface.
- Apply additional settings.
- Run the export and download your order export file.
How To Import Export WooCommerce Orders?
You can use the combination of WP All Export and WP All Import to migrate orders between WooCommerce sites.
- Use WP All Export to export the orders that you wish to migrate on the source site.
- When downloading your export file, select the “Bundle” option instead of a CSV file. The bundle file contains settings data in addition to the export data.
- Upload the bundle file on the destination site using WP All Import.
- WP All Import will automatically know how to import the orders based on the bundle file settings.
- Review your imported orders. This will complete your WooCommerce order migration.
What Is the Best Order Export Plugin for WooCommerce?
WP All Export is the best order export plugin for WooCommerce. It allows you to choose exactly which order fields to export and lets you reorder and rename export columns. It also includes advanced features like filtering, scheduling, and modifying order data.
