Are you wondering how to import affiliate products into WooCommerce hassle-free?
Affiliate products are a great way to earn passive income from your WooCommerce store. They do not require any upfront financial commitments and allow you to expand your store offerings without an increase in operational or inventory-related costs.
However, manually adding multiple affiliate products from third-party vendors to your WooCommerce store can be tedious and slow. It also leaves room for mistakes and data inconsistencies. Importing affiliate products into your WooCommerce store is a more efficient approach.
This article will show you how to import affiliate products into your WooCommerce store using the best WooCommerce import plugin – WP All Import.
What Are WooCommerce Affiliate Products?
WooCommerce affiliate products are a type of WooCommerce products set up to be purchased only from an external source to which they are linked. They appear on your products/shop page, similar to simple or variable products in your WooCommerce store, but cannot be purchased directly through the usual checkout process.
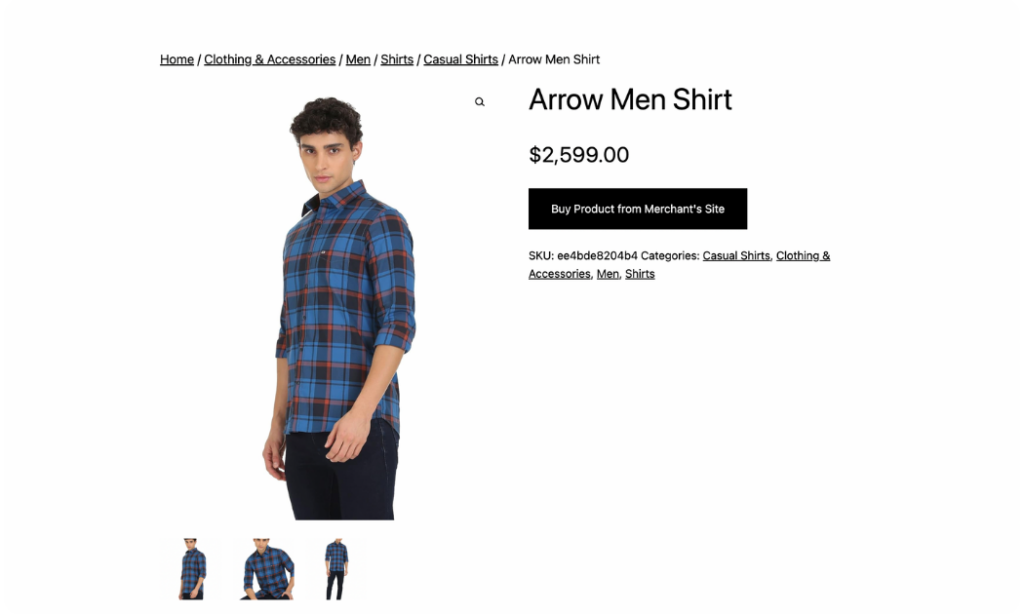
When a customer clicks the link to purchase an affiliate product, they will be redirected to the third-party merchant’s website to make their payment. Once they do this, you will automatically earn a commission without fulfilling the order. This is the convenience and value that accompanies offering affiliate products to customers on your WooCommerce store.
If you have many affiliate products to add to your WooCommerce site, you do not want to waste productive time manually adding them one after another. Instead, it’s better to bulk-add the products to your store by importing them.
Many WooCommerce product import plugins are available on the market; however, not all support importing WooCommerce affiliate products. We have chosen the WP All Import plugin in this article because it supports the seamless import of affiliate products into WooCommerce and offers tons of advanced import features that make it the leading product import plugin. We will discuss it in more detail in the next section.
WP All Import – Best WooCommerce Import Plugin for Importing Affiliate Products
WP All Import is the best WooCommerce import plugin for importing affiliate products to your store. The plugin allows you to seamlessly bulk-add all your WooCommerce affiliate product data through its user-friendly drag-and-drop interface and intuitive 5-step import wizard.
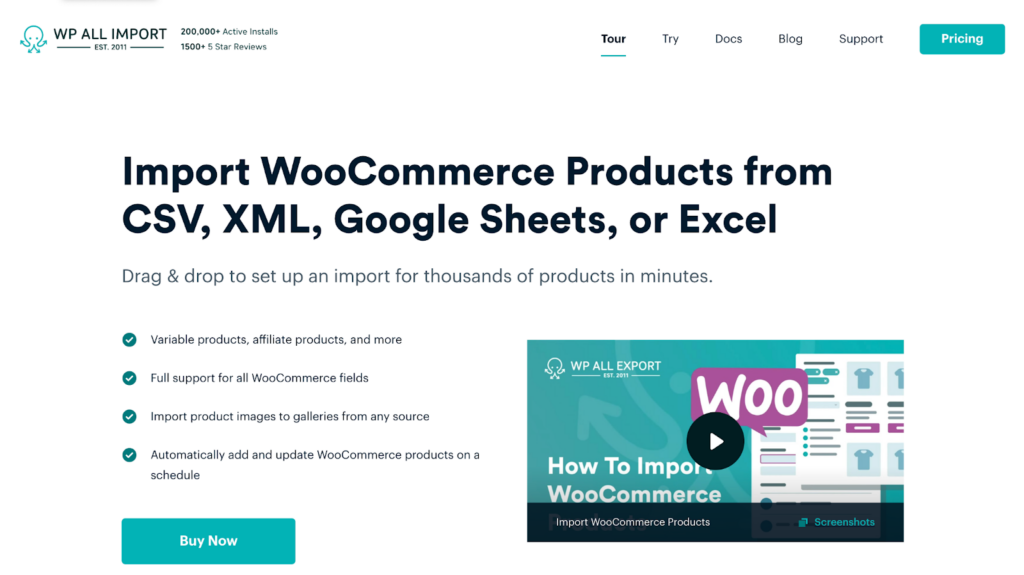
The WP All Import plugin also supports importing other WooCommerce product types (e.g. simple and variable products) and WooCommerce data types, including custom field data. Other exciting features it offers include:
- Support for importing affiliate products from multiple file sources, including CSV, XML, Excel & Google Sheets.
- Powerful filtering feature to import only specific affiliate products.
- Support for importing product images from any source.
- Scheduling tool to automate the import of affiliate products to your store on pre-defined days and times.
- Support for importing data into existing affiliate products to update them.
- Support for importing other WordPress data types, including users, pages, posts, etc.
- On-the-fly modification of import data using PHP functions, and more.
These features clarify why WP All Import is our choice plugin for importing affiliate products into WooCommerce. In the next section, we will discuss how to set up an import for thousands of affiliate products within minutes.
How To Easily Import Affiliate Products Into WooCommerce Using WP All Import
We will now show you how to easily import affiliate products into WooCommerce using WP All Import.
First, you must purchase and download the pro version of the WP All Import plugin and its WooCommerce Import Add-On.
The Pro version is required, as it has all the advanced features to smoothly import your affiliate products into WooCommerce. The WooCommerce Import Add-On, on the other hand, ensures you can import data into all WooCommerce product fields.
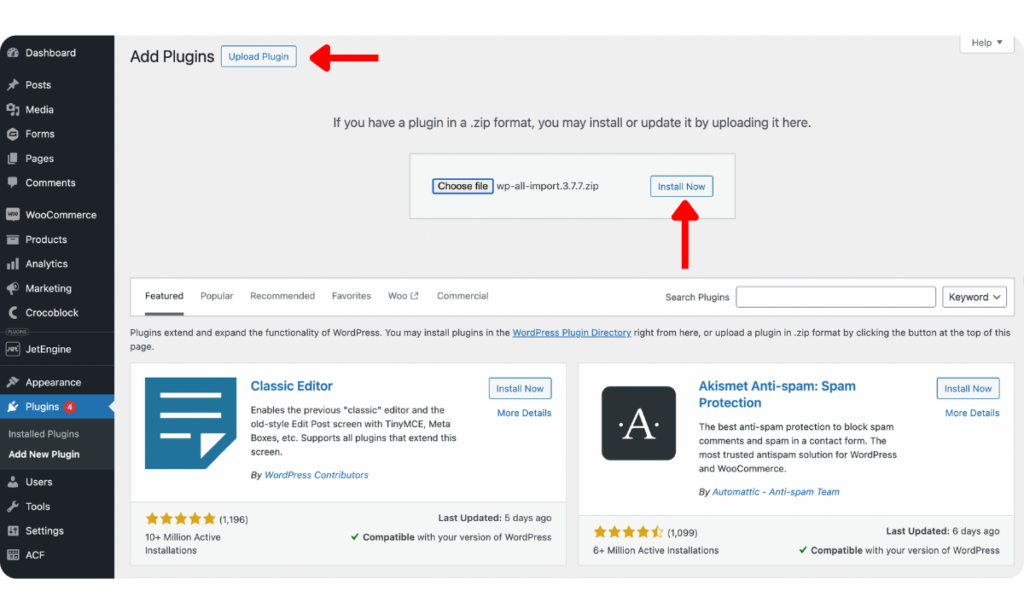
To install the plugin on your site, go to the WordPress admin menu and navigate to Plugins › Add New Plugin › Upload Plugin › Choose file › Install Now › Activate Plugin. The plugin will be installed and ready for use.
Install its WooCommerce Import Add-On by following the same steps.
Once they are both installed and activated, you can create a new WooCommerce affiliate product import!
1. Create a New WooCommerce Affiliate Product Import
From your WordPress admin dashboard, navigate to All Import › New Import. This brings you to the New Import screen with options for loading your affiliate products import file.
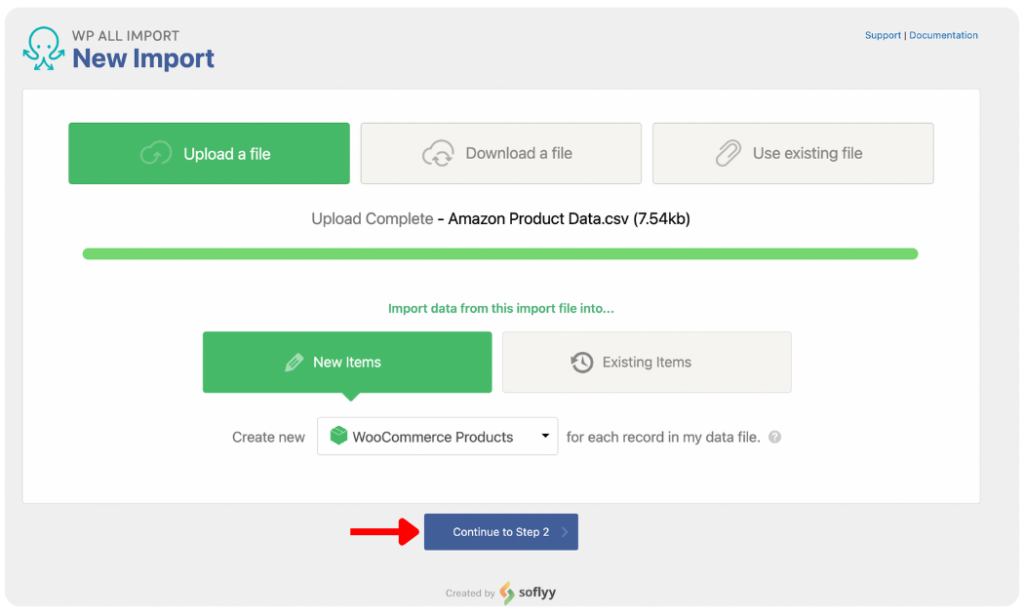
WP All Import provides three ways to import your data. You can:
- Upload a file: Use this option to upload your affiliate product file directly from your PC.
- Download a file: If your import file exists on a URL or FTP/SFTP, choose this.
- Use existing file: This is useful for re-importing data from a previously uploaded file.
Select the best option depending on where your affiliate product data exists.
Once the product data is loaded, under New Items, choose WooCommerce Products as the import type and click Continue to Step 2.
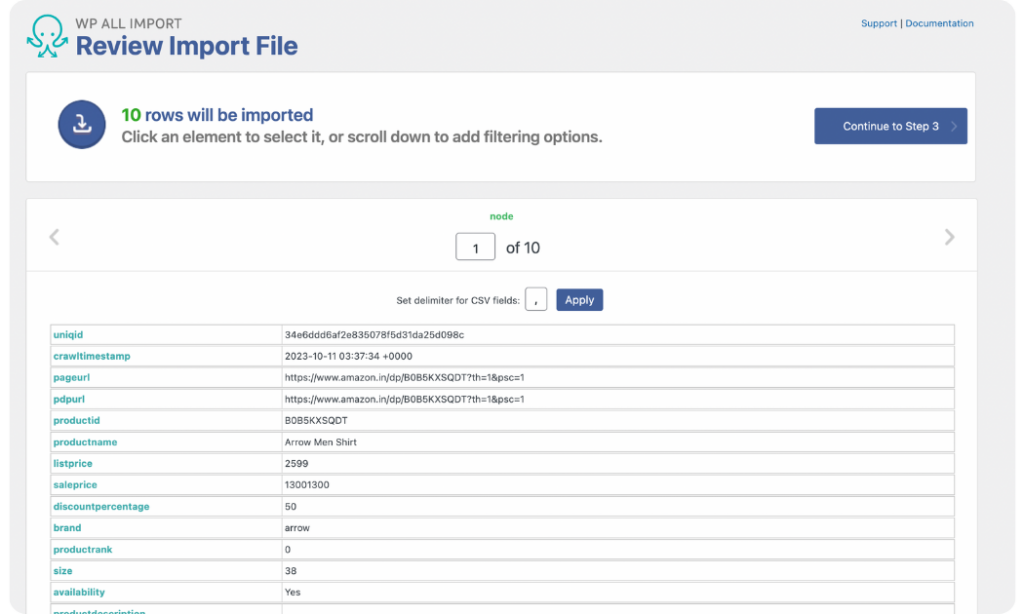
2. Review Affiliate Product Data and Apply Filters
The Review Import File screen allows you to review data in your import file to ensure that WP All Import correctly detects all the fields. Use the gray arrows on the left and right of the screen to navigate between records in the file and review them.
If you’re using a CSV file, you can also set the delimiter to be used by WP All Import when processing your import file.
If you want to filter the affiliate products that will be imported to your WooCommerce store, scroll down the screen to reveal the panel to Manage Filtering Options. This panel contains the settings for WP All Import’s powerful filtering feature that enables you to import only a subset of products that meet your specific requirements.
For example, if you are importing affiliate products from an Amazon store merchant and want to create a filter to import only available items to your store, you can do this easily. Select the Element containing information on product availability, set the Rule as equals, and input the correct Value for available products. Next, click Add Rule › Apply Filter to XPath, and the filter will be created.
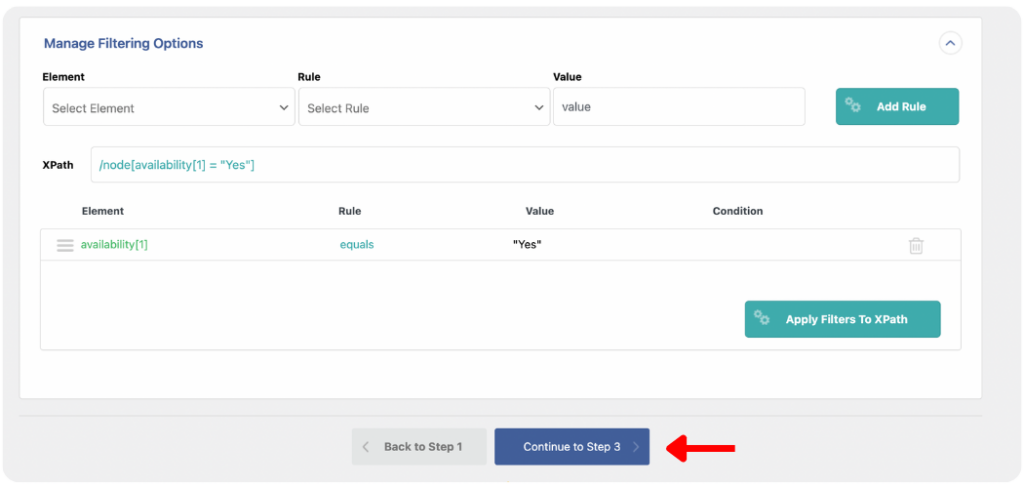
You can create as many filters as you want and define the dependencies using the AND/OR condition.
Click Continue to Step 3 at the bottom of the screen to proceed to the next step.
3. Map Affiliate Product Data to WooCommerce Fields
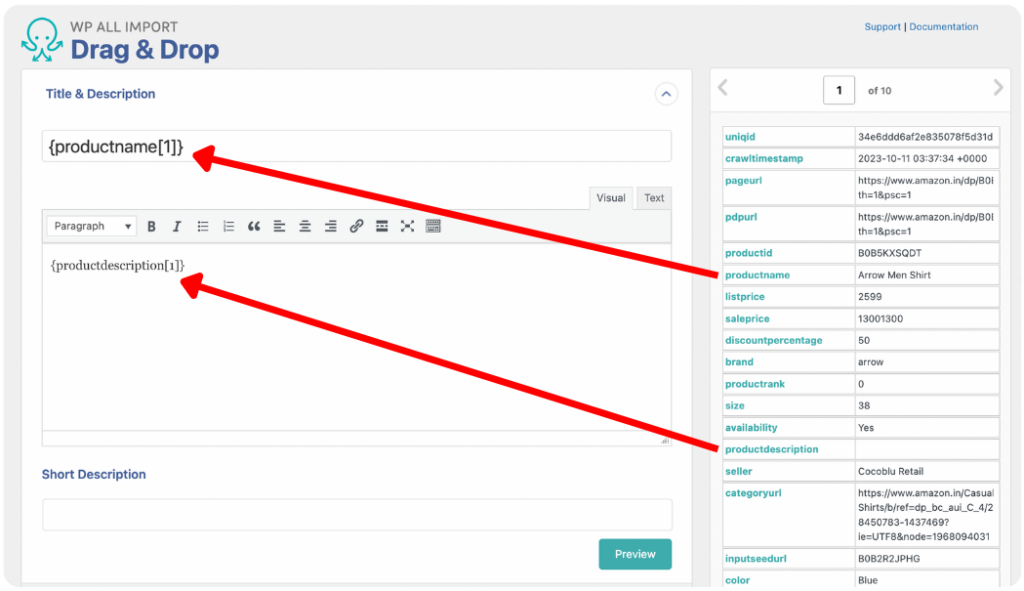
On the Drag & Drop screen, you will carry out the most critical steps in the import process.
Here, you will map elements from your affiliate products import file to various product fields to ensure that all the products and their associated details are successfully imported to your store.
The incoming data elements are listed in a table on the right of the screen, while the product fields are nested within panels on the left.
Title & Description
The Title & Description panel lets you map your affiliate products’ title and description data. Drag and drop the corresponding elements from your incoming data file into the provided fields to map them.
WP All Import offers an easy-to-use drag-and-drop mapping interface to ensure the mapping process is easy, even for beginners.
WooCommerce Add-On
The WooCommerce Add-On panel has a similar layout to the native WooCommerce product data section, making mapping the fields easy and intuitive.
The first thing to do here is to set the Product Type to External/Affiliate product. Once you do this, the relevant product tabs and fields for affiliate products will appear.
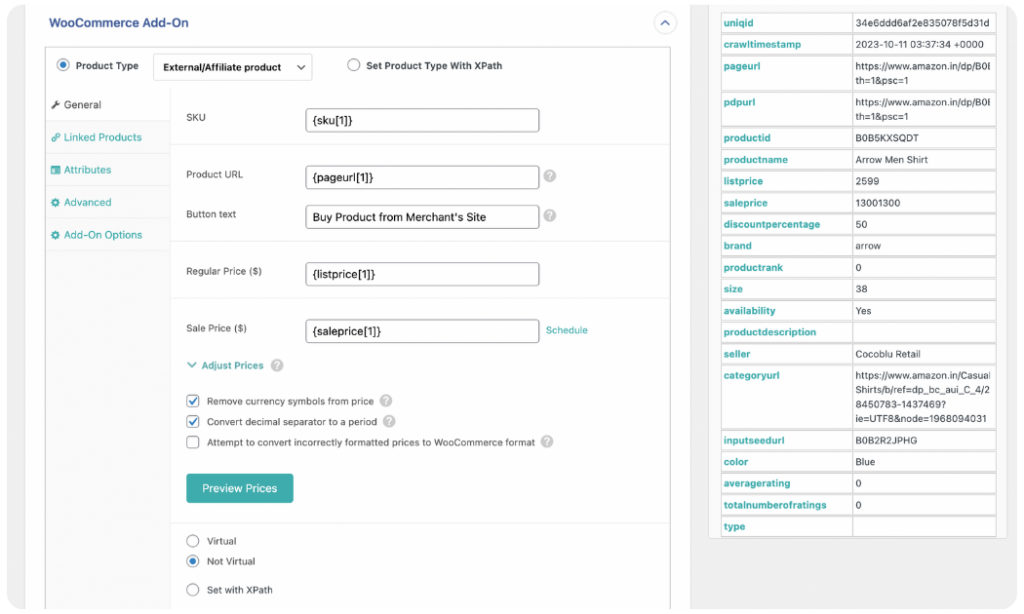
The General tab, opened by default, contains the fields for SKU, Product URL, Button Text, Regular Price, and Sale Price. Drag the elements for each field from your incoming data and drop them into the provided input boxes to map them.
The tab provides additional settings to adjust your product prices, set the products as virtual or downloadable, and add a tax status and class. Keep the default selections for these settings.
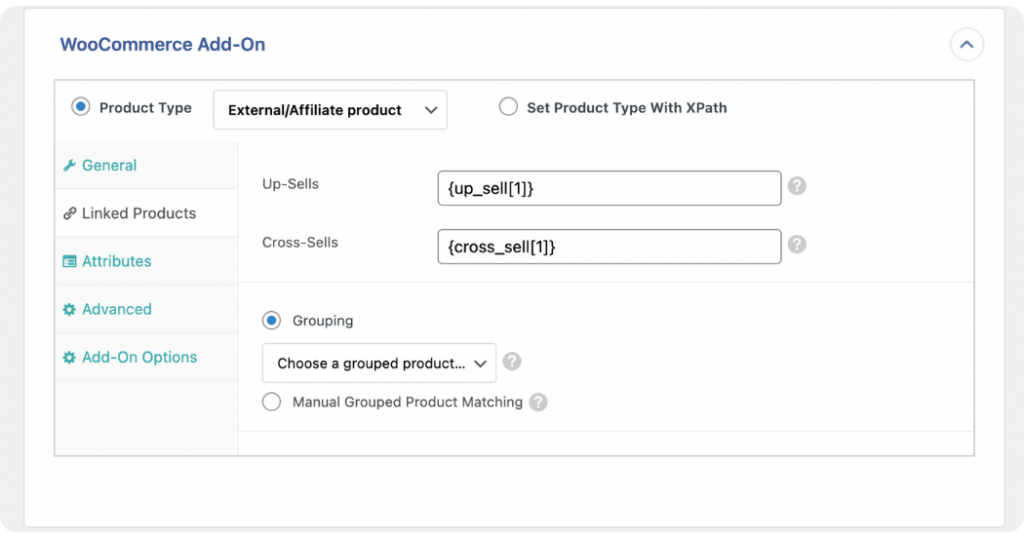
The Linked Products tab lets you map Up-Sells or Cross-Sells for your affiliate products. If applicable to your import, drag and drop the relevant elements for these fields.
You can map attributes for your affiliate products from the Attributes tab by adding the corresponding elements to the Name and Values fields. You can create as many attributes as needed for your import by clicking the Add Attribute link.
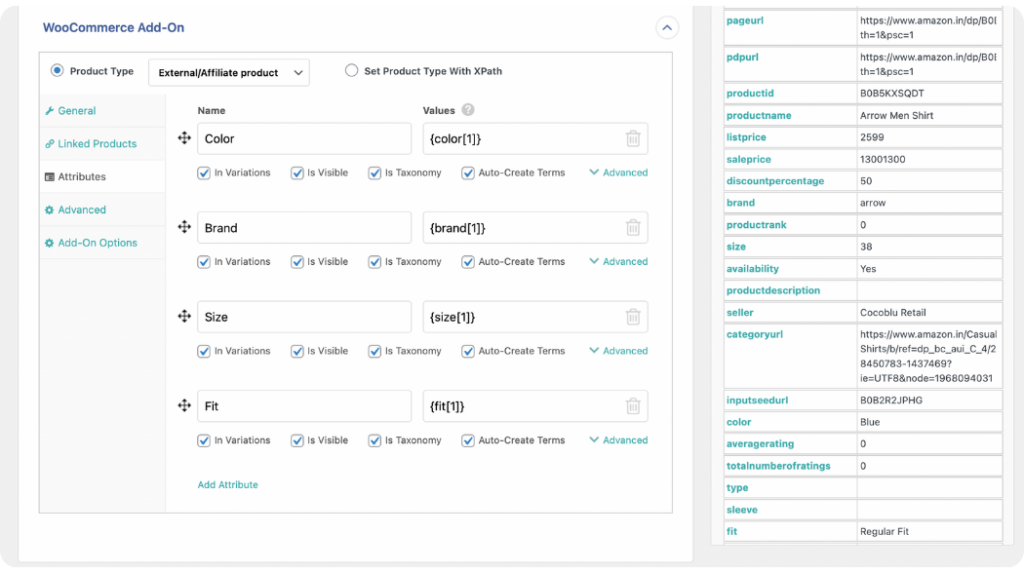
The Advanced and Add-On Options tabs have pre-selected options by default, which work well for most imports. However, you can open each tab to review and make changes suitable for your import.
Import Affiliate Product Images
You will find options for importing your affiliate product images within the Images panel.
WP All Import allows you to import product images from any source. You can:
- Download images hosted elsewhere: Choose this option for product images hosted on another site’s server.
- Use images currently in Media Library: This option allows you to map images already added to your Media Library.
- Use images currently uploaded in wp-content/uploads/wpallimport/files/: This option is ideal if you have many image files and have uploaded them directly to your website’s backend.
Since you are importing affiliate products from a third-party merchant’s site, the default selection to Download images hosted elsewhere works well.
Map the provided field by dragging and dropping the image URL element(s) from your incoming data file.
You will see some Image Options within the panel to optimize the import of your product images. The default selections work well for most imports, but you can tweak them if necessary.
Import Affiliate Product Custom Fields
The Custom Fields panel lets you map any custom data your affiliate products may have.
WP All Import can auto-detect existing custom fields created for your products. You can click the See Detected Fields button to allow WP All Import to auto-add the detected fields’ Names and Values.
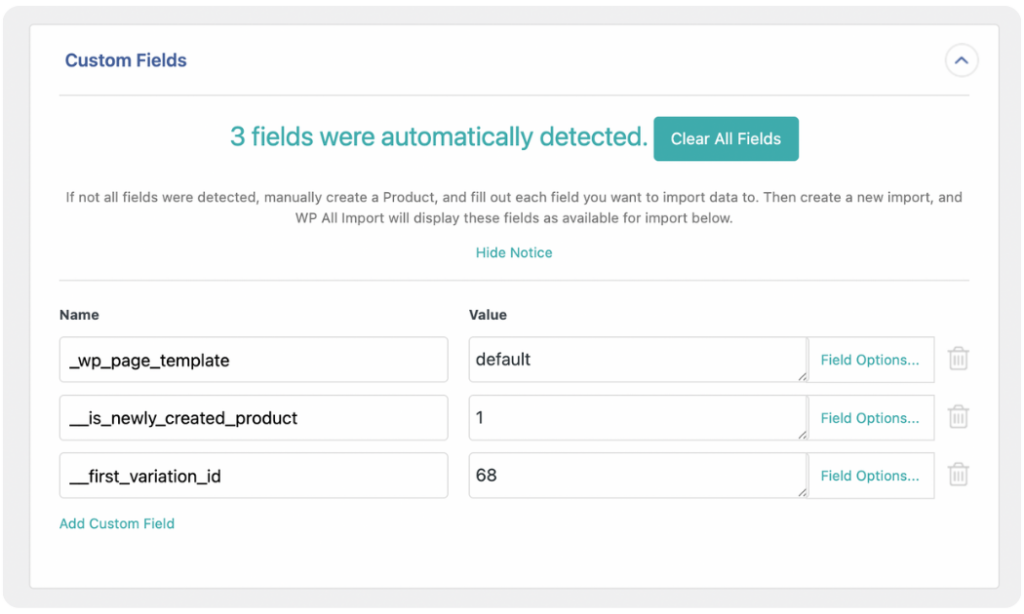
However, if you do not have any existing products with custom fields or would rather create them during the import, simply click the Add Custom Field link and drag and drop the Name and Value elements for each field from your incoming data file.
You can create multiple custom fields by clicking the Add Custom Field link.
Import Affiliate Product Taxonomies, Categories, Tags
From the Taxonomies, Categories, Tags panel, you can map your affiliate product categories and tags. Check the Product categories and Product tags checkboxes to open their mapping fields and settings.
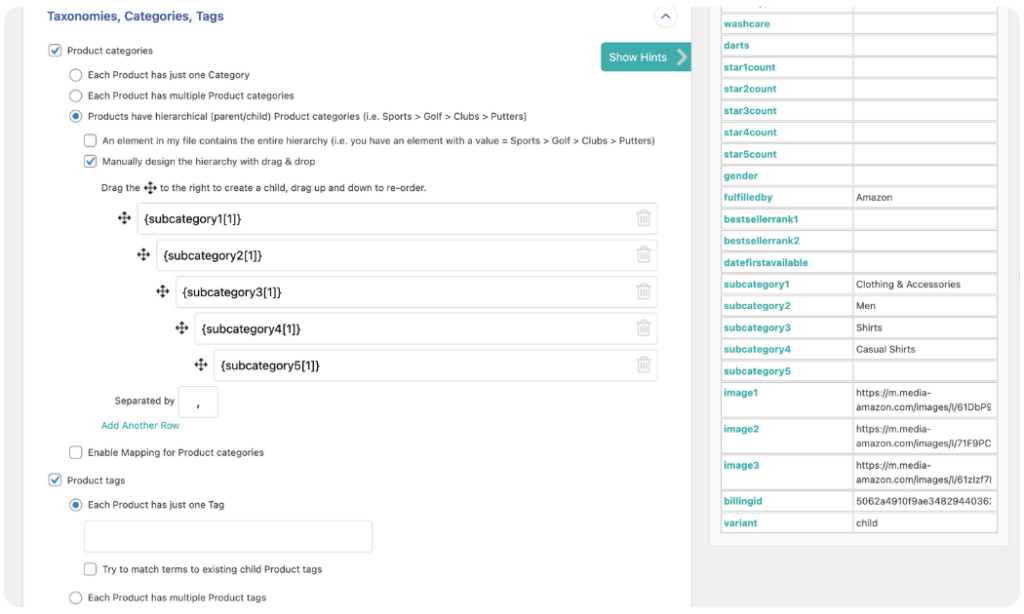
For Product categories, WP All Import allows you to import them in multiple ways. You can choose if Each Product has just one Category, Each Product has multiple Product Categories, or if Products have hierarchical (parent/child) Product Categories.
Once you have chosen the option that best reflects how the product categories for your affiliate products are laid out in the import file, map the elements to the provided field(s).
Similar options apply for Product tags. You can choose whether Each Product has just one Tag or Each Product has multiple Product Tags, and then map the tag element(s) to the provided field.
WP All Import provides other panels for mapping additional product data, but we will not discuss them in this article.
Scroll to the bottom of the screen and click Continue to Step 4 to proceed.
4. Configure Additional Product Import Settings
The Import Settings screen allows you to configure additional settings to optimize your import and ensure it runs smoothly.
First, click the Auto-detect button to create a Unique Identifier for your import. The Unique Identifier allows WP All Import to correctly link records in your current import to those in an updated file if you re-run the import in the future. This is important to prevent product duplicates and keep your data clean.
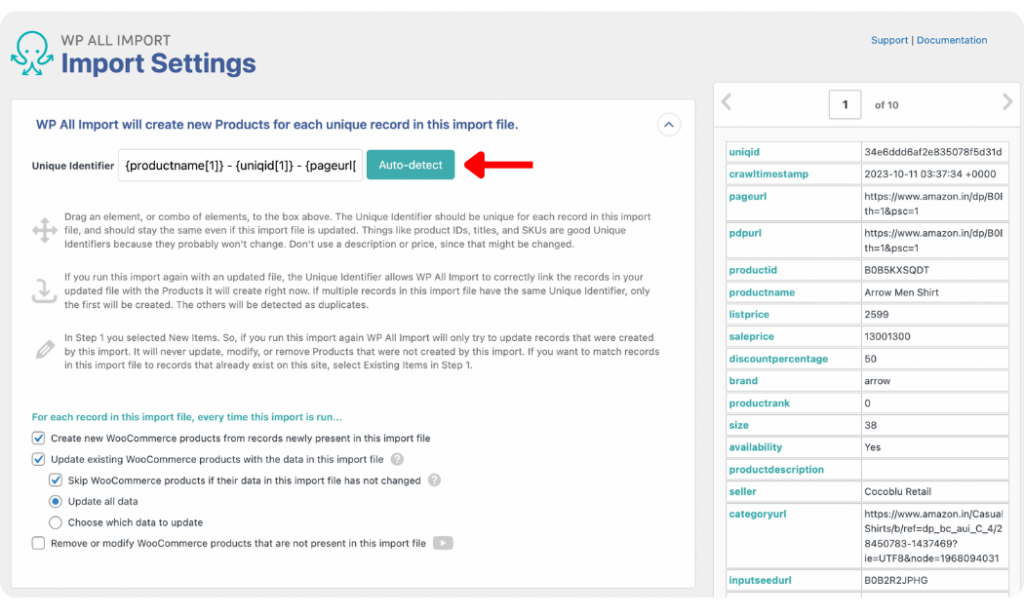
With the additional settings provided within the panel, you can also dictate how WP All Import should handle each record in the import file every time the import is run. You can leave the default selections since they work well for most imports.
Scroll down to see the Scheduling Options and Configure Advanced Settings panels.
The Scheduling Options panel allows you to access WP All Import’s powerful scheduling tool that enables you to automatically run recurring imports on specific days and times of the week. We will not go into detail in this article, but you can learn more about import scheduling through the Run WordPress Import on a Schedule documentation.
The Configure Advanced Settings panel provides settings to optimize the speed of your import. You can also keep the default selections here since they work well for most imports. However, if you encounter any issues during the import, you can always tweak them as needed.
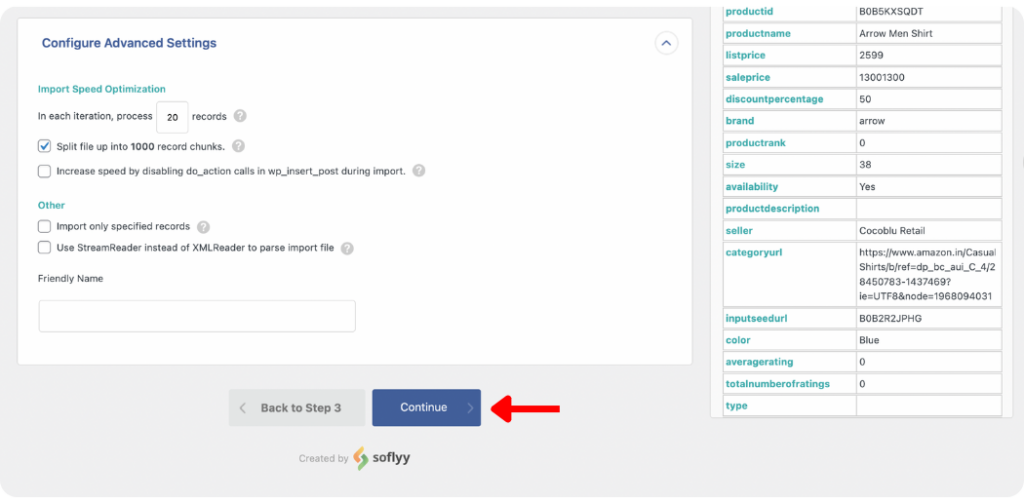
Click Continue at the bottom of the screen to move to the final step.
5. Run the WooCommerce Affiliate Product Import
The Confirm & Run screen is the final step of importing affiliate products into WooCommerce with WP All Import.
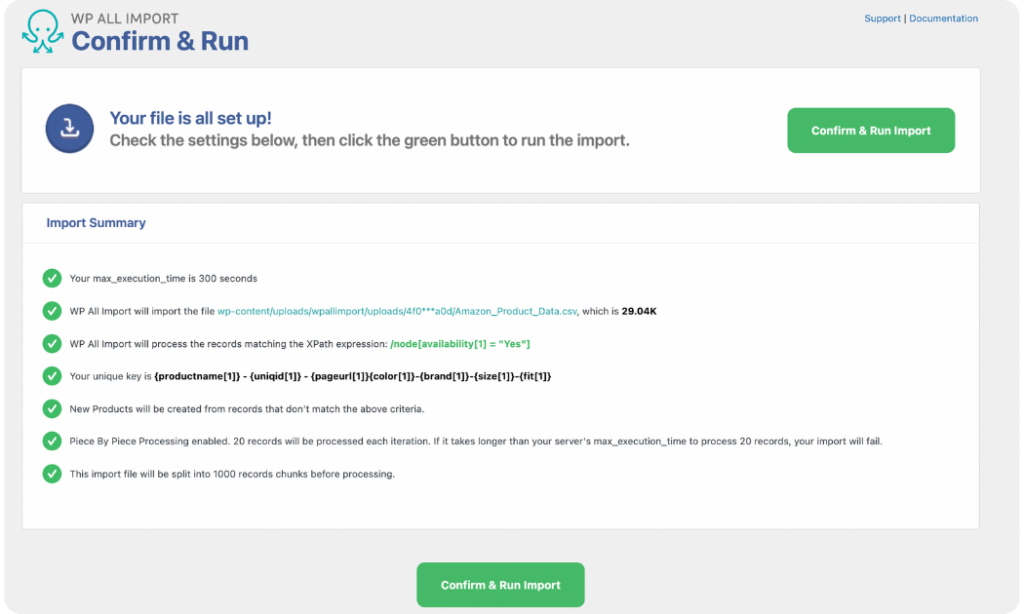
On this screen, WP All Import summarizes all your applied import settings to allow you to ensure that your import will run without issues. Review the summary, and if you notice any errors, go back and fix them before proceeding.
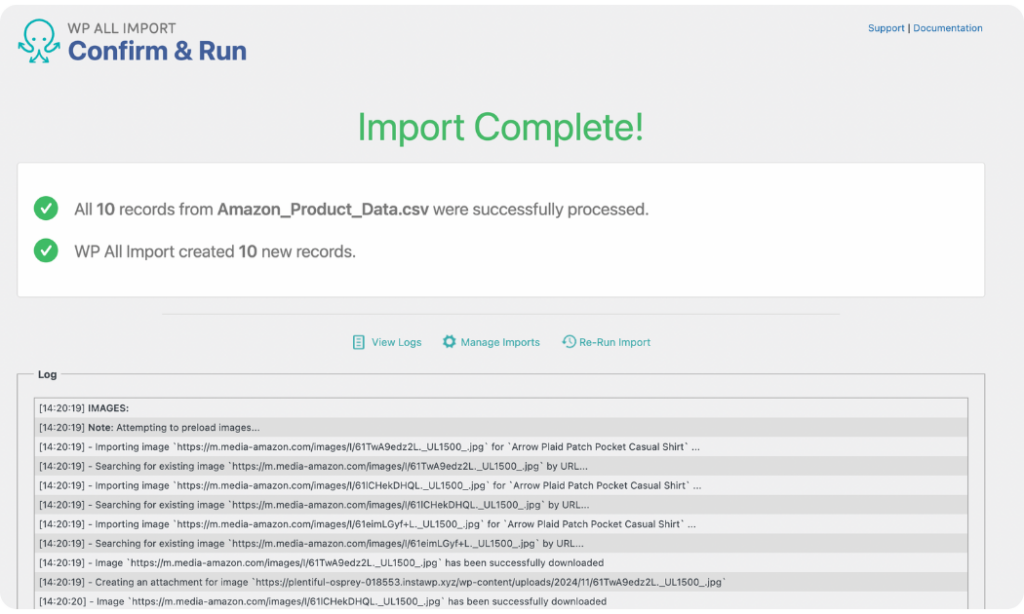
To run the import, click the Confirm & Run Import button.
The import process will immediately start. Once it’s completed, you will see an Import Complete notification.
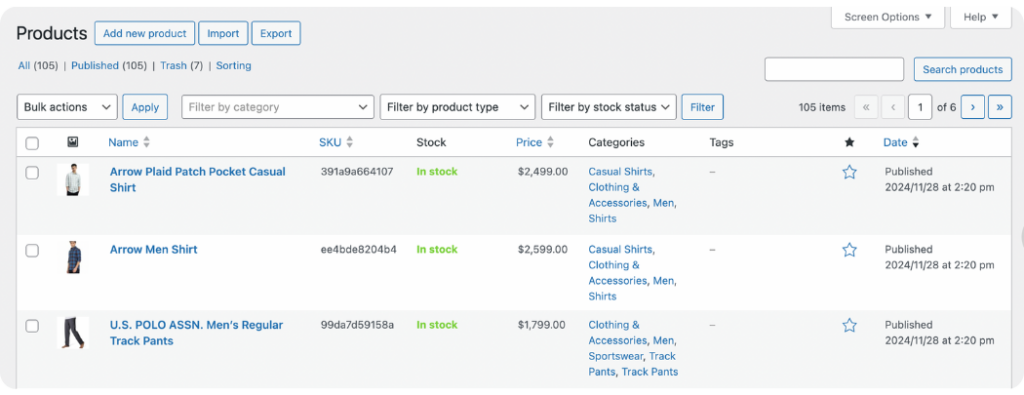
To confirm that all your affiliate products were successfully imported into your store, navigate to Products › All Products. You can click the product data tab for a few of them to be sure all the data was imported correctly.
Import Affiliate Products Into WooCommerce – FAQs
How Can I Import Products From Any Website to My WooCommerce Website?
With the WP All Import plugin and its WooCommerce Import Add-On, you can import products from any website to your WooCommerce website. The plugin allows you to import products from multiple sources, including an external URL or FTP/SFTP. You can also import products from a website in multiple file formats, including CSV, XML, Excel & Google Sheets. This leaves you with various options for seamlessly importing products from any website to your WooCommerce store.
What Is an External Affiliate Product in WooCommerce?
An external affiliate product in WooCommerce is a product type that can be listed on any WooCommerce store but can only be purchased on the third-party merchant’s store to which it is linked. They enable you to expand your store’s offerings and increase your income by listing products from other sources without increasing your operational expenses to fulfill the orders.
How Do I Add an External Product in WooCommerce?
To add an external or affiliate product that directs customers to another site for purchase, follow these steps within your WordPress admin:
- Navigate to the Add New Product page from your WordPress admin menu.
- Choose External/Affiliate product as the product type from the Product Data section.
- Enter the product URL, button text, and price, and complete all the required fields.
- Click Publish, and the external product will be added to your store.
If you want to add multiple external products, consider using an import plugin like WP All Import. It makes the process faster and more efficient, saving time and effort.
How To Add Affiliate Products in WooCommerce?
To add multiple external or affiliate products in WooCommerce, install and activate the WP All Import plugin and its WooCommerce Import Add-On on your site. Then follow the steps below:
- Navigate to All Import › New Import and upload the import file of the affiliate products.
- Select WooCommerce Products as the import type.
- Choose External/Affiliate product as the Product Type and map the incoming data elements to the product fields.
- Run the import, and the affiliate products will be added to your WooCommerce store.