Are you looking to import product images in WooCommerce but don’t know where to start? Importing products along with their images can be a daunting task, especially when dealing with hundreds or even thousands of items. The manual process of adding products one by one is time-consuming and prone to errors, leaving many store owners searching for a more efficient way to get the job done.
For those with extensive WooCommerce stores, manually adding products with images is not just inefficient—it’s practically impossible to maintain consistency across a large inventory. Each product needs detailed information, images, and other data accurately imported, and any mistake could lead to a disorganized store and a frustrating shopping experience for customers.
Luckily, there’s an efficient solution: WP All Import. In this guide, we’ll show you how to bulk import WooCommerce products with images directly from a CSV or Excel file, saving you time and effort while ensuring accuracy. Let’s dive in!
WooCommerce’s Built-in Importer: Image Handling Limitations
WooCommerce’s built-in product importer offers basic functionality, but it falls short when handling images, particularly when importing large volumes of products. Here are some limitations to be aware of:
- Restricted Image Sources: The default importer can only handle images from the WordPress media library. You can only directly import images hosted internally or on other servers, limiting flexibility. This can be incredibly cumbersome if your images are stored on an external platform, forcing you first to upload them to the media library manually, which is not ideal for large imports.
- Lack of SEO and Metadata Support: The built-in importer doesn’t offer support for adding image alt text, titles, or metadata, which are essential for SEO. Proper image metadata is crucial for improving your store’s search engine rankings and providing context to users with accessibility needs. Without this, your products may not perform as well in search engine results.
- Inconsistent Image Placement: There’s no straightforward way to differentiate between featured images and gallery images during the import process, leading to inconsistent product displays. This can negatively impact the visual appeal of your store, as featured images often serve as the main selling point for customers.
- Limited Error Handling and Validation: If the CSV file used during import has errors, such as missing images or broken URLs, the WooCommerce importer doesn’t provide advanced validation or error handling options, making it difficult to troubleshoot and correct issues during the process.
These limitations make WooCommerce’s default importer less suitable for complex imports, especially for store owners who rely on external image sources or need advanced image handling features.
Step-by-Step: Import Product Images in WooCommerce
To overcome these limitations, we recommend using WP All Import, a powerful plugin that simplifies the import process while providing extensive options for managing product images.
WP All Import supports multiple methods for importing images, including importing from Google Drive and Dropbox direct URLs and media library uploads, making it the best tool for WooCommerce store owners.
Key Features of WP All Import:
- Drag-and-drop interface for easy data mapping
- Supports importing images from external URLs
- Handles image metadata for SEO optimization
- Advanced filtering options to select specific records from the import file
- Import scheduling to automate future imports
Now that you’ve explored all the possibilities that this beloved tool, used by WordPress developers around the world, brings to you, let’s delve into the next section.
1. Prepare the CSV File with Product Data and Images
Before importing, you need a well-structured CSV file containing your product data, including image URLs. Essential columns include Product Name, SKU, Description, Price, and Image URLs. For each product, list the URLs of the images you want to import, ensuring they are accessible online.
It’s crucial to format the URLs correctly and verify that all links are functioning. Broken URLs can disrupt the import process, causing missing images or incomplete product listings. Tools like Excel or Google Sheets can help you organize and clean your data before importing.
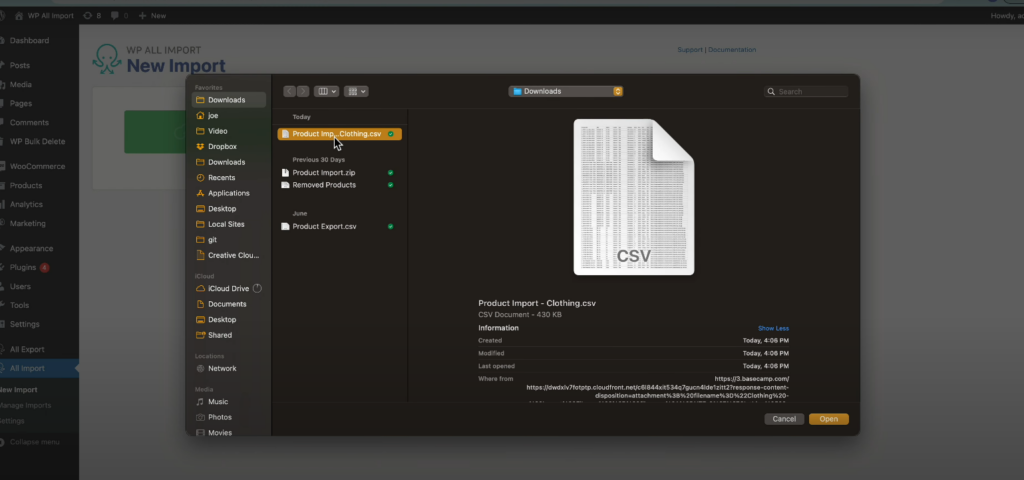
2. Start a New Product Import and Upload Product Data CSV
Once your CSV file is ready, navigate to All Imports › New Import to start a new import in WP All Import. Load your product data by selecting the import type as WooCommerce products. WP All Import offers multiple ways to upload data, including CSV, Excel, and XML files, giving you flexibility based on your data source.
Whether you choose to drag and drop your file or import it from a URL, WP All Import makes it easy to start the import process. The plugin also supports importing from Google Sheets, FTP, or a specific URL, giving you more options to pull in data from wherever it’s stored.
3. Review Uploaded WooCommerce Product Data
After uploading your data, review the product details within WP All Import’s interface. The plugin provides robust filtering options, allowing you to refine which products to import. You can set filter rules to exclude or include specific products based on criteria like SKU, price, category, or any custom attribute.
This step is crucial for managing large datasets and ensuring that only the intended products are imported. Filtering allows you to exclude outdated products, low-stock items, or test data that you don’t want to appear on your live store. To apply filter rules, you can set conditions based on specific criteria like SKU, price, or categories directly within the import interface. Simply choose the field you want to filter, and set your condition (e.g., “Price is greater than $10” or “Stock is not zero”), and WP All Import will only import products that meet these rules. These advanced filtering options empower you to customize your import, ensuring that only relevant and accurate data is included in your store.

4. Map the Incoming Data to WooCommerce Product Fields
Mapping your data to the correct WooCommerce fields is crucial for a successful import. WP All Import uses a simple drag-and-drop interface, making it easy to map CSV columns to WooCommerce product fields, even for beginners.
For instance, the Title & Description Panel lets you add your product titles and descriptions, ensuring each item is clearly explained, while the Categories, Tags, & Attributes Panel helps organize products into categories, tags, or custom attributes, making it easy for customers to find what they’re looking for.
The Pricing & Stock Panel is where you set up prices, sales, and inventory levels, keeping your store’s financial details in check, and, if you need to add extra information that doesn’t fit standard fields, the Custom Fields Panel allows for advanced data input, like custom product details or special metadata. The Taxonomies & Other Fields Panel manages additional settings like product types and shipping classes, adding more layers of customization to your import.
Now, let’s break down the mapping options specifically for images:
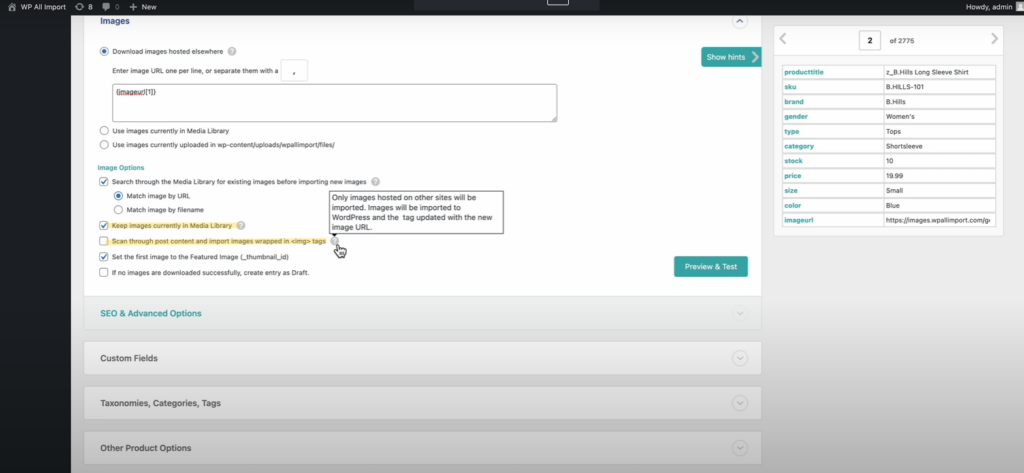
Product Image Import Options
- Download Images Hosted Elsewhere: WP All Import allows you to pull images directly from external URLs, saving you the trouble of uploading images to the media library beforehand. This feature is particularly useful when dealing with hundreds of images stored offsite, as it cuts down on import time and eliminates manual steps.
- Use Images Currently in the Media Library: If your images are already in your WordPress media library, you can map them directly without re-uploading. This option saves server resources and speeds up the import process for existing content.
- Use Images Currently Uploaded in wp-content/uploads/wpallimport/files/: This option lets you use images stored in the plugin’s dedicated folder, offering an organized way to manage imports. You can batch upload images to this folder before starting your import, ensuring that all images are correctly linked to your products.
Import Multiple Images to Product Variations
For stores with variable products, WP All Import provides options to import multiple images for different product variations. This feature allows you to assign specific images to product variations, enhancing the user experience with tailored visuals for each option. For example, if a product comes in multiple colors, you can assign images to each color variant, making it easy for customers to see what they’re purchasing.
Looking to learn how to import WooCommerce products? Check out our comprehensive docs and learn all you need to know about WP all import!
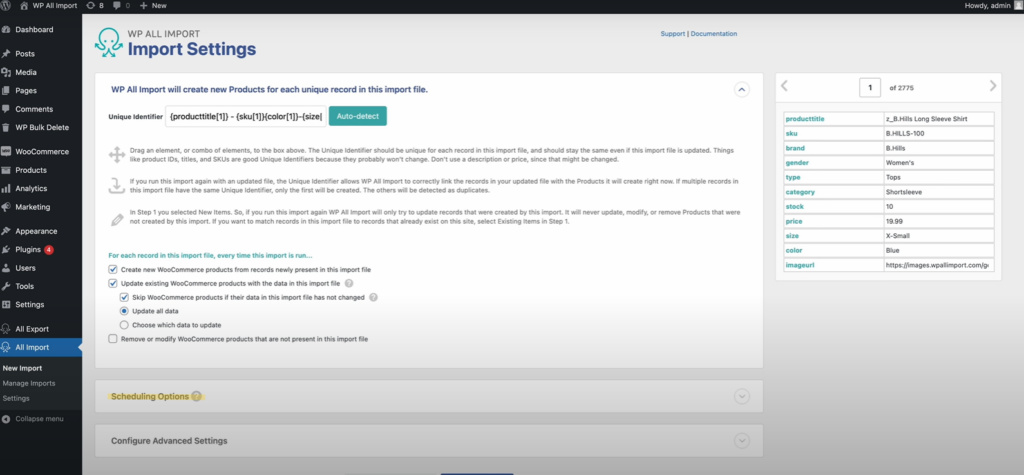
5. Configure the Product Import Settings
Before running the import, configure additional settings in WP All Import to optimize the process. A unique identifier, such as SKU or product ID, helps avoid duplicate entries and ensures that your data is correctly matched with existing products. This step is essential when updating existing products, as it prevents accidental duplication and maintains data consistency.
You can also set up import scheduling to automate future imports, keeping your store data up-to-date with minimal effort. This is particularly useful for stores that frequently update their product catalogs, as it ensures new products are regularly added without manual intervention. Scheduling can be configured for daily, weekly, or custom intervals, depending on your needs.
WP All Import has an optional Scheduling service that costs $19/month for an unlimited websites. There’s also a manual scheduling option that requires you to set up cron job on your server.
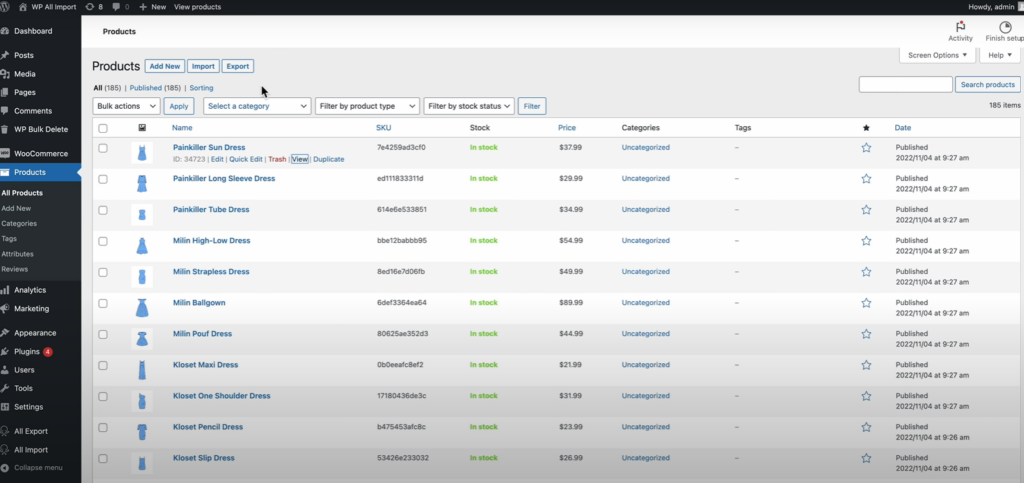
6. Run the Import and Verify the Imported Product Data
Once all settings are configured, it’s time to run the import. WP All Import provides a summary of the applied settings, allowing you to review them before finalizing. Once you’ve reviewed the import settings, click the Confirm & Run button to start the import process. After the import is complete, WP All Import will show a confirmation message along with a summary of the number of products imported. It will also show if any existing products have been updated and if any products failed to be imported due to missing information. Once the import is complete, navigate to Products > All Products to verify that your products and images have been correctly imported.
Check for any missing data, incorrect images, or other discrepancies. WP All Import includes a detailed log of the import process, making it easy to trace and fix any issues that arise. A thorough review ensures that your store looks polished and professional, enhancing the overall shopping experience for your customers.
Looking to simplify the way you import products? Get WP All Import now and kickstart your journey to smoother and more efficient WooCommerce store management! Just click here and start your journey.
Import WooCommerce Products with Images – FAQs
How Do I Import Images from CSV in WooCommerce?
You can import images from a CSV file using WP All Import, which allows you to map image URLs directly to your products, making the process straightforward and efficient.
You can refer to this tutorial for more information: How to Import WooCommerce Product Images
How to Add Product Images in WooCommerce Programmatically?
To add product images programmatically, you can use custom PHP code and WooCommerce’s hooks and functions. WP All Import simplifies this by offering a no-code approach, making it accessible even to those without coding skills.
How Do I Import Products with Multiple Images in WooCommerce?
Using WP All Import, you can import multiple images by listing URLs in your CSV file separated by commas, and then mapping them to the product gallery fields during the import process. This enables a richer, more engaging product presentation.
How Do I Import Product Images from CSV or Google Sheets to WooCommerce?
To import images from CSV or Google Sheets, save your data as a CSV file, then upload it to WP All Import. The plugin supports data from various sources, making the process seamless and adaptable to different needs.