Exporting WooCommerce orders is common for store owners looking to analyze their sales data, manage inventory, or fulfill orders efficiently. While WooCommerce out-of-the-box provides basic CSV export, it often falls short of meeting the complex requirements of advanced users. This is where third-party plugins come into play, offering advanced features and customizable options to suit different business needs.
In this guide, we’ll show you how to use the advanced features of WP All Export to create detailed order exports.
Step-by-Step Guide to Advanced WooCommerce Order Exports
The advanced features include applying filters so that you only get the data you need, customizing columns to give you a ready-to-use order export file, or creating an XML order data file with a custom structure.
If you’re new to exporting orders or need a refresher, check out our beginner’s guide to WooCommerce order exports. Once you’re comfortable with the basics, let’s explore the advanced features.
1. Using Advanced Order Export Filters
Efficient data management often requires filtering and exporting specific subsets of information. WP All Export offers advanced filtering options that allow you to tailor your WooCommerce order exports to meet specific requirements.
This section will guide you through the different ways you can apply advanced filters to your order exports, ensuring you get exactly the data you need.
Applying Nested Filters to WooCommerce Orders
A nestable filter is a powerful feature that allows you to combine multiple conditions using logical operators like AND and OR. This helps you create complex filter rules that can precisely target the data you’re interested in.
Let’s say you’re running a promotion and want to analyze orders within a specific price range and that are pending. Let’s now look at how to apply filtering in this example.
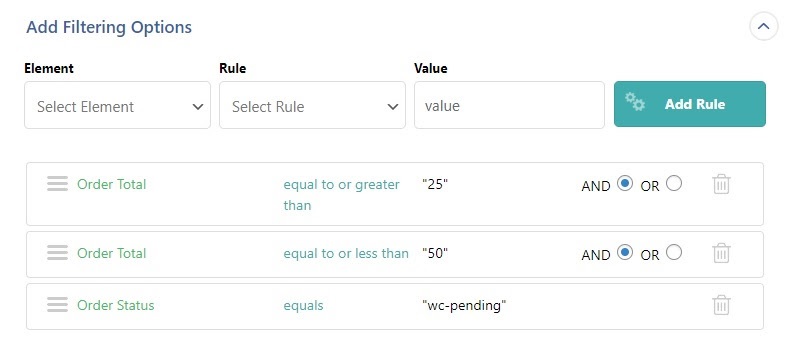
Start by navigating to the filter panel in the New Export screen of the WP All Export and begin adding basic filter rules. You can set two rules to select orders with a total amount between $25 and $50. Add another rule to include orders with a “wc-pending” status. You can combine all these rules using the AND logic.
Let’s say you want to apply an even more advanced filter wherein you want to combine two rules:
- Rule 1: Order Total >= 25 AND Order Total <= 50
- Rule 2: Order Status = “wc-pending” AND Order Total > 50
Here’s how we would write this by hand:
Order Total >= 25 AND Order Total <= 50 OR (Order Status = “wc-pending AND Order Total > 50)
How do we represent this pair of brackets in the interface? We simply drag the last Order Total filter rule inside the Order Status filter rule.
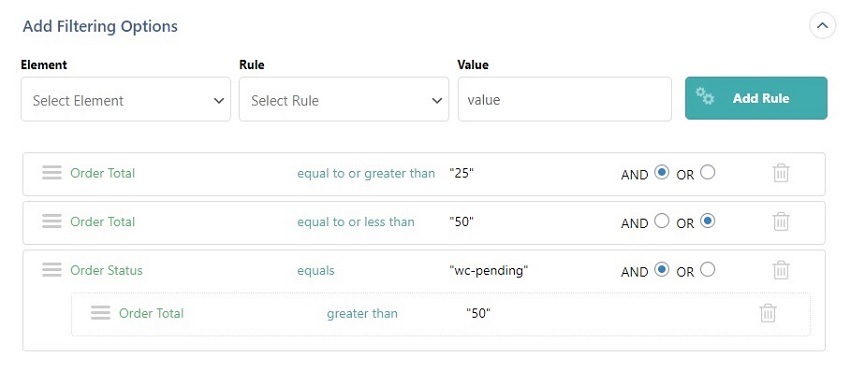
This nested filtering allows you to include orders that either fall within a specific price range or have a pending status with a total exceeding $50. Such precise filtering ensures that you export only the orders that meet your exact requirements.
Using Relative Date in Export Order Filters
When dealing with recurring tasks, such as monthly reports or quarterly audits, specifying exact dates can be cumbersome and prone to error. Relative date filters offer a dynamic way to handle such requirements by allowing you to set time-based conditions relative to the current date.
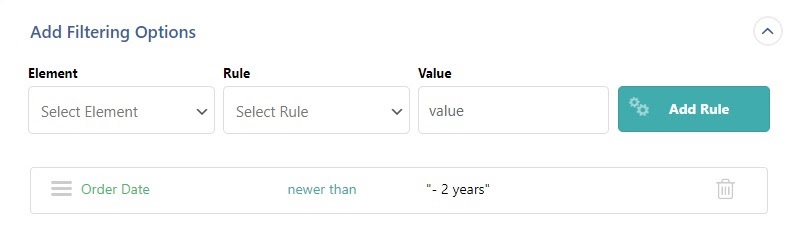
In the filter panel on the New Export screen, instead of setting a fixed date, specify a relative date. For example, you can set a filter to include orders with an “Order Date” newer than two years ago.
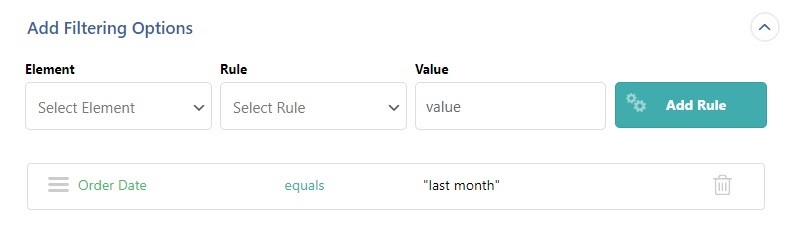
Or you can apply a filter to return orders that are placed “last month.”
These relative date filters are particularly useful for scheduled exports. It ensures that the data remains current without manually updating the date parameters each time the export is run.
2. Customizing WooCommerce Order Export Columns
One of the most powerful features of WP All Export is its ability to customize the columns in your order export files. This flexibility reduces the need for post-export data manipulation and makes your data more organized and easier to work with.
WP All Export lets you combine multiple data points into a single column, create custom columns using PHP, or rename and reorder columns, all from within the plugin. In this section, we’ll explore how to customize your order export columns in detail.
Combining Multiple Order Data Points into a Single Column
Oftentimes, you might find it useful to combine multiple fields into a single column to streamline your data analysis. For instance, combining the customer’s first and last names into a single “Full Name” column can save you from having to manually merge these fields later.
Here’s how you can achieve this using the WP All Export plugin:
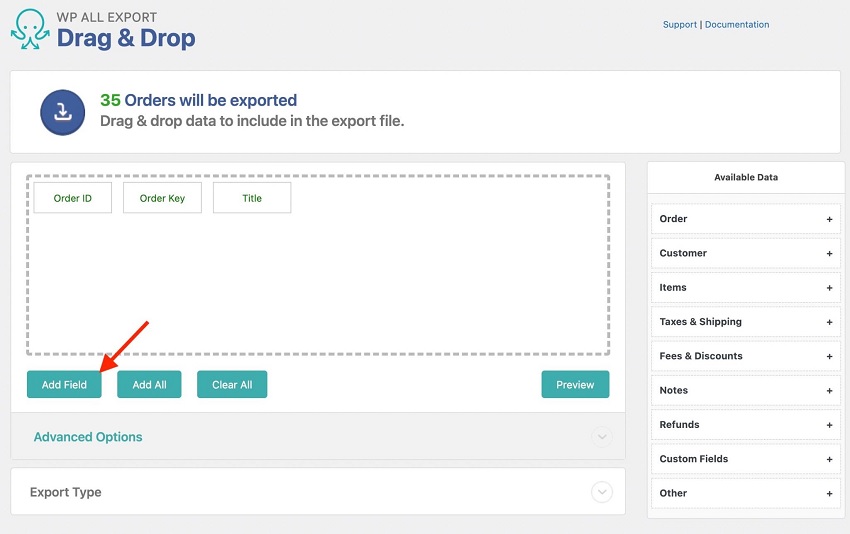
- Start a new export and navigate to the Drag & Drop interface in WP All Export.
- Click the Add Field button to open the form for adding a new export field.
- Choose the Custom export field option from the form.
- Drag the “Billing First Name” and “Billing Last Name” fields from the Available Data panel into the text box.
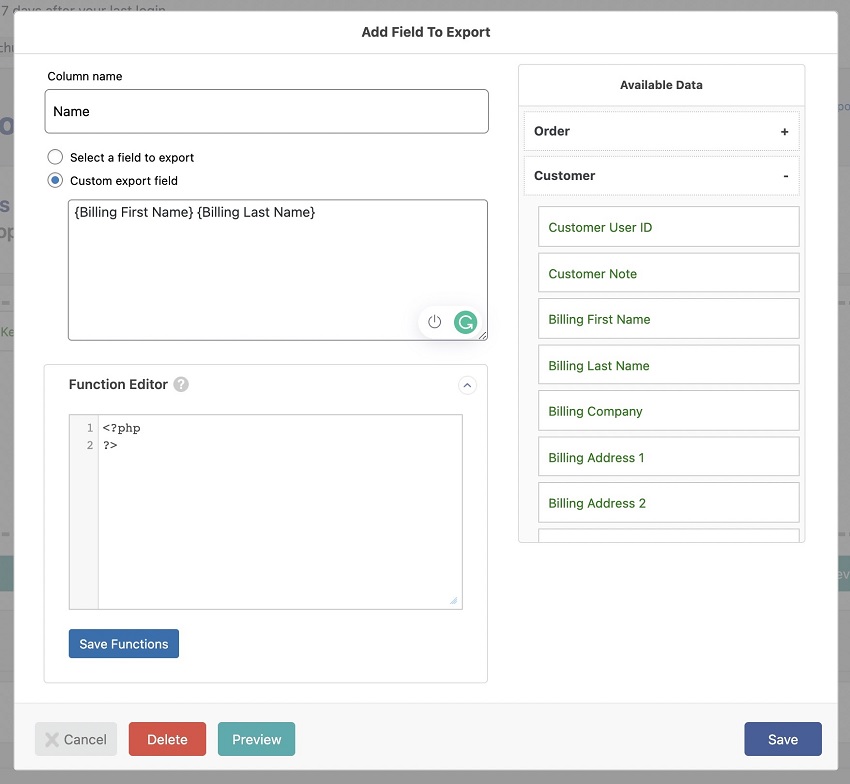
- In the Column name box at the top, enter a suitable name such as “Name.”
- Click the Preview button to ensure the data is combined correctly. If satisfied, click the Save button.
Creating Custom Columns Using PHP
For more advanced customization, WP All Export allows you to use PHP to create custom columns. This feature is particularly useful when you need to apply complex logic to your data.
For example, let’s say that you’re exporting order data and want to assign a shipping method based on the weight of the order. Here’s how you can achieve this using PHP:
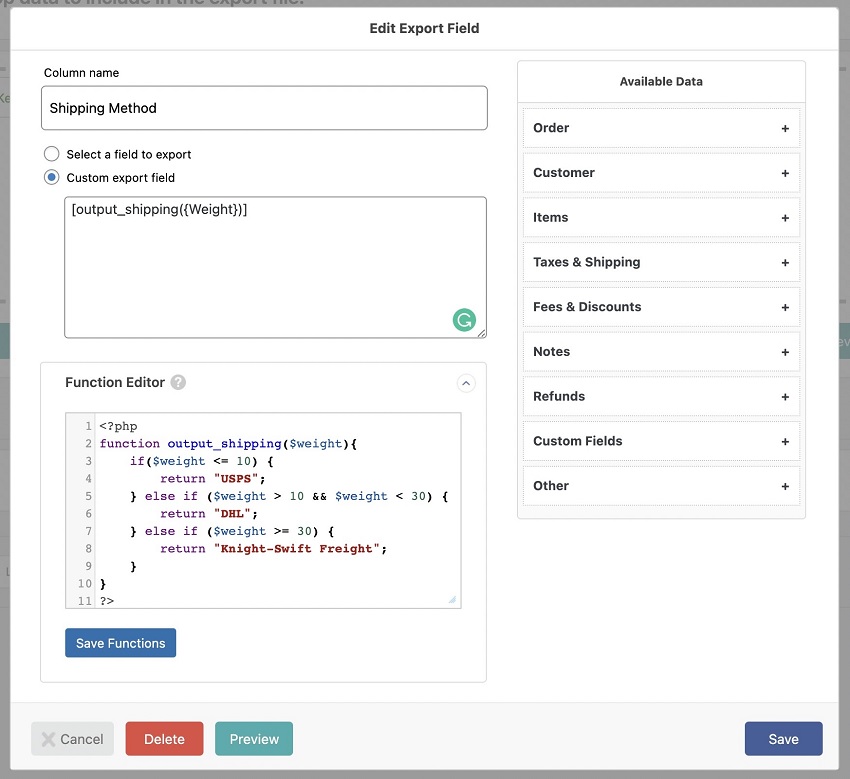
- On the Drag & Drop screen, click the Add Field button to access the form for adding new export fields.
- Choose the “Custom export field” option and enter “[output_shipping({Weight})]” without the quotes. This is known as a function call. Note the reference to the field inside the curly brackets.
- In the Function editor, add the following PHP function:
function output_shipping($weight){
	if($weight <= 10) {
		return "USPS";
	} else if ($weight > 10 && $weight < 30) {
		return "DHL";
	} else if ($weight >= 30) {
		return "Knight-Swift Freight";
	}
}- Click the Save Function button at the bottom and name the column as “Shipping Method.”
- Click the Save button to save the field and close the form.
- Back to the Drag & Drop screen, add the Weight field from Items > Advanced to the column selection area.
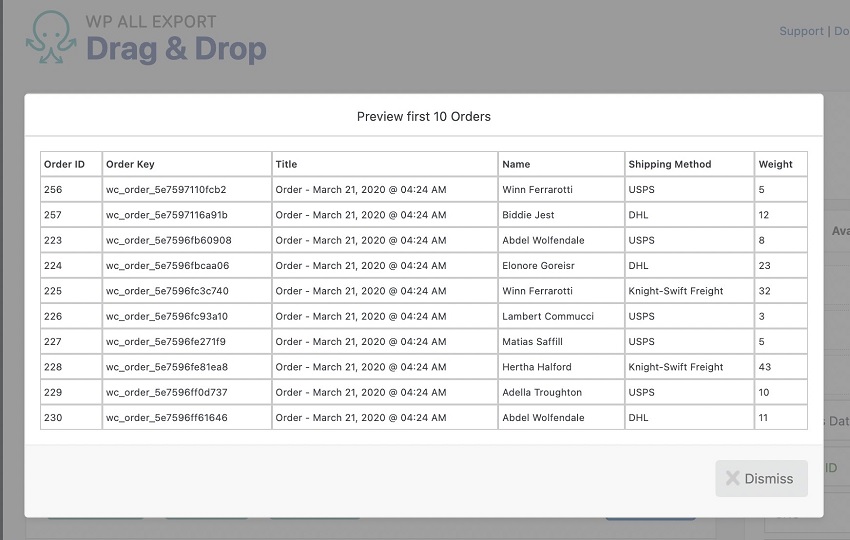
- Click the Preview button to ensure that the function is working properly and the correct shipping method shows up in the Shipping Method column.
To learn more about using PHP during an export, refer to our dedicated documentation article.
Renaming and Reordering Export Order Columns
Customizing your order export isn’t just about creating new columns. It is also about organizing your data in a way that makes sense for your workflow. WP All Export makes it easy to rename and reorder columns using the same drag-and-drop interface.
Here’s how you can do it using WP All Export:
- In the Drag & Drop interface, locate the column you wish to rename.
- Click the field and enter a new name under the “Column name” box. Click the blue Save button to reflect the new name in your export file.
- To rearrange, drag and drop the fields in your preferred order.
That’s all! The above customization saves you from post-export customization and gives you organized data to work with.
3. Creating XML Feeds for WooCommerce Order Exports
The XML format is a popular format among businesses that need to share order data with other systems and platforms. Unlike, CSV and Excel format, XML feeds provide a structured and hierarchical format.
WP All Export offers robust features for creating both simple and custom XML feeds for WooCommerce order export.
In this section, we’ll guide you through the process of setting up both simple and custom XML feeds in detail.
WooCommerce Orders Simple XML Feeds
Creating a simple XML feed with WP All Export is straightforward and can be done with just a few clicks. This option is ideal for users who need a quick and easy way to export their order in XML format without extensive customization.
Here’s how to export WooCommerce order data in simple XML format:
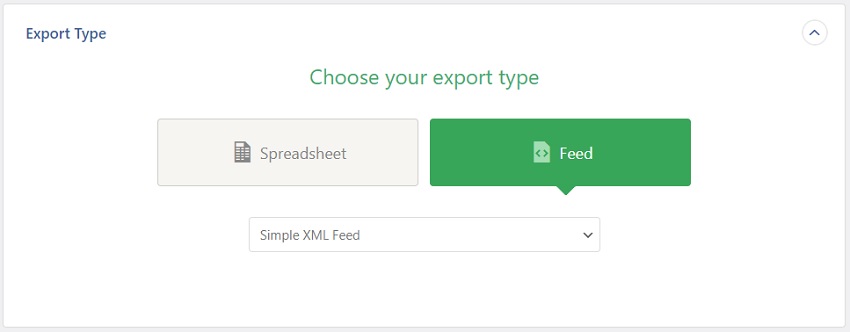
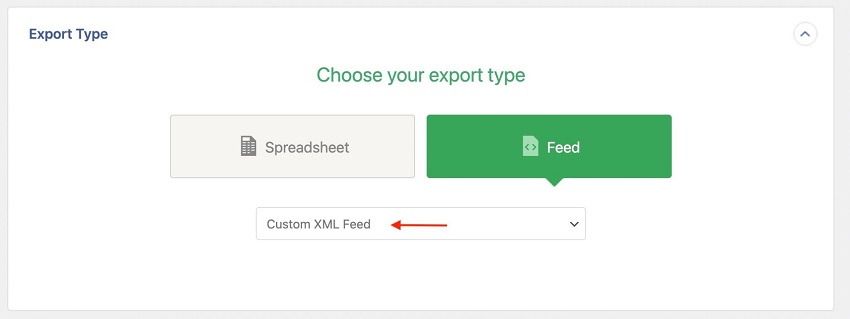
- In the WP All Export Drag & Drop interface, navigate to the Export Type panel.
- Change the export type from Spreadsheet to Feed and choose Simple XML Feed from the dropdown menu.
- Just as you would do for an Excel or CSV file format, drag and drop the desired fields into the selection area.
- Complete the rest of the steps and then click the XML button in the last step to download the order data in XML format.
Here’s how the Simple XML will look when downloaded.
<?xml version="1.0" encoding="UTF-8"?>
<data>
  <post>
    <OrderID>223</OrderID>
    <OrderKey>wc_order_5e7596fb60908</OrderKey>
    <Title>Order - March 21, 2020 @ 04:24 AM</Title>
  </post>
  <post>
    <OrderID>224</OrderID>
    <OrderKey>wc_order_5e7596fbcaa06</OrderKey>
    <Title>Order - March 21, 2020 @ 04:24 AM</Title>
  </post>
  <post>
    <OrderID>225</OrderID>
    <OrderKey>wc_order_5e7596fc3c740</OrderKey>
    <Title>Order - March 21, 2020 @ 04:24 AM</Title>
  </post>
</data>
WooCommerce Orders Advanced Custom XML Feeds
For users who need more control over the structure and content of their XML feeds, WP All Export offers a Custom XML feed option. This option allows you to design a fully customized XML schema to meet specific integration requirements.
Here’s how to customize the XML feed using the Advanced XML:
- In the Drag & Drop screen, expand the Export Type panel and choose Custom XML feed from the dropdown.
- WP All Export will open its XML editor where you can manually define your XML structure.
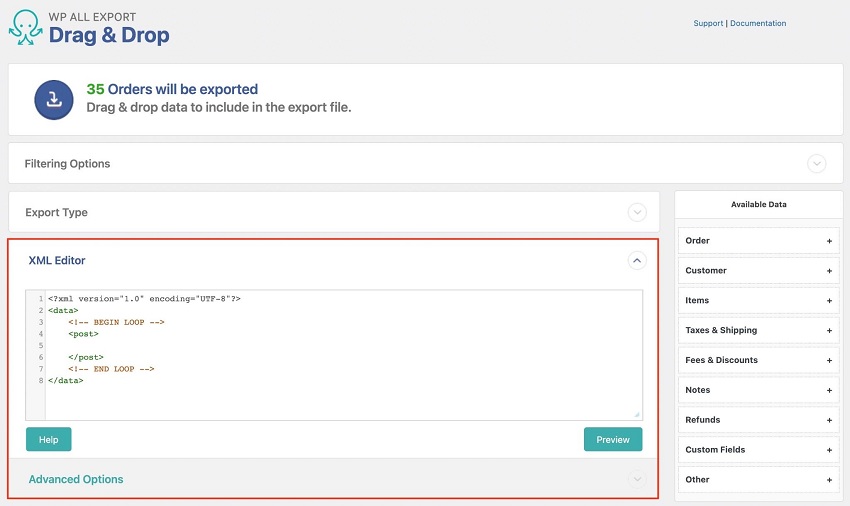
- Begin by dragging fields from the Available Data panel into the XML Editor. Place them between the <!– BEGIN LOOP –> and <!– END LOOP –> comments. This marks the start and end of the loop that processes each order.
- The <post> and </post> elements are the default way to mark the start and end of each record. You can easily modify the default element names to suit your schema. For example, you can change <post> element to <oder> while including the order ID as an attribute named “id”.
- Using the Available Data section, you can drag and drop the order fields into the XML Editor. For example, we have added the Billing First Name, Billing Last Name, and Weight fields into the editor.
<?xml version="1.0" encoding="UTF-8"?>
<data>
  <!-- BEGIN LOOP -->
  <order id="{Order ID}">
    <BillingFirstName>{Billing First Name}</BillingFirstName>
    <BillingLastName>{Billing Last Name}</BillingLastName>
    <Weight>{Weight}</Weight>
  </order>
  <!-- END LOOP -->
</data>- As we add the various fields to the XML editor, you’ll notice that each field is wrapped in its own corresponding XML element. Just as you changed the record element to <order>, you can also modify the name elements.
- You can also modify the schema in other ways. For example, we can add the quantity as an attribute to the Weight element in the XML Editor.
<?xml version="1.0" encoding="UTF-8"?>
<data>
  <!-- BEGIN LOOP -->
  <order id="{Order ID}">
    <FirstName>{Billing First Name}</FirstName>
    <LastName>{Billing Last Name}</LastName>
    <Weight quantity="{Quantity}">{Weight}</Weight>
  </order>
  <!-- END LOOP -->
</data>- The XML customization doesn’t stop there. Remember the output_shipping function that we created in the Custom Export Columns Using PHP section of this article? We can embed that function in our custom XML editor.
Here is how the XML output will look:
<?xml version="1.0" encoding="UTF-8"?>
<data>
  <order id="223">
    <FirstName>Abdel</FirstName>
    <LastName>Wolfendale</LastName>
    <Weight quantity="5"/>
  </order>
  <order id="224">
    <FirstName>Elonore</FirstName>
    <LastName>Goreisr</LastName>
    <Weight quantity="12"/>
  </order>
  <order id="225">
    <FirstName>Mike</FirstName>
    <LastName>Jones</LastName>
    <Weight quantity="6"/>
  </order>
</data>
That’s it! The flexibility of the Custom XML feed doesn’t stop here. WP All Export lets you create any kind of custom XML feed that you want.
4. Managing Large WooCommerce Order Exports
Handling a large volume of data can be a daunting task, especially when it comes to exporting orders from a busy WooCommerce store. Large order exports can strain server resources leading to timeouts and file size limitations.
Fortunately, WP All Export can manage and export large data sets without breaking a sweat. Here are some of the options available in WP All Export that let you optimize for large-volume order exports.
Breaking Down the Order Export Process into Batches
One of the main challenges of exporting large datasets is server timeout. Servers typically impose a limit on how long a process can run. If a process exceeds this time limit, it is said to “time out”, meaning it will fail. WP All Export lets you solve this issue by breaking the export process into manageable batches.
Here’s how you can control the batch size in WP All Export:
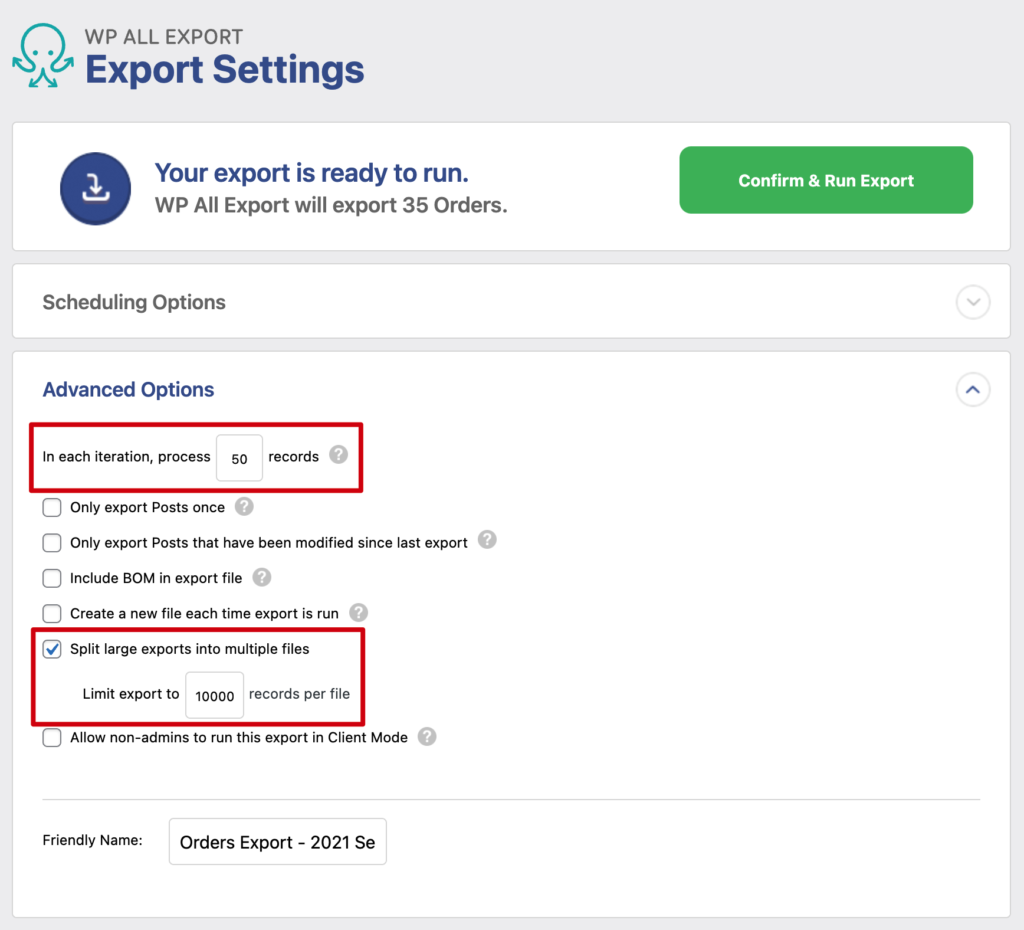
- Navigate to the Export Settings screen in the export wizard. Locate the Advanced Options panel and click on it to expand it.
- The first option lets you adjust the batch size to a number that your server can handle without timing out. If you encounter timeouts, reduce the batch size and try again. For example, if your batch size is set to 500 records and the export process time out, try reducing the batch size to 250 records.
Splitting Order Export Files to Manage File Size
Another common issue with large exports is exceeding file size limits. Servers often have restrictions on the maximum file size to prevent disk space from running out.
WP All Export solves this by allowing you to split your exports into multiple files, each containing a specified number of records.
In the same Export Settings screen under the Advanced Options, set the maximum number of records per file. For example, if your server has a file size limit of 100MB, and your export exceeds this limit, you can set the maximum record count to 1,000. This will generate multiple files, each containing up to 1,000 records.
More WooCommerce Orders Advanced Options
In addition to the above-discussed features, WP All Export includes some more advanced features. These include:
- Export your WooCommerce orders in different languages using WPML
- Full developer support including an Add-on API and WP-CLI.
- Using WP_Query to perform order queries that can’t be performed any other way.
- Allowing non-client users to run order exports and controlling what settings they can access.
- Real-time order export to external applications via Zapier.
- Automatic export of order data on a set schedule.
Advanced Order Export for WooCommerce – Frequently Asked Questions
How Do I Export All WooCommerce Orders?
You can easily export all WooCommerce orders using the WP All Export plugin. Follow these four simple steps:
- Go to All Export › New Export and select Orders as the export type.
- Select your export fields using the Drag & Drop interface.
- Apply additional settings.
- Run the export and download your order export file.
How Do I Export Orders by Date in WooCommerce?
WP All Export includes a feature to filter orders by date and export only those orders that are needed. Just follow these simple steps:
- Go to All Export › New Export and select Orders as the export type.
- Apply filters to include specific data orders
- Use the Drag & Drop interface to add your export fields.
- Run the export and download your order export file.
How To Migrate WooCommerce Orders?
You can efficiently migrate orders from one WooCommerce site to another using the combination of WP All Export and WP All Import plugins.
- Use the WP All Export plugin to export orders from your source site.
- Import the exported order file to your destination site using the WP All Import plugin.
How Do I Export All Products From WooCommerce?
WP All Export supports exporting multiple WordPress and WooCommerce data types, including WooCommerce Products. Follow these four simple steps to export all product data:
- Navigate to All Export › New Export.
- Select to export WooCommerce Products from the available post types.
- Do NOT apply any filters.
- Complete the export and download the exported products.